
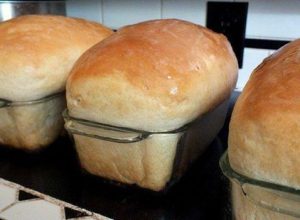
 Wow, this recipe is truly impressive! I’m a big fan of baking bread and it’s always disappointing when it turns out dense. This bread, however, was beautifully light with a soft and chewy crust! I ended up using 4 packets of Rapid Rise Yeast since that’s what I had on hand. Regular all-purpose flour worked just fine too. I allowed the dough to rise for an hour between each step and let the cinnamon rolls rise an additional 35 minutes while the bread baked. The result? Two nice loaves and a generous batch of 18 cinnamon rolls topped with cream cheese icing. Delicious! We polished off an entire loaf with a Peasant soup for dinner and had a cinnamon roll for dessert. I’m stuffed! The bread has a nice tangy flavor and a wonderful texture. Don’t hesitate, you must TRY IT!
INGREDIENTS:
PROCEDURE:
 Initiate the process by dissolving the yeast in a blend of warm water and sugar in a large mixing bowl. Let this mixture rest for about 10 minutes before adding the oil. Now, integrate the salt and start with 6 cups of flour into the mixture. Combine all the ingredients to form a dough.
Indulge in a kneading spree, ensuring all the ingredients have melded together and the dough has turned smooth and elastic. It should be mildly sticky and start to detach from the bowl. This should take you anywhere between 6 to 10 minutes. If needed, keep adding more flour gradually until you attain the perfect dough consistency.
Continue reading directions & video on the next page

This Recipe Can Be Achieved With Only 2 Ingredients

Ingredients:
Directions:

This Recipe Does Not Take Much Time, Only 5 Ingredients
 The warm, cinnamon scent that filled her home was simply wonderful. To this day, the scent of peaches and cinnamon takes me back to the lazy summer afternoons I spent with my grandmother. That’s why this recipe is special to me – it’s not just dessert, it’s a connection to the past.
Ingredients:
Directions:

How To Make Fish Fried Extra Krispy
Ingredients:
Instructions :
 Preparation: Pat dry the fish fillets using paper towels to remove any excess moisture. This helps to get a crispier finish. Season both sides lightly with salt and pepper.
Continue reading all instructions on the next page

How To Make The Best Recipe Every Week, It’s So Easy
Picture this: The unmistakable scent of steak sizzling to perfection, blending seamlessly with the rich notes of garlic and the comforting aroma of potatoes. All this, neatly packed within a foil packet, waiting to be unraveled like a culinary present. Welcome to our game-changing recipe for Garlic Steak & Potato Foil Packets. This is more than just a dish; it’s an experience, perfectly designed for barbecues, picnics, or a touch of luxury on an ordinary weeknight.
A summer memory stands out vividly: a spontaneous lakeside picnic with my family. The blanket laid out, the serene ambiance of the lake, and then the sudden realization – I had forgotten to marinate our picnic steaks! But, as fate would have it, an inspiration struck, and the memory of a garlic steak foil packet recipe came to my rescue.
Armed with fresh garlic, crisp potatoes, and trusty foil, we improvised. What emerged from the grill was nothing short of a revelation. The steak, juicy and marinated with the essence of garlic, paired brilliantly with flawlessly cooked potatoes. It was a dish that transformed a simple picnic into a gourmet feast.
From that day on, these foil packets weren’t just a recipe; they became a cherished tradition, accompanying us on camping adventures, picnics, and soul-warming evenings at home.
Verdict:
Give this recipe a whirl, and you’ll understand why it has a permanent spot in our culinary repertoire. It’s not just about the flavors; it’s about the memories you create along the way. Save it, savor it, and let every bite transport you to a place of pure gastronomic joy!
Ingredients:

Continue reading ingredients & instructions on the next page

Old Fasion Macaroni and Cheese, GREAT TASTING !
Ingredients :

Directions :

The Easiest And Hassle-Free Way Of Cooking Bacon
Bacon lovers rejoice! We have discovered a game-changing method for preparing bacon that is not only incredibly easy but also remarkably neat. You no longer need to worry about oil splatters everywhere and dirtying your kitchen.
By following a few simple steps, you can achieve crispy, delicious bacon without any messy spatters. In this article, we will guide you through the process of cutting and cooking bacon to perfection, leaving you with a satisfyingly crispy and mouthwatering result.
Step 1: Gather your supplies
To begin, you’ll need a package of bacon of your choice. For those who enjoy bacon in large quantities, we recommend using four packages from Costco (or adjust the amount to suit your needs). Additionally, you will need a large pot with sides.
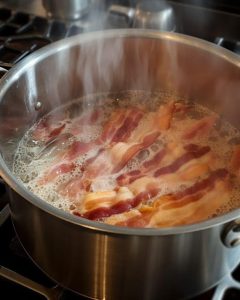 Step 2: Prepare the bacon
Continue reading all steps on the next page

How To Make Dole Pineapple Whip
Experience Paradise in Every Bite: Dole Pineapple Whip 

Whisk yourself away to an island paradise with a refreshing treat that’s as delightful to taste as it is easy to make. Whether you’re reminiscing about your last beach vacation or just seeking a refreshing escape from daily life, our Dole Pineapple Whip promises a tantalizing burst of tropical flavors in every spoonful. Dive into this creamy, fruity concoction and let the vacation vibes roll in!
Ingredients:
½ cup pineapple juice
2 cups frozen pineapple chunks (about 10 ounces)
1 cup vanilla ice cream (either dairy or dairy-free, your choice)
Instructions:
 Blend: In a high-speed blender, combine the pineapple juice, frozen pineapple chunks, and ice cream. Process on medium speed for approximately 1 ½ to 2 ½ minutes, ensuring the mixture is thick and smooth. If needed for consistency, add more pineapple juice in increments of 1 tablespoon.


