Author: Admin

Zucchini and Oatmeal Cutlets

Ingredients:

  • 1 zucchini (350g)
  • 2 eggs
  • 100 grams of cheese, grated
  • chopped
  • 1 potato
  • 1 clove of garlic, minced
  • 1 carrot
  • Salt, to taste
  • Black pepper, to taste
  • Paprika, to taste
  • 4 tablespoons oatmeal
  • 1 teaspoon Herbes de Provence
  • 2 tablespoons flourDirections
  • 1. Prepare the Vegetables:
  • Grate the zucchini, carrot, and potato. Place the grated zucchini in a colander, sprinkle with a little salt, and let it sit for 10 minutes to draw out excess moisture. Then squeeze out the excess water from the zucchini using a clean kitchen towel or cheesecloth.
  • 2. Mix the Ingredients:
  • Add the eggs, grated cheese, and chopped parsley. Mix well.
  • Add the oatmeal, flour, Herbes de Provence, salt, black pepper, and paprika. Mix until all the ingredients are well combined and the mixture holds together.
  • In a large bowl, combine the grated zucchini, carrot, potato, and minced garlic.
  • 3. Form the Patties:
  • 4. Cook the Patties:
  • Take a small amount of the mixture and form it into a patty shape. Repeat until all the mixture is used up.
  • Heat a non-stick skillet over medium heat and add a little
  • Cook the patties for about 3-4 minutes on each side, or until they are golden brown and cooked through.
  • 5. Serve:
  • Serve the zucchini and oatmeal cutlets warm, garnished with additional if desired.
  • Serving Suggestions
  • Serve with a side salad or steamed vegetables for a complete meal.
  • Pair with a dipping sauce like tzatziki, sour cream, or a light sauce.
  • Cooking Tips
  • Cheese Variation: Use any type of cheese you prefer, such as cheddar, mozzarella, or feta.
  • Squeeze Excess Moisture: Ensure to squeeze out as much moisture as possible from the grated zucchini to prevent the cutlets from becoming too soggy.
  • Spice It Up: Add a pinch of chili flakes or cayenne pepper for a spicy kick.
  • Nutritional Benefits
  • Zucchini: Low in calories and high in vitamins and minerals.
  • Oatmeal: Provides fiber and helps to bind the cutlets.
  • Carrot and Potato: Add texture and additional nutrients.
  • Dietary Information
  • Vegetarian: This recipe is suitable for vegetarians.
  • Gluten-Free Option: Use gluten-free flour and oatmeal.
  • Storage Tips
  • Refrigerate: Store any leftover cutlets in an in the for up to 3 days.
  • Reheat: Reheat in a skillet or microwave before serving.
  • Why You’ll Love This Recipe
  • Easy to Make: Simple ingredients and quick preparation.
  • Healthy and Nutritious: Packed with vegetables and whole grains.
  • Delicious: A flavorful and satisfying meal for any time of the day.
  • Conclusion
  • Enjoy

Read More

Easy Fall Off the Bone Oven-Baked Ribs

Ingredients:

°Ribs (without stuffing)
°3/8 cup (95 ml) ketchup
°1/3 cup (85 ml) barbecue sauce
°3 tbsp chili sauce
°3/4 cup (190 ml) maple syrup
°4 tablespoons of HP sauce
°Paprika, salt and pepper

Instructions:

Boil ribs for about 1 hour. This step is the secret to making good ribs. Preheat oven 300°F (150°C). In a bowl, mix the ingredients to make the sauce. Brush the ribs well with the sauce. Bake for about 40 minutes on each side. Brush the ribs frequently with the sauce.

Enjoy!

Read More

Peach Cobbler withCinnamon SugarCrust

Introduction:
This peach cobbler is a warm, comforting dessert with a rich cinnamon-sugar crust that perfectly complements the sweet, juicy peaches. It’s an easy-to-make treat that’s great for sharing with family and friends, especially during the summer or fall when fresh peaches are in season. Serve it with a scoop of vanilla ice cream for an extra indulgent experience!

Recipe:

Ingredients:

  • 1 cup sugar, divided
  • 1/2 cup brown sugar
  • 4 cups fresh peach slices (or canned peaches, drained)
  • 1/2 cup unsalted butter, melted
  • 1 tsp cinnamon
  • 1/2 tsp nutmeg
  • 1 tsp vanilla extract
  • 1 can (8 oz) crescent roll dough

Instructions:

  1. Preheat Oven – Preheat your oven to 350°F (175°C).
  2. Prepare Peaches – In a mixing bowl, combine the peaches, 1/2 cup of sugar, brown sugar, cinnamon, nutmeg, and vanilla extract. Toss until the peaches are well coated.
  3. Arrange Crescent Rolls – Unroll the crescent roll dough and arrange the pieces on the bottom of a greased baking dish, overlapping slightly.
  4. Add Peaches – Pour the peach mixture over the crescent rolls, spreading evenly. Drizzle melted butter over the peaches and sprinkle the remaining sugar on top.
  5. Bake – Bake for 30-35 minutes, or until the crescent rolls are golden brown and the peach mixture is bubbly.
  6. Serve – Allow the cobbler to cool for a few minutes, then serve warm, optionally topped with vanilla ice cream or whipped cream.

Tips:

  • Fresh peaches work best, but if using canned, make sure they are well-drained.
  • For a deeper flavor, add a splash of bourbon or rum to the peach mixture.

This peach cobbler with its buttery, cinnamon-sugar crust is a dessert that’s sure to be a hit at any

Enjoy!

Read More

Egg rolls filled with Philly cheesesteak

Philly Cheesesteak Egg Rolls

Ingredients

  • 1 pound minced meat
  • 1 tablespoon Worcestershire sauce
  • 1/2 teaspoon salt
  • 1/2 teaspoon black pepper powder
  • 2 tablespoons butter
  • 1 onion, chopped into small pieces
  • 1/2 green bell pepper, chopped into small pieces
  • 24 egg roll wrappers
  • 12 slices American cheese
  • 3/4 cup vegetable oil for frying

Instructions

  1. Heat a frying pan over medium heat. Cook the minced meat until browned, about 5 to 7 minutes, breaking it up as little as possible.
  2. Add Worcestershire sauce, salt, and pepper to the meat. Stir gently, then remove the meat from the pan.
  3. Melt butter in the same pan. Add onion and green bell pepper, cooking for 5 to 7 minutes until browned. Add the cooked beef back into the pan and mix well. Allow the filling to cool while preparing the wrappers.
  4. Lay out the egg roll wrappers on a flat surface. Place half a slice of American cheese on each wrapper.
  5. Spoon 3 tablespoons of the filling onto each wrapper. Fold the bottom left corner over the filling, then fold in the sides, sealing the edges with water as you roll it tightly.
  6. Heat 1 inch of oil in a large pot over medium-high heat. Fry 3 to 4 egg rolls at a time, cooking until golden brown (about 3 to 4 minutes). Repeat with the remaining egg rolls.

Tips for Delicious Philly Cheesesteak Egg Rolls

  • Steak: You can also use ribeye or flank steak instead of ground beef. Slice it into small pieces for easier eating.
  • Cheese: Replace Monterey Jack with provolone, Swiss, or add flavor with pepper jack cheese.
  • Peppers and Onions: Use red, yellow, or orange peppers for more color. A red onion adds a nice touch.
  • Wrappers: Don’t stress about wrapping. Instructions are usually on the package. Use water to seal them properly.
  • Dip: Try dipping your egg rolls in cheese sauce, ranch dressing, horseradish sauce, or BBQ sauce.

Enjoy!

Read More

Homemade Sweetened Condensed Milk Recipe

Ingredients:

1 cup (240 ml) whole milk

2 tablespoons butter

1 cup (200 g) granulated sugar

1/2 teaspoon vanilla extract (optional)

Instructions:

In a medium saucepan, mix the milk and sugar.
Place over medium heat and stir constantly until the sugar is fully dissolved.
Bring the mixture to a gentle simmer, reduce the heat to low, and let it cook for about 30-40 minutes, stirring occasionally.
As it cooks, the milk will reduce and thicken to a creamy consistency.
Remove from heat, add butter, and stir until melted and smooth.
For extra flavor, you can add vanilla extract at the end.
Let it cool before pouring into jars. Store it in the refrigerator, and it should last up to two weeks. Enjoy your homemade condensed milk for desserts, drinks, or as a sweet treat on its own!

Enjoy!

Read More

Garlic Butter Chicken Bites with Creamy Parmesan Pasta

Ingredients:

Ingredients:
– 4 tbsp butter
– 2 cloves garlic, minced
– 1 cup heavy cream
– 1 lb chicken breast, cubed
– 8 oz pasta (penne or rotini)
– 1 cup grated Parmesan cheese
– Salt and pepper, to taste
– Fresh basil, for garnish

Instructions:

1. Cook the Pasta: Boil pasta in salted water according to package directions until al dente. Drain and set aside.
2. Cook the Chicken: In a skillet, melt butter over medium heat. Add minced garlic and cubed chicken, cooking until the chicken is golden brown and fully cooked, about 5-7 minutes.
3. Make the Sauce: Reduce heat to low, then stir in heavy cream and Parmesan cheese, cooking until the sauce is creamy and smooth. Season with salt and pepper to taste.
4. Combine and Serve: Add the cooked pasta to the skillet, tossing to coat in the sauce. Garnish with fresh basil and serve hot.

Tips:
– Add a pinch of red pepper flakes for a slight kick.
– For extra flavor, add a splash of white wine to the sauce before adding cream.
– Use fresh Parmesan for best results; it melts more smoothly into the sauce.

Notes:
This quick and delicious meal combines tender chicken bites with a rich, garlicky Parmesan sauce. Perfect for an easy yet indulgent weeknight dinner.

Pairing:
Serve with a side of garlic bread and a crisp Caesar salad. A glass of Chardonnay or sparkling water with lemon complements the flavors nicely.

Enjoy!

Read More

Creamy Chicken Enchiladas

Ingredients:

°2 cups shredded cooked chicken (store-bought roast chicken can be used)

°1 cup grated Monterey Jack cheese (or mozzarella)

°Salt, pepper, adobo seasoning, to taste

°10 flour tortillas (taco size)

°3 tablespoons of butter

°3 tablespoons all-purpose flour

°Half a cup of chicken broth

°1 cup sour cream

°4 ounces green bell pepper, diced (do not drain)

°1 cup grated Monterey Jack cheese

Instructions:

Preheat oven to 350 degrees F . Spray a 9″ x 13″ baking dish with nonstick cooking spray.

In a medium bowl, combine 2 cups shredded cooked chicken, 1 cup shredded Monterey Jack cheese, salt, pepper and Adobo seasoning to taste.

Spoon chicken mixture into each of 10 tortillas.

Roll them all up and put them in the prepared baking dish.

In a medium saucepan, melt 3 tablespoons of butter.

Whisk in 3 tablespoons all-purpose flour and cook and thicken for 1 minute (do not let it burn).

Add 2 cups of chicken broth and stir until smooth.

Stir in 1 cup sour cream and 4 ounces diced green pepper. Be sure not to let the mixture boil.

Remove the sauce from the heat and pour it over the enchiladas.

Top with 1 cup grated Monterey Jack cheese.

Bake for 20-25 minutes.

If you like, you can turn the grill to high heat and broil for a minute or two until the cheese is brown and slightly crispy.

Enjoy!

Read More

Crispy Cottage Cheese Treats: A Protein-Packed Snack for Any Occasion

Why You’ll Love These Crispy Cottage Cheese Treats

  • High Protein: Cottage cheese is rich in protein, making these treats a healthy and satisfying snack.
  • Quick and Easy: Ready in under 20 minutes, this recipe is perfect for busy days or spontaneous cravings.
  • Versatile: Enjoy them as a snack, appetizer, or pair them with sides for a light meal.
  • Customizable: Add herbs, spices, or even veggies to make them your own.
  • Kid-Friendly: These treats are so tasty that even picky eaters will love them!

Ingredients You’ll Need

To make these protein-packed cottage cheese treats, you’ll need:

  • 1 cup cottage cheese (drained well to remove moisture)
  • 1/4 cup all-purpose flour (or almond flour for a low-carb option)
  • 1 egg (to bind the mixture)
  • 1/2 teaspoon garlic powder (for flavor)
  • 1/4 teaspoon black pepper
  • 1/4 teaspoon salt
  • 2 tablespoons grated Parmesan cheese (optional, for added flavor)
  • 1 tablespoon olive oil or butter (for frying)

Step-by-Step Instructions

Step 1: Drain the Cottage Cheese

  • Place the cottage cheese in a fine-mesh strainer or cheesecloth to remove excess moisture.
  • Use a spoon to press out any liquid, and pat it dry with paper towels if needed. Proper draining ensures a crisp texture when frying.

Step 2: Prepare the Batter

  • In a medium-sized bowl, combine the drained cottage cheese, flour, egg, garlic powder, black pepper, salt, and Parmesan cheese (if using).
  • Mix until all ingredients are fully incorporated into a thick batter.

Step 3: Shape the Treats

  • Scoop small portions of the mixture (about 1 tablespoon each) and gently shape them into patties or small balls.
  • For consistency, you can use a cookie scoop or your hands.

Step 4: Cook the Treats

  • Heat olive oil or butter in a non-stick skillet over medium heat.
  • Place the cottage cheese patties in the skillet, leaving space between each one.
  • Fry for 2-3 minutes per side, or until golden brown and crispy. Adjust heat as needed to prevent burning.

Step 5: Serve and Enjoy

  • Remove the crispy cottage cheese treats from the skillet and drain on paper towels to absorb excess oil.
  • Serve warm with your favorite dipping sauce, such as sour cream, yogurt-based dips, marinara sauce, or even ketchup.

Tips for Perfect Crispy Cottage Cheese Treats

  1. Drain Thoroughly: Cottage cheese holds a lot of moisture, so draining is essential to ensure your treats are crispy, not soggy.
  2. Flavor Additions: Add fresh herbs like parsley, dill, or chives for extra flavor. A pinch of paprika or chili flakes can also give a nice kick.
  3. Bake for a Healthier Option: Instead of frying, bake the treats on a parchment-lined baking sheet at 400°F (200°C) for 12-15 minutes, flipping halfway through.
  4. Use Low-Fat Cottage Cheese: For a lighter version, opt for low-fat cottage cheese without compromising the flavor or texture.
  5. Make Ahead: Prepare the batter ahead of time, refrigerate it, and fry the treats when ready to serve.

Serving Suggestions

These crispy cottage cheese treats are incredibly versatile and pair well with a variety of dishes:

  • Serve as an appetizer with ranch dip, tzatziki, or spicy mayo.
  • Enjoy as a healthy snack with a side of fresh veggies or a green salad.
  • Pair with a bowl of hearty tomato soup for a comforting meal.
  • Use them as a protein-packed breakfast with eggs or avocado toast.

Why Cottage Cheese is a Great Ingredient

Cottage cheese is not only delicious but also packed with nutritional benefits:

  • High in Protein: Helps build and repair muscles, making it a great snack for fitness enthusiasts.
  • Low in Calories: A light yet filling ingredient that satisfies hunger without excess calories.
  • Rich in Nutrients: Loaded with calcium, B vitamins, and other essential nutrients.

FAQs

1. Can I Use Ricotta Instead of Cottage Cheese?

Yes, ricotta cheese can work as a substitute, but the texture may be softer, so adjust the flour accordingly.

2. Can I Make These Gluten-Free?

Absolutely! Use almond flour, coconut flour, or a gluten-free flour blend as a replacement for all-purpose flour.

3. How Do I Store Leftovers?

Store leftover treats in an airtight container in the refrigerator for up to 3 days. Reheat in a skillet or oven for best results.

4. Can I Freeze These?

Yes! Place the cooked treats on a baking sheet to freeze individually, then transfer to a freezer-safe bag. Reheat in a skillet or oven until warmed through.

Conclusion

These Crispy Cottage Cheese Treats are the perfect protein-packed snack or appetizer for any occasion. With their crunchy exterior, creamy interior, and customizable flavor options, they’re a healthy and delicious addition to your recipe collection. Easy to prepare and loaded with nutrients, this dish is perfect for busy weekdays, family gatherings, or meal prep.

Try this recipe today and enjoy the ultimate balance of flavor, texture, and nutrition—your taste buds will thank you!

Enjoy!

Read More

Chicken Enchiladas with Sour Cream White Sauce

Ingredients:

10 small soft flour tortillas (you can use corn but I like flour with chicken)
3 tablespoons flour
2 cups chicken broth
1 cup sour cream
2 1/2 cups shredded and cooked chicken (we like to use rotisserie chicken)
3 cups Monterey Jack cheese – shredded
3 tablespoons butter
4oz can diced green chillies (I like medium – they are not spicy at all)

Instructions:

Preheat oven to 350 degrees
Combine shredded chicken and 1 cup of cheese
Fill tortillas with the mixture above and roll each one then place in a greased 9×13 pan
Melt butter in a pan over medium heat
Stir flour into butter and whisk for 1 minute over heat.
Add broth and whisk together. Cook over heat until it’s thick and bubbles up
Take off heat and add in sour cream and chilies. (be careful it’s not too hot or the sour cream will curdle)
Pour mixture over enchiladas and add remaining cheese to top.
Bake in oven for 20-23 minutes then you will want to broil for 3 minutes to brown the cheese.

Enjoy!

Read More

Homemade ice cream with only 3 ingredients

Making your own ice cream at home adds an extra special touch to one of life’s basic pleasures. A decadent dessert that can be made at home with only three simple ingredients tastes precisely like the store-bought one. Here you can find instructions for creating your very own strawberry ice cream with whipped cream, condensed milk, and a few simple ingredients. Indulge your taste buds and wow your loved ones on an epicurean journey that is about to begin!

What You Need:

What you’ll need to whip up this delicious homemade ice cream is:

2.5 cups, or 500 milliliters mascarpone cheese

around two-thirds of a cup, or 150 grams mixed milk

This is equivalent to around 3/4 cup, or 100 grams. strawberries, diced into little pieces

Instructions

Make sure the whipped cream is chilled before you start preparing the ingredients. Before you start, you may chill it in the fridge for a couple of hours. In addition, after washing, remove the stems and cut the strawberries into little pieces.

To get firm peaks, beat the cold whipped cream in a large mixing basin. Your mixer’s speed will determine how long this process takes.

Toss in the condensed milk with a spatula when the whipped cream has reached room temperature. To avoid changing the texture of the finished product, be cautious not to deflate the whipped cream to an extreme.

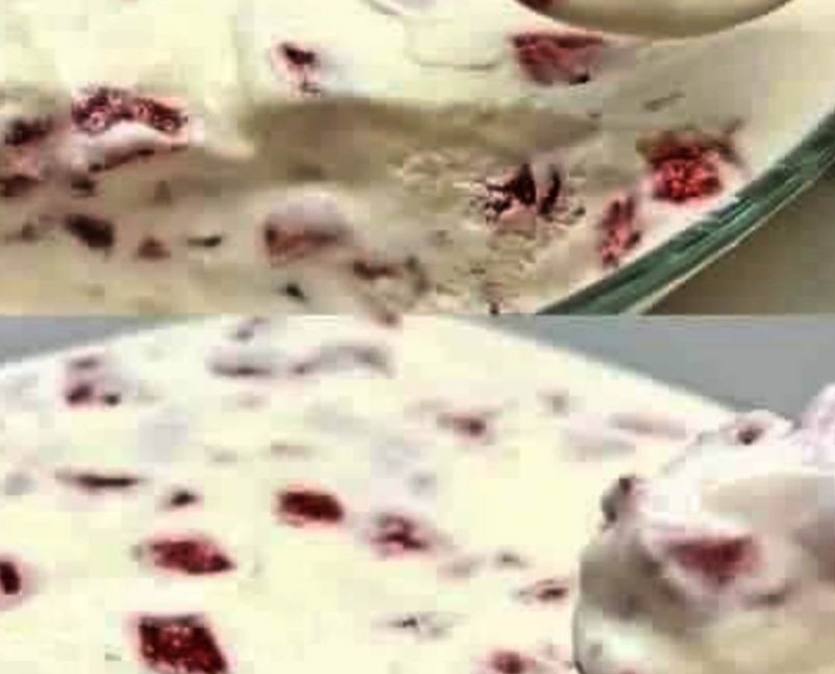
Toss in the chopped strawberries once the condensed milk has been thoroughly mixed with the whipped cream. To get a well-rounded flavor, sprinkle them uniformly throughout the mixture.

In a freezer-safe container, make sure the lid fits snugly before transferring the ice cream mixture. To make it even, use a spatula to smooth down the top.

The ice cream should be allowed to freeze for at least six hours, or ideally all night, after placing the container in the freezer. Then it may set up and have that velvety consistency.

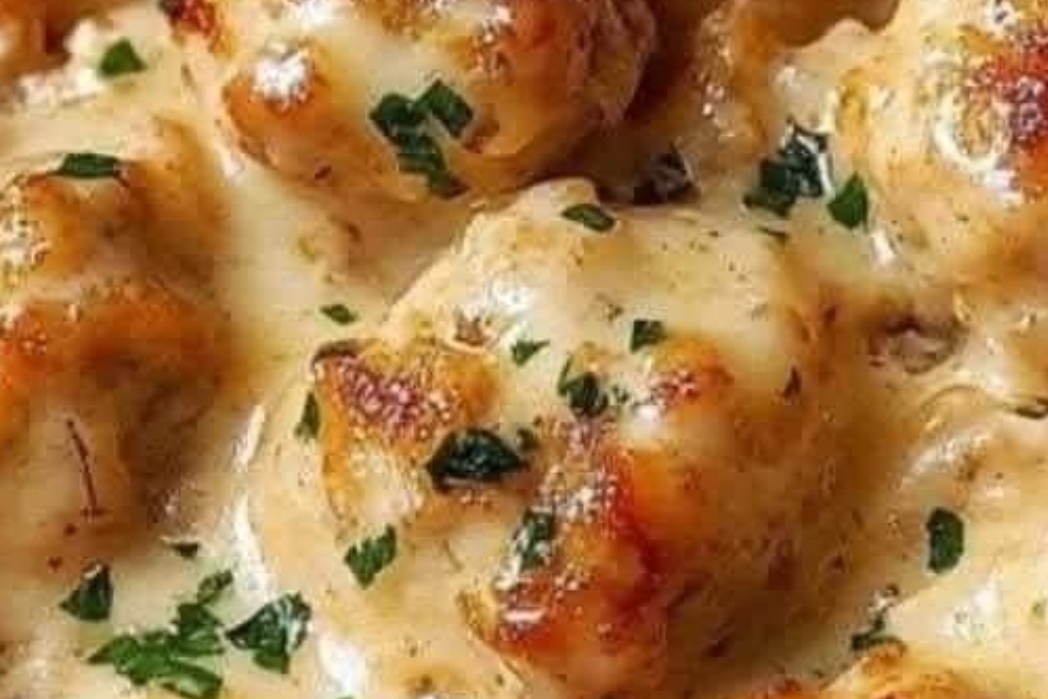
Savor the Delight: Pour the ice cream into serving dishes or ice cream cones once it has frozen completely. For an extra decadent touch, top with some chocolate sauce or more fresh strawberries.

Tips & Tricks for the Kitchen

Texture: Puree the strawberries before mixing them with the whipped cream and condensed milk if you like a smoother texture. The ice cream will turn out smoother and more consistent all around as a result.

Variations: Feel free to experiment with other variations of mix-ins, including chocolate chips, almonds, or crumbled cookies. Be careful not to overmix by folding them in too lightly.

Variations in Flavor: Strawberries are a traditional fruit for homemade ice cream, but you can get creative by adding raspberries, blues, or even peaches for a different taste profile.

Low-Carb and Keto Alternatives

Here are some alternatives that people on low-carb or ketogenic diets can use:

Make your own whipped cream with heavy whipping cream and a keto-friendly sweetener like erythritol or stevia.

Condensed Milk: Look for a low-carb substitute for regular condensed milk or whip up a batch at yourself by heating heavy cream and a keto-friendly sweetener until it thickens.

Fruit: For a simpler, lower-carb ice cream recipe, use berries or other low-carb fruits sparingly.

With only a few simple ingredients, you can whip up a delicious batch of homemade ice cream. A rich and decadent dessert is within your reach when you follow this easy recipe. Homemade ice cream is delicious any time of year, but especially on warm summer days or as a decadent dessert after a romantic dinner. Get all the ingredients you need, whip up a batch, and enjoy the joy of making something tasty from the ground up. Indulge your taste buds

Fry up some chicken with some chopped carrots and onions in a pan.

After the onion and carrots have been added, lower the heat to medium. As the chicken begins to brown and the carrots and onions begin to caramelize, continue cooking while stirring occasionally. 

Poaching chicken with chopped onion, carrot, capers, olives, and raisins.

Bring to a boil and then add the almonds, raisins, capers, pine nuts, and olives. After a quick stir, pour in half a cup of vin cotto. Reduce the liquids by half by deglazing the pan while scraping and stirring the fond, or browned pieces on the bottom. Toss in the leftover vin cotto and heat till boiling.

In a pan, sauté chicken with chopped carrots, onion, capers, and raisins in a wine sauce.

The sugar and vinegar should be mixed in a small basin. While stirring, heat the addition to the pan. A coating will form as the sauce reduces. Use sea salt and freshly ground pepper as seasonings, according to your taste.

Enjoy!

Read More