Author: Admin

How To Make Philly Cheese Steak Sloppy Joes

These Philly Cheesesteak Sloppy Joes will quickly become a family favorite!  They combine the best of two worlds: the flavorings and cheesy goodness of a Philly Cheesesteak with the ease, economy and sauciness of Sloppy Joes.

Philly Cheesesteak Sloppy Joes are pure comfort food, and easy to make with flavors reminiscent of a cheesesteak sandwich. Ready to serve in just 30 minutes, this Sloppy Joe Philly Cheesesteak Recipe is bound to become a weeknight favorite.

Ingredients

  • 1 lb lean ground beef
  • 1 yellow onion finely diced
  • 1 green pepper chopped
  • ½ teaspoon salt
  • 1 tablespoon cornstarch
  • 1 cup beef broth
  • ¼ cup A.1. Sauce
  • 1 teaspoon steak seasoning
  • sliced provolone cheese
  • hamburger buns, sliders, etc.

How To Make Philly Cheese Steak Sloppy Joes

  • In a skillet pan, over medium-high heat, cook and crumble the ground beef, onion, green pepper, and salt until beef is no longer pink. Drain.
  • Stir the cornstarch into the ground beef and mix together until the meat is coated in the cornstarch. Add the beef broth, A-1 sauce, and steak seasoning. Stir together and bring to a boil.
  • Once boiling, reduce heat to medium-low and let it simmer, while stirring occasionally, for 10 minutes. Mixture should thicken up and will thicken up more once it’s off the heat.
  • While meat is simmering, set the oven to broil, and place the buns on a cookie sheet. Butter each bun. Broil for just a few minutes. Watch carefully as they can burn easily.
  • When the meat is done use a slotted spoon to scoop it out onto each bottom bun. Place a slice of provolone cheese on the top bun. Broil for a few more minutes until cheese is melted.
  • Place the top bun with the cheese on top of the bottom bun with the philly cheesesteak meat. Eat warm!

Notes

Nutrition information is for ⅙ of the meat, one slice of provolone cheese, and one hamburger bun.If you are using slider buns or feeding lots of little kids then this recipe easily serves 8 sloppy joes. I highly recommend toasting the buns! If you don’t have the time or just don’t want to, simply serve the sloppy joe meat in a hamburger bun and eat it as is. Still yummy!I know I will get comments saying that these are not real, true, or authentic Philly Cheesesteaks. Yes, I know. They are meant to be a fast, family-friendly, budget-friendly version of the original.

Nutrition

Calories: 320kcal | Carbohydrates: 28g | Protein: 26g | Fat: 11g | Saturated Fat: 5g | Cholesterol: 60mg | Sodium: 937mg | Potassium: 456mg | Fiber: 2g | Sugar: 5g | Vitamin A: 283IU | Vitamin C: 19mg | Calcium: 240mg | Iron: 4mg

Read More

How To Make Stuffed Pepper Soup

A super easy, fast, budget-friendly one pot dinner! So hearty and so cozy with ground beef, rice and bell peppers.

This is one of the most cozy soup recipes with rich homestyle flavor. It totally reminds me of growing up and being home. There’s just so much goodness in one bowl of this hearty soup.

You’ll love the comforting flavors in this soup and how well all the flavors blend together. The peppers and tomatoes offer a mellow and faintly sweet flavor, while the beef kicks in that flavor that will remind you of a traditional stuffed pepper.

And the rice in this soup gives it such a great texture and adds some body to it to keep it filling.

It’s the lazy way of making stuffed peppers and one of my go-to soup recipes. Trust me you’ll love this one!

Ingredients

  • 1/2 lb Italian sausage
  • 1/2 lb lean ground beef
  • 1 small finely chopped onion
  • 1 green pepper, finely chopped
  • 1 red pepper, finely chopped
  • 3 cloves garlic, chopped
  • 4 c low sodium beef broth
  • 2 cups low sodium chicken or vegetable broth
  • 1 can (14.5 oz) salsa tomatoes
  • 3/4 cup raw rice (I use jasmine)
  • kosher salt and fresh ground black pepper

How To Make Stuffed Pepper Soup

In a pot or casserole over medium heat, brown the Italian sausage and ground beef; separating as you go.

In the middle of browning, add onions and peppers; stirring several times. During the last minute of browning, reduce heat to medium-low and add chopped garlic, stirring constantly. Drain the excess fat.

Add the beef broth, chicken broth and tomatoes to the salsa and simmer. Simmer for 15 minutes or until the peppers begin to soften.

Add the rice and coat well. Cover and cook for 5-7 minutes or until the rice is tender. For best results, serve quickly. Season with kosher salt and freshly ground black pepper to taste.

Read More

How To Make Garlic Roasted Chicken and Potatoes

I’ve been making this recipe for so many years, I can’t remember where I got it from. It’s really quick to throw together. After fixing it several times, my husband ‘discovered’ that you were supposed to spread the garlic on the chicken. It’s one of his favorites now. This recipe is very easy to adjust up or down. Just make sure your pan is big enough if adjusting up. I usually add more potatoes, since we like them. Serve with a mixed greens salad.

Ingredients

¼ cup butter

6 chicken leg quarters, split into drumsticks and thighs

6 large Yukon Gold potatoes, cut into chunks

24 cloves garlic, unpeeled

salt and ground black pepper to taste

¼ cup maple syrup

How To Make Garlic Roasted Chicken and Potatoes

Preheat oven to 400 degrees F (200 degrees C).

Place the butter into a roasting pan, and melt in the oven. When butter is melted, swirl to coat the bottom of the roasting pan, and place the chicken drumsticks and thighs, potatoes, and unpeeled garlic cloves into the pan. Sprinkle with salt and black pepper; turn the chicken, potatoes, and garlic to coat with butter.

Bake in the preheated oven until the chicken is no longer pink inside and the juices run clear, about 40 minutes, basting 3 times with pan drippings. Brush maple syrup over the chicken pieces, and spoon pan drippings over the potatoes.

Return to oven, and bake until the chicken and potatoes are tender and browned, about 20 more minutes. An instant-read thermometer inserted into a thick part of a thigh should read at least 165 degrees F (74 degrees C). To serve, squeeze garlic from the baked cloves, and spread the soft garlic over the chicken. Pour pan juices over chicken and potatoes.

Read More

How To Make Cinna-bun Cake

My Mom makes the best cinnamon buns.  I don’t make cinnamon buns…I’ve been craving Mom’s cinnamon buns, but they’ve been away.  So I had to improvise.  Enter Cinnamon Bun Cake, or as our two year old calls it, Cinabun Cake.

Ingredients

Base:

  • 3 cups flour
  • 1/4 teaspoon salt
  • 1 cup sugar
  • 4 teaspoons baking powder
  • 1 1/2 cups milk
  • 2 eggs
  • 2 teaspoons vanilla
  • 1/2 cup butter, melted

Topping:

  • 1 cup butter, softened
  • 1 cup brown sugar
  • 2 tablespoons flour
  • 1 tablespoon cinnamon

Glaze

  • 2 cups powdered sugar
  • 5 tablespoons milk
  • 1 teaspoon vanilla

How To Make Cinna-bun Cake

  • Pre-heat oven to 350F.
  • Prepare a 9-inch x 13-inch baking pan by spraying with non-stick cooking oil or, if you prefer, coat the pan with butter.
  • In a large bowl, mix all of the base ingredients, with the exception of the butter, together until thoroughly combined.
  • Add the melted butter last and pour into the prepared pan; set aside,

To prepare the topping:

  • In a small bowl, mix all of the topping ingredients together; mix well to combine.

To assemble the cake for baking:

  • Drop topping, by teaspoonful over the base, as evenly as you can, over the entire base.
  • Use a butter knife and swirl the topping into the base.
  • Place into the pre-heated oven and bake for 28 – 30 minutes.

To prepare and use the glaze:

  • While the cake is baking, using a small bowl, prepare the glaze by mixing all ingredients until completed combined; set aside.
  • Remove cake from oven and glaze the cake while still warm.

Read More

Zucchini Garlic Bites

This tasty zucchini garlic bites recipe combines shredded zucchini with garlic, Parmesan cheese, fresh herbs, and is served with a marinara dipping sauce for an Italian inspired twist.

Ingredients

  • 1 cup shredded zucchini drained well
  • 1 clove garlic grated fine
  • 1/3 cup breadcrumbs
  • 1/4 cup grated Parmigiano-Reggiano cheese
  • 1 large egg
  • 2 tablespoons chopped fresh chives (or 1 tablespoon dried chives)
  • 1 tablespoon chopped fresh parsley (or 1/2 tablespoon dried)
  • 1 teaspoon chopped fresh basil (or 1/2 teaspoon dried)
  • 1 teaspoon chopped fresh oregano (or 1/2 teaspoon dried)
  • pinch of salt and pepper
  • tomato sauce for dipping

Instructions

    • Preheat oven to 400˚F. Lightly coat a baking sheet with olive oil or non-stick spray. Set aside.
    • Use a box grater to grate the zucchini into a clean towel. Roll up the towel and twist to wring out the moisture.
    • Grate the garlic using the small holes on the box grater.
    • Add the shredded zucchini, garlic, egg, breadcrumbs, parmesan, chives, parsley, basil, oregano, salt and pepper to a medium bowl. Mix well to combine.
    • Shape a tablespoon of the mixture into your hands, pat into small balls, and place on the baking sheet.
  • Bake for 15-18 minutes in the preheated oven until golden. Serve warm with marinara sauce. Recipe makes about 16 bites.

Notes

How to Freeze

Follow the recipe and let zucchini bites cool. Place in a single layer on a large baking sheet and flash freeze for one hour. Once the zucchini balls are frozen, place them into a freezer bag. Store up 4 months in the freezer.

Reheat by preheating your oven to 400˚F. Place the frozen zucchini garlic bites on a baking sheet and bake until heated through and crispy on the outside, about 10 to 15 minutes.

Read More

How To Make Creamy baked Mac And Cheese

Baked mac and cheese.  It’s nearly the universal comfort food, and there are SO many variations!  In fact, I almost didn’t post this recipe, as there are SOOOO many mac and cheese recipes available, and most people already have their favorite way of making it.

Of course, there’s no “right” way or “wrong” way, so I’m here sharing the way I like to make my mac and cheese (the way my family loves it too).

Ingredients

  • 1 lb. dry elbow macaroni pasta
  • ½ cup salted butter
  • ½ cup all-purpose flour
  • 2 cups milk, at room temperature (I use 2%, but whole milk will also work well)
  • 2 cups half-and-half, at room temperature
  • 1 teaspoon Worcestershire sauce
  • 12 ounces cubed Velveeta cheese, at room temperature
  • 3 cups grated sharp cheddar cheese, divided (at room temperature)
  • 1 teaspoon salt
  • ½ teaspoon dry mustard
  • ¼ teaspoon black pepper
  • Pinch of nutmeg

How To Make Creamy baked Mac And Cheese

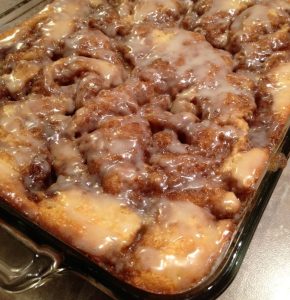
Preheat oven to 325 degrees F. Grease a 9 x 13-inch baking dish and set aside.

In a large pot of salted boiling water, cook pasta for 1 minute less than the package suggestion for al dente (about 8 minutes). Drain and toss with a drizzle of olive oil to prevent sticking.

While the pasta boils, melt butter in a large Dutch oven (about 6-7 quarts) over medium heat. Add flour; cook, whisking constantly, for 1 minute. Very gradually, whisk in the milk and half-and-half. Bring to a boil over medium heat, whisking constantly. Remove from the heat.

Whisk in the Worcestershire sauce. Gradually add all of the Velveeta cheese and half of the cheddar cheese (1 ½ cups). Stir until the cheese is completely melted and smooth. Stir in the salt, dry mustard, pepper and nutmeg. Add cooked, drained pasta and stir to coat.

Transfer to the prepared baking dish. Sprinkle remaining 1 ½ cups of grated cheddar on top. Bake for 15 minutes, or until cheese is melted on top and the sauce is bubbly.

For a crispier, browner top, pop the dish under the broiler for 2-5 minutes.

Read More

Sausage Cream Cheese Crescents

Crescent Rolls are not just Holiday dinners or special times. Today, we use crescents for so many different meals and food items. These Sausage and Cream Cheese Crescents are the bomb! They are savory and delicious.

They make a perfect breakfast! Serve them up with a side of eggs and you have a full meal right there.

Ingredients

  • 1 lb. Ground sausage, breakfast, Italian or other
  • 1 C. Shredded cheese of choice
  • 8 oz. Cream cheese softened
  • 2 Cans refrigerated crescent rolls
  • Pepper to taste

How To Make Sausage Cream Cheese Crescents

  1. Preheat the oven to 375 degrees.
  2. Roll the crescent rolls out flat, and cut each triangle in half lengthwise.
  3. Cook the ground sausage until it is completely browned.
  4. Add the cooled ground sausage to a mixing bowl with the cream cheese and shredded cheese of your choosing as well as pepper to taste. Stir to combine completely.
  5. Spoon a small ball of the sausage mixture into the top of each piece of crescent roll where it is fattest.
  6. Starting at the widest end, roll the crescent roll dough over the sausage filling forming a mini stuffed crescent roll.
  7. Bake for 15 minutes until golden brown and cooked through.

Read More

Peanut Butter Balls with Chocolate Rice Krispies

Peanut Butter Balls with Chocolate Rice Krispies are just like your favorite Peanut Butter Balls but with a crispy filling thanks to the rice krispies. This delicious candy is great for the holidays and cookie trays! Truly, the perfect combination of sweet and salty. A must make for Christmas!

Ingredients

  • 1 cup of crunchy peanut butter (the chunkier, the better!)
  • 6 tablespoons of honey (for that extra touch of sweetness)
  • 1/8 teaspoon of salt (just a pinch to enhance the flavors)
  • 3 cups of Rice Krispies cereal (the classic crispy goodness)
  • 1 1/2 cups of vegan chocolate chips (because who doesn’t love chocolate?)

How To Make Peanut Butter Balls with Chocolate Rice Krispies

  1. Grab a muffin pan and line it with liners. Give them a light spray of non-stick spray to make sure your treats come out easily.
  2. Time to melt some goodness! In a saucepan over low heat, melt together the peanut butter, honey, and salt. Keep stirring until everything is melted and well combined. You’ll start to smell the delicious aroma!
  3. Once the mixture is smooth and melted, take it off the heat. Now it’s time to add the Rice Krispies cereal. Stir it in until all the cereal is coated and mixed well. You want every bite to be packed with that peanut butter flavor.
  4. Get your muffin pan ready and evenly distribute the mixture into the liners. Press it down firmly to make sure everything sticks together nicely. You don’t want any crumbly treats!
  5. Now for the chocolaty goodness. In another saucepan over low heat, melt those vegan chocolate chips. Keep stirring constantly until they’re perfectly melted and smooth. Be careful not to burn it!
  6. Spoon the melted chocolate over each treat in the muffin pan, making sure to distribute it smoothly and evenly. Get creative and make some swirls or patterns if you’re feeling fancy.
  7. It’s time to chill out! Pop the muffin pan in the refrigerator and let the treats firm up. It won’t take too long, just enough time to build up your excitement.
  8. Once they’re firm and ready to go, take them out of the fridge. Peel off the liners and get ready to indulge in these irresistible Peanut Butter Rice Krispies Treats. Share them with friends or keep them all to yourself – no judgment here!
  9. So, go ahead and treat yourself to these delectable goodies. They’re the perfect combination of sweet, crunchy, and chocolaty goodness that will satisfy your cravings in no time. Enjoy every bite and savor the deliciousness!

Read More

Marinated Cucumbers, Onions, and Tomatoes

Marinated Cucumbers, Onions, and Tomatoes, a delicious, light, and refreshing salad that is perfect for summer or winter. What I love about this recipe is that you can serve with chicken or any main dishes you want !!

Ingredients

  • Cucumbers: 3 medium (peeled and sliced 1/4 inch thick)
  • Onion: 1 medium (sliced and separated into rings)
  • Tomatoes: 3 medium (cut into wedges)
  • Vinegar: 1/2 cup
  • Sugar1/4 c: up
  • Water: 1 cup
  • Salt: 2 teaspoons
  • Fresh coarse ground black pepper: 1 teaspoon
  • Oil: 1/4 cup
  • Fresh mint: 1 teaspoon (chopped) “optional”

How To Make Marinated Cucumbers, Onions, and Tomatoes

1. To start off the recipe, get a large bowl and combine in all ingredients.

2. And please toss well to mix.

3. Finally, refrigerate for no less than 120 minutes before serving.

Read More

Baked Garlic Parmesan Fries

Baked Garlic Parmesan Fries are the perfect side dish for any meal! They are crispy, flavorful, and easy to make. Best of all, they can be baked in the oven, so you don’t have to worry about frying them.

Ingredients ( Serving 6 )

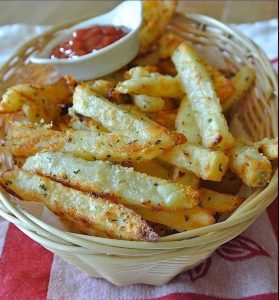
  • 3 Large Russet Potatoes
  • 3 Tbsp. Olive oil
  • 1 tsp. Italian seasoning
  • 2 tsp. Minced garlic
  • 1 Tbsp. Parsley flakes
  • ¼ c Parmesan cheese grated
  • ¼ c Parmesan cheese grated
  • Salt and pepper to taste

How To Make Baked Garlic Parmesan Fries

  1. Preheat the oven to 400 degrees.
  2. Cut the potatoes into long thin french fry shapes.
  3. Combine the cut up potatoes, olive oil, minced garlic, Italian seasoning as well as salt and pepper to taste in a large mixing bowl, toss to coat the fries well.
  4. Spread the fries out in an even layer on a baking sheet, and bake for 30 minutes, stopping to toss and flip the fries halfway through.
  5. Sprinkle the fries with the parsley flakes and ¼ cup of the Parmesan, toss to coat, and bake for another 10-15 minutes until don to your liking.

Read More