
The baking powder starts working once the wet and dry ingredients are mixed together, so it’s important to preheat your oven and prep your pans before combining the two.
If you have leftovers, you can save them until you are ready to eat them. Cool completely, then freeze in a zip lock bag for up to 1 month. When you’re ready to use it, thaw it at room temperature or in the fridge or microwave for a few seconds until warmed through.
Ingredients
+for the cake
°Half a cup of unsalted butter
°Half a cup of granulated sugar
°1 large egg
°1½ teaspoon vanilla extract
°Half a cup of milk
°Half a cup of sour cream
°1⅔ cup all-purpose flour
°1½ tsp baking powder
°Half a tsp of baking soda
°Half a teaspoon of ground cinnamon
°Half a teaspoon of salt
+At the top:
°3 tablespoons melted butter
°Half a cup of granulated sugar
°2 teaspoons ground cinnamon
How to Make :
For the cake
Preheat oven to 375 degrees, generously coat a standard muffin pan with nonstick cooking spray and set aside.
Add the butter and granulated sugar to a large mixing bowl and mix for about 2 minutes, until the mixture is smooth and well combined. Then add the eggs, vanilla, milk and sour cream and mix until combined.
Stir flour, baking powder, baking soda, cinnamon and salt into butter mixture. Use a rubber spatula to fold it until it is fully combined. Be sure not to over mix
Spoon mixture into greased muffin tin, filling each tin about half full. Insert a toothpick in the center of each box filled with the mixture
Transfer the muffin pan to the preheated oven and bake for 25 minutes, or until a toothpick inserted comes out clean.
After baking, let the muffins cool in the muffin tin for 1-2 minutes, then transfer them to a cooling rack.
At the top:
Melt the butter for the topping in a small bowl. Meanwhile, combine the granulated sugar and cinnamon in another bowl.
Once the muffins are out of the oven and cooled for only a few minutes, use a pastry brush to brush a thin layer of melted butter onto each muffin.
Sprinkle the cinnamon-sugar mixture generously over the butter layer. Serve hot and Enjoy !

 I love chicken breasts too, but only for some meals. While they’re the best chicken meat for diet, they tend to get dry; and that’s not what I want in my meals. Chicken thighs are still the perfect parts to go to my savory meals.
 So why make a copycat recipe of it if you have one a mile down the road? Well, A: Copycat recipes are a ton of fun and B: Way, way, way, way higher quality.

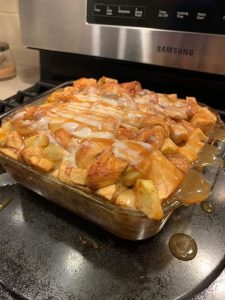
 ld fashioned bread pudding with vanilla sauce is an easy and simple homestead recipe to use up eggs, milk and stale bread. Comfort food at its best – breakfast, dessert, or snack! We found this recipe tucked inside my mom’s Bible when going through her things. It has become a family tradition on the first snow day of the year and if that doesn’t happen, which can be the case here in central Virginia, we know it’ll be the featured dessert at Easter and anytime a comfort food is in order.
 Sauce Ingredients:
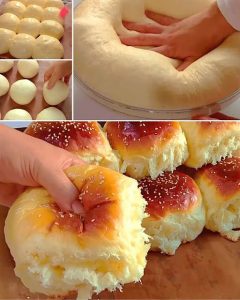
 °2 packets of cinnamon rolls
 °4 tablespoons of melted butter
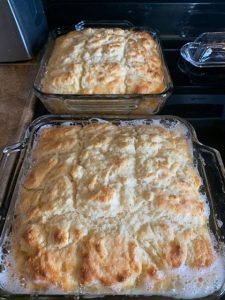
 Start by preheating your oven to 375°F. Grease a 9×13 inch baking pan and keep it aside for now.
 1 Egg
1 Egg
 °2 1/2 cups all-purpose flour
 °6 strips bacon (about 6 ounces), cut into 1-inch pieces


