Month: February 2024

Ingenious Ways to Repurpose Your Wine Bottles

Is there anything more delightful than combining a wine night with crafting? Rather than mindlessly tossing your empty wine bottles into the recycling bin, consider transforming them into artful creations. This compilation of 12 captivating wine bottle crafts discovered across the internet might just inspire you to rethink your disposal habits.

Terrariums You can fashion whimsical terrariums by cutting wine bottles. There are devices available for cutting wine bottles.

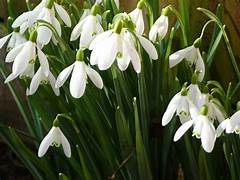
Elegant Centerpiece This elegant and simple table centerpiece alone is reason enough to start saving your wine bottles.

Mercury Glass Bottles Add a touch of metallic glamour to your decor with these chic bottles. Create a single one or make several to form an eye-catching group.

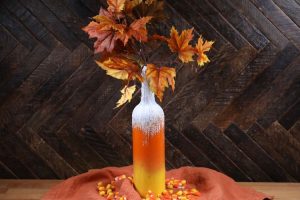
Ombré Fall Centerpiece Craft the ultimate fall centerpiece with this creative project.

Beachy Decor If your home exudes beachy vibes, this craft is perfect for you.

Self-Watering Planter If you lack a green thumb, try this DIY project. It takes the hassle out of watering your plants.

Candle Holders Learn how to turn a wine bottle into a charming candle holder.

Read More

How to grow and care for snowdrops

Snowdrops (Galanthus), adorned with delicate white blooms, stand out as one of the premier harbingers of the end of winter, often breaking through the frosty ground as early as January or February. These enduring perennials hold a special place in the hearts of numerous gardeners seeking to infuse their home gardens with the vibrancy of early spring.

Cultivating snowdrops is not a challenging endeavor, but ensuring their sustained vitality and charm in your garden requires careful attention to specific requirements. If you aspire to nurture these fleeting beauties at home, adhering to a set of crucial steps for both planting and ongoing care is paramount.

Choosing the Right Bulbs and Planting Time

  1. Opt for high-quality, firm bulbs free of any signs of disease or damage. It is advisable to procure bulbs from a reputable nursery or garden center.
  2. Acquire and plant snowdrop bulbs during late summer to early autumn, a period when the bulbs lie dormant yet are prepared to root and establish themselves.
  3. Snowdrops thrive in a cool to temperate climate and may struggle in regions with hot, dry summers. They find their optimal conditions in USDA Hardiness Zones 3 through 7.

Deciding on the Planting Site

  1. Select a location that receives dappled sunlight, with snowdrops thriving in partial shade, particularly beneath deciduous trees where they bask in early spring sun before the trees leaf out.
  2. Ensure the soil is well-draining and rich in organic matter. Amend impoverished soil with compost or well-rotted manure before planting.
  3. Plant snowdrop bulbs in naturalistic drifts or groupings to create a visually striking display, mirroring their growth in the wild and enhancing their overall allure.

Planting the Bulbs

Read More

How To Make Mississippi Mud Cake

This Mississippi Mud Cake includes a homemade chocolate cake with melted marshmallows and warm chocolate frosting poured on top. Trust me, it’s as delicious as it sounds!

When I think of a chocolate lover’s dream, this is the cake that comes to mind! It’s called a “Mississippi Mud” cake because of the layers of soft marshmallow and chocolate that make up the topping and frosting. It’s one of the easiest cakes to make, baked in a simple 9×13” pan.

Ingredients

For the cake:

  • 1C.Butter unsalted and softened
  • 1 ½C.Granulated sugar
  • 1 ½C.All purpose flour
  • ½C.Cocoa powder
  • 4Large eggs
  • 2tsp.Vanilla extract
  • 1C.Chopped pecans
  • 4C.Mini Marshmallows

For the icing:

  • 16oz.Confectioners sugar
  • ½C.Whole milk
  • ½C.Cocoa powder
  • ¼C.Butter unsalted and softened

How To Make Mississippi Mud Cake

  1. Preheat the oven to 350 degrees.
  2. Beat together the butter and sugar for the cake in a mixing bowl.
  3. Add in the flour, cocoa powder, eggs and vanilla extract until well combined.
  4. Fold in the chopped pecans.
  5. Spread the batter in an even layer in a well greased 9×13 baking dish.
  6. Bake for 25 minutes until cooked completely through.
  7. Immediately pour the marshmallows on top of the cake when removed from the oven and let them sit. Once they are soft and melted, spread them evenly over the top of the cake.
  8. Mix together the ingredients for the icing until smooth and creamy.
  9. Spread the icing over the top of the cooled cake, and serve.

Read More