Day: February 16, 2024

How To Make Tropical Twist Banana Bread

Indulge in a taste of the tropics with this delightful twist on classic banana bread. Bursting with the flavors of Hawaii, this recipe brings together the rich sweetness of ripe bananas with hints of coconut and pineapple, creating a truly irresistible treat. Whether enjoyed as a morning pick-me-up or a satisfying afternoon snack, this tropical banana bread is sure to transport your taste buds to paradise. Get ready to embark on a culinary journey to the islands with each delicious bite!

Ingredients:

  • 1/2 cup butter softened
  • 1 cup of sugar
  • 2 large eggs
  • 1 very ripe banana, mashed
  • 8 ounces crushed pineapple (do not drain)
  • 2 cups flour
  • 1 tsp baking powder
  • 1/2 tsp baking soda
  • 1/4 tsp salt
  • 1/4 cup shredded coconut

How To Make Hawaiian Banana Bread:

Continue reading how to make on the next page

Read More

Unlocking Nature’s Secret: A Banana Peel and Potato Anti-Wrinkle Cream

In the realm of natural skincare, the most effective remedies are often those that harness the power of simple, earth-derived ingredients. Today, we’re delving into an enchanting recipe that brings together the humble banana peel and the unassuming potato in a concoction designed to brighten, lighten, and smooth your skin. This delightful duo works wonders in fading age spots and reducing the appearance of wrinkles, offering a natural and healthy approach to achieving a youthful glow.

Ingredients for Your Skincare Elixir:

1 banana peel, cut into small pieces

1 potato, peeled and cut into small pieces

230ml water

1 teaspoon flaxseed oil

1 tablespoon lemon juice

1 teaspoon cornstarch

Creating Your Anti-Wrinkle Cream:

Continue reading this amazing recipe on the next page

Read More

Green Thumbs Up: Grow Green Onions with Just a Towel and Water!

Unlock the wonder of home gardening, even in the smallest of spaces, with a method that’s as simple as it is gratifying. Growing green onions with just a towel and water is not just easy; it’s a delightful way to infuse your kitchen with fresh flavors and greenery. This approach transforms your windowsill into a mini garden oasis, requiring minimal effort for a rewarding experience.
Getting Started is Easy !
To embark on this verdant adventure, gather a few basic supplies:
Green onion bulbs with roots
A kitchen or paper towel
A shallow dish or tray
Water
Your Step-by-Step Guide to Cultivating Green Onions
Prepare Your Bulbs…

Continue reading this amazing article on the next page

Read More

Make Crispy Potato Pastry in 15 Minutes with Flour, Water, Salt !

Embrace the charm of homemade crispy, golden pastries filled with a scrumptious potato and cheese blend. This straightforward recipe transforms basic pantry staples into delectable crispy potato pastries in a mere 15 minutes, making it a tempting addition to your kitchen endeavors.

Ingredients for Your Culinary Adventure:

For the Dough:
1 teaspoon yeast (3g)
2 glasses warm water (400ml)
5.5 cups all-purpose flour (630g)
1.5 teaspoons salt (7g)
For the Filling:
2 potatoes
1 teaspoon salt (3g)
1 teaspoon black pepper (3g)
1 cup grated cheddar cheese
For Dough Greasing:
150g butter
For Topping:
1 egg yolk
Crafting the Dough:
Kickstart the process by activating the yeast in warm water until dissolved. Mix in the flour and salt gradually, kneading to a soft, elastic dough. Divide into 8 parts, cover, and let rest for 25 minutes.

Potato Filling Preparation:

Continue reading preparation on the next page

Read More

Vinegar: The Natural Solution to Cleaner, Fresher Clothes

Vinegar, especially apple cider vinegar, emerges as a standout choice for those seeking a natural, effective solution for laundry care. Its gentle yet powerful cleaning capabilities offer a refreshing alternative to the harsh chemicals found in many commercial laundry products. Here’s why incorporating vinegar into your laundry routine can make a significant difference in the appearance and freshness of your clothes.
The Benefits of Using Vinegar for Laundry
Natural Cleaning Agent: Vinegar’s acidity is tough on dirt and grime but gentle enough to preserve the integrity of your fabrics. This balance makes it an excellent choice for everyday laundry, ensuring your clothes come out clean without the risk of damage.
Stain Removal: Vinegar is adept at tackling a wide range of stains, from sweat and deodorant marks to food spills. Applying vinegar directly to stains before washing can lift them away with minimal effort.
Odor Eliminator: Vinegar naturally neutralizes odors, leaving your clothes smelling fresh without the need for synthetic fragrances. It’s particularly effective against musty smells often associated with towels and workout gear.
Fabric Softener: The acetic acid in vinegar helps break down laundry detergent residue, leaving clothes feeling soft and comfortable against the skin. It’s a cost-effective and hypoallergenic alternative to traditional fabric softeners.
Brightens and Whitens: Over time, fabrics can become dull or yellowed. Adding vinegar to your wash can help restore the brightness of whites and the vibrancy of colored garments without resorting to bleach.
How to Use Vinegar in Your Laundry

Continue reading this amazing article on the next page

Read More

4-Day Belly Fat Burning Mixture: A Healthy and Effective Recipe

Belly fat, often a result of a sedentary lifestyle and unhealthy eating habits, is not just a cosmetic concern but also a health risk. While there’s no shortage of quick-fix solutions, truly combating belly fat requires a lifestyle change.
Key Lifestyle Changes for a Healthier You
Exercise regularly and include a variety of vegetables and fruits in your diet. Stay hydrated by drinking at least 2 liters of water daily. These habits boost your metabolism and enhance fat-burning processes. Cut down on unhealthy fats, fried foods, excess carbs, sweets, sodas, and alcohol.
A Natural Boost: A Four-Day Belly Fat Reduction Remedy
In addition to these healthy habits, you can try a natural remedy believed to target belly fat effectively within four days. This remedy is also thought to support overall body function, boost brain activity, strengthen the immune system, and provide energy.

Ingredients:

125 grams of…

Continue reading ingredients, how to prepare, results & notes on the next page

Read More

Rice as Fertilizer for Orchids: A Sustainable and Cost-effective Approach

Orchids are known for their stunning beauty and elegance, making them a popular choice among plant enthusiasts. However, achieving the perfect balance of nutrients for orchids can be a challenge. While there are many commercial orchid fertilizers available, they can be expensive and often contain chemicals that may not align with eco-friendly gardening practices. An alternative and sustainable solution to nourishing your orchids is by using rice as fertilizer.

Rice, a staple food for billions of people worldwide, can be a valuable resource in your orchid care routine. It is rich in essential nutrients such as nitrogen, phosphorus, and potassium, which are crucial for healthy orchid growth and vibrant blooms. Here’s how you can use rice as an effective and eco-friendly fertilizer for your orchids:

Rice Water Fertilizer:

Ingredients:

  • Uncooked rice grains
  • Water

Instructions:


  • Take a small container or jar and add 1-2 tablespoons of uncooked rice.
  • Pour in water until the rice is fully submerged.
  • Let the rice soak in the water for 24-48 hours.
  • Strain the rice water into another container, discarding the rice grains.
  • Dilute the strained rice water with an equal amount of fresh water.


Use this diluted rice water to water your orchids once a month during the growing season (spring and summer).

Rice Husk Mulch:

Ingredients:

Uncooked rice husks

Instructions:

Spread a layer of uncooked rice husks on top of the orchid’s potting medium.


Ensure the rice husk layer is around 1-2 inches thick.

As you water your orchids, the rice husks will slowly release nutrients into the potting mix, providing a gradual and long-lasting source of nourishment.

3. Rice Bran Compost:

  • Ingredients:
      • Rice bran
      • Organic compost

  • Instructions:
      1. Mix equal parts rice bran and organic compost.
      2. Add this mixture to your orchid’s potting medium during repotting or refreshment.

    1. The rice bran will enrich the potting mix with essential nutrients, promoting healthy root growth and vigorous orchid development.

By incorporating rice-based fertilizers into your orchid care routine, you not only provide your orchids with the essential nutrients they need but also contribute to sustainability by repurposing a common household item. Additionally, rice-based fertilizers are cost-effective and reduce the need for chemical alternatives, making them an environmentally friendly choice for orchid enthusiasts.

Remember that orchids are sensitive to over-fertilization, so it’s crucial to monitor your orchid’s growth and adjust the frequency of rice-based fertilization accordingly. With proper care and the use of rice as fertilizer, your orchids will thrive and continue to grace your living space with their captivating beauty.

Read More

Creamy Cucumber Salad Recipe

I’m the person who submitted this recipe and I appreciate all the feedback, both positive and negative. I use the largest cukes I can find and use the full tablespoon of sea salt because “water follows salt” (think “Osmosis”). Adding salt to cukes, zucchini, etc. will help dry them out. You most certainly can decrease the amount to suit your taste but as the majority of reviewers mentioned: you MUST drain the cukes thoroughly or you’ll end up with a runny mess. I like the idea of using a salad spinner (an item I don’t have) but I have to rely on time and patience when I make this (or squeezing by hand if I’m in a hurry and they’re still too wet after 30 minutes). I’m glad that most of you have enjoyed this recipe, and I also enjoyed seeing some of the twists on it.

Don’t forget to drain the cucumbers! I used cucumbers from our garden. Follow the steps EXACTLY, especially the draining part. I put mine in a salad spinner, which automatically caused a separation between the cucumbers and the brine. I also waited the full 30 minutes indicated. I also added a sprig of fresh tarragon that I chopped up and it added an amazing flavor. I made it a bit last minute so I wasn’t able to keep it in the refrigerator the full two hours, but it tasted great after cooling for 45 minutes. The incredible thing about this salad is how crispy the cucumber remained, even the left overs we ate the next day.. I’ve made it twice already; my husband loves it.

When I saw this recipe I hoped it would be good, thought it sounded good. After making it, I can honestly say it was better than I had hoped. It was easy to make and ended up with a flavor that was much better than I had anticipated.

Ingredients:

4 large Cucumbers

1 medium Sweet Onion

1 cup Mayonnaise

1/2 cup White Sugar

1/4 cup White Vinegar

Salt and Pepper to taste

Directions:

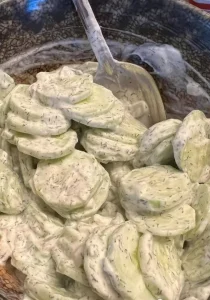
Wash, peel and thinly slice 4 large cucumbers. Use a mandoline for uniformity.

Thinly slice 1 medium sweet onion.

Place the sliced cucumbers and onions in a ceramic, glass or plastic bowl that has a lid.

In a small bowl combine mayonnaise, sugar and vinegar. Mix until smooth.

Turn the mayonnaise mixture into the cucumber and onion mixture, combine well.

Salt and pepper to taste.

Cover with a lid, shake lightly.

Allow to marinate in the refrigerator for a minimum of 6 hours (overnight works well).

Refrigerate leftovers.

Watch the video guides to release the salad :

Read More

How to Propagate an Orchid from a Leaf: A Simple Guide

The allure of orchids is a shared passion among many, and it’s not surprising. These exquisite plants gift us with some of the most beautiful flowers found in nature, displaying a variety of shapes and colors. However, there’s a slight drawback: they can be quite expensive.

What few people know is that orchids can be propagated at home through precise yet straightforward processes. Preferred methods include propagation through cuttings, seeding, plant division, and propagation through a flower spike.

A single orchid leaf is not suitable for propagation. There are no growth points on it that can give rise to new roots. This is why it’s necessary to take a leaf with a small piece of the stem

Before starting the orchid propagation from a leaf, prepare the necessary tools. You’ll need a well-sharpened and sterilized garden scissors, a plastic container, filtered water, and the following fertilizers: rooting hormone, a bit of activated charcoal, and a mix of cytokinin and succinic acid.

The process of propagating an orchid from a leaf is one of the more complex methods and takes time: roots can take more than a year to develop.

The leaf for propagation should be taken from a healthy adult plant. Use the scissors to cut the leaf and the piece of stem, then let it dry for 8 hours

Next, apply some rooting hormone to the leaf and the stem. Dissolve a bit of activated charcoal in water, then place the leaf and stem in the solution. The base of the shoot must be completely immersed in water.

Before planting the orchid in the soil, check for any signs of mold or rotting plant pieces. This meticulous process ensures the successful propagation of orchids from a leaf and sets the foundation for a new, thriving plant.

Read More