Day: February 16, 2024

Say Goodbye to Cockroaches and Bugs: A Guaranteed Cure for Your Home

Are you sick of bugs and roaches always being around? What you need to do to get rid of this problem, especially in the summer, is the following.
There are some nice things about spring and summer, but they also have their own problems. In fact, the extreme heat at these times can make people feel stressed and uncomfortable, especially the old and those who are already weak.
In fact, summer isn’t just trips, the beach, and the sun; it can also bring about some bad things. Without a doubt, the broad spread of insects is one of these. A lot of bugs, mosquitoes, ants, flies, and other insects can spread quickly and cause a lot of difficulties.
A lot of people do different things to cut down on the number of bugs in their homes and the places around them. Some insects can be kept away by spraying repellent on your body or putting poisons in key spots around the house. Putting special mosquito nets over doors and windows can be a very good shield.
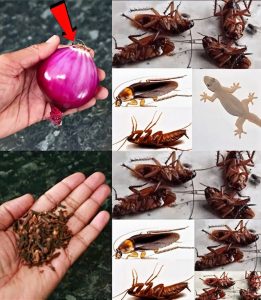
We’re going to talk about a very common problem, though, which is cockroaches and roaches that might be in houses. How can we keep these bugs from getting into our homes and making us feel bad? Here are some natural methods that work really well that you can use.
The Way to Keep Roaches and Cockroaches Out of Your House:
The appearance of cockroaches and roaches in the home is not always a sign of poor hygiene. A lot of the time, these bugs get into homes through high humidity or other ways. They love life like this and the heat. Don’t worry, though! Home solutions that are safe for the environment can help keep cockroaches away.

A cockroach…

Continue reading this amazing article on the next page

Read More

How to make homemade FANTA Without chemicals! Stays fresh for 2 years!

In our constant search for healthier habits, there is a need to reevaluate our beverage choices, especially in a world full of commercial sodas that are often saturated with chemicals and refined sugars . But, there is no reason to worry! How to make homemade FANTA Without chemicals! Stays fresh for 2 years!

Below, we present a step-by-step recipe for making your own homemade Fanta, free of any unwanted chemical components. Discover how to turn simple natural ingredients into a refreshing and delicious drink, prepared with love and without compromising health.

Ingredients:

5 kg of Oranges.

3 Lemons.

3 liters + 2 liters of water.

200 g of Sugar.

Procedure:

Continue reading procedure on the next page

Read More

Discover the Wonders of Okra: A Versatile Veggie for Your Health

Greetings, cherished friends! Today, we turn the spotlight to a vegetable that might subtly blend into the background at your local grocery store, yet unequivocally deserves a prime spot in your kitchen and diet. I’m excited to talk about okra – a small, spear-shaped marvel, often overlooked, but loaded with flavor and incredible health benefits.
Affectionately known as “lady’s finger,” okra has graced culinary traditions for centuries, making its mark in a variety of global dishes. In the southern regions of the U.S., it’s a key player in gumbo, imparting a unique gooey texture that’s become synonymous with the dish. Beyond gumbo, okra shines in stir-fries, can be roasted for a delightful crunch, and finds its way into innovative dishes as more people awaken to its nutritional prowess and culinary flexibility.
But what makes okra such a standout vegetable on your journey to better health and weight management? Let’s explore the compelling reasons to make okra a dietary staple.
1. Promotes Satiety
Okra’s rich dietary fiber content plays a crucial role in making you feel full for longer periods, helping curb unnecessary snacking and aiding in weight control.
2. Enhances Digestive Health
The abundant fiber in okra not only facilitates smooth digestion but also ensures regular bowel movements, contributing to overall health and aiding in weight maintenance.
3. Low Calorie Count

Continue reading this amazing article on the next page

Read More

My mom’s Sponge Cake made with Common Fowl Eggs

Cake-cutting ceremonies are common throughout the world. From birthdays to weddings and celebrations of success, a beautifully decorated, big cake makes the centrepiece. Eating this dessert is a ceremony in itself, with numerous cake shops being found at every locality across the globe. Even Indians cannot resist this sweet delight that contains the delectable mixture of refined flour, sugar, and eggs. The protein-filled egg serves as a binding agent that holds all ingredients together. The egg cake, or as the Indians call it, ande ka cake, utilizes multiple eggs and other ingredients to make the cake taste rich and decadent.

What is the history of an egg cake?

The term ‘cake’ originated centuries ago, with the word being traced back to the Vikings who called it ‘kaka’. The ancient Greeks created this unique mixture made from flour, milk, honey, and eggs. Thus began the tradition of egg cakes. This baked dish became increasingly popular and started evolving as it satiated the sweet tooth of the people. The English did not know much about the baking of cakes. They confused it with baking bread, which looked similarly flat. It was the classic sponge cake that was first baked during the Renaissance period by the Spaniards that kicked off the popularity of these cakes in England. This particular type of egg cake is famously called ande ka cake across North India today.

We’ve got an easy and delicious recipe for you today that you can make using Licious fresh eggs! Licious eggs are hormone and antibiotic residue-free, they are naturally laid, cleaned and tested for freshness. We’ve got brown, quail, classic white, kadaknath eggs and more, that would make rich & creamy cakes.

Ingredients:

  • 1.5 cups refined flour (maida)
  • 1.5 teaspoons baking powder
  • ¾ cup…

Continue reading ingredients, instructions & notes  on the next page

Read More

Classic Fried Plantains Recipe

Ingredients:

  • Ripe plantains (1 or 2, depending on serving size)
  • Vegetable oil (enough for frying)
  • Salt (optional, to taste)

Instructions:

  1. Prepare the Plantains: Peel the ripe plantains and cut them into slices. You can cut them diagonally or into rounds, depending on your preference.
  2. Heat the Oil: In a frying pan or skillet, heat enough vegetable oil over medium heat to cover the bottom of the pan. The oil should be hot but not smoking.
  3. Fry the Plantains: Carefully add the…

Continue reading instructions & notes on the next page

Read More

How To Clean The Stove Eyes and Get Rid of Blockages

How to clean the stove eyes and get rid of blockages??
Every housewife faces a constant problem, which is cleaning the stove eyes, clogging the stove eyes, and not being able to clean it. She does not know what are the correct ways to get rid of the problem of clogged stove eyes, and she also does not know what is the correct way to clean it. Therefore, through this topic, we will present the methods of getting rid of it. From the problem of clogged stove eyes, as well as the correct way to clean the stove
Ways to get rid of clogged stove eyes and clean the stove eyes
1- One of the most important reasons for clogging of the stove’s eyes is the presence of a large amount of food residue on them and their entry into the eyes themselves. Therefore, you must clean the stove and the oven as well from food residue after finishing cooking. Leaving them will make it difficult for you to clean the stove later and will lead to boiling. His eyes are also clogged
2- White vinegar: The white vinegar method is a common and well-known method, where you can use a few drops of white vinegar and put it on the clogged eyes and leave it for a while, after which you will find that the clogged eyes begin to work well.
3- A thin needle: You can also clean the clogged eyes of the stove by using a thin needle or even a metal wire. You clean the eyes from the food residues accumulated on them first, then you insert this needle or wire into the eye to unblock it and unclog it, and thus these eyes will work. After that well
4- Vinegar and lemon: You can also use a mixture of vinegar and lemon to solve the problem of clogged stove eyes. Add some lemon juice and lemon pieces to the vinegar and add a little water to them. Then, using a brush, put this mixture on the clogged stove eyes and gas vents to be cleared.
Ways to properly clean the stove eyes to avoid clogging:

Continue reading ways to properly clean the stove eyes on the next page

Read More

Unlocking Flavor: The Restaurant Industry’s Secret to Perfect Rice

Cooking rice with just water is a basic approach many of us are familiar with, but there’s a culinary secret that can transform your rice from mundane to magnificent. Here’s a closer look at the restaurant industry’s top strategies for infusing rice with irresistible flavors and textures. A polite reminder: appreciative members always express their gratitude.
1. Use Broth Instead of Water
Switch plain water for a rich broth—beef, vegetable, or chicken. The broth imbues the rice with a complexity and depth of flavor that water alone cannot achieve, elevating it to a whole new level of deliciousness.
2. Toast the Rice
Begin by toasting the rice in a bit of butter or oil until it reaches a light golden brown. This step not only imparts a subtle nutty flavor but also helps the grains stay separate and fluffy after cooking.
3. Add Aromatics and Spices
Aromatics are key! Sauté onions, garlic, or shallots in the pot before adding your rice. Introduce spices like cinnamon, cardamom, or star anise, and herbs such as thyme, rosemary, or bay leaves early on. These additions infuse the rice with delightful fragrances and flavors that captivate the senses.
4. Perfect the Liquid-to-Rice Ratio

Continue reading this amazing article on the next page

Read More

Use salt in the toilet: Grandma’s foolproof trick!

Maintaining a clean and hygienic toilet is crucial for the overall cleanliness of your bathroom. Over time, limescale, residue, and bacteria can accumulate, turning this essential household fixture into a breeding ground for germs. While regular cleaning is necessary, it might not always be sufficient to tackle the tougher stains and build-up.
Enter the timeless wisdom of grandma’s household tricks: using salt. This simple yet effective method can restore your toilet to its original shine, leveraging salt’s natural abrasive and deodorizing properties.
Why Use Salt in the Toilet Bowl?
Descales Surfaces: Salt’s abrasive action helps remove limescale and yellow stains that cling to the bottom of the toilet bowl and shower walls.
Natural Stain Remover: Beyond its descaling abilities, salt acts as a natural stain remover.
Eliminates Bad Odors: It also combats and neutralizes unpleasant smells, ensuring your bathroom remains fresh.
Unclogs Toilet Pipes: Salt can help clear blockages in your toilet’s plumbing, especially from improper disposal of items like tampons or wipes.
How to Use Salt for Toilet Maintenance

Continue reading this amazing article on the next page

Read More

Unbelievable Results: Mixing Detergent with Salt

In the realm of household cleaning, combining common ingredients can sometimes yield unexpectedly effective results. One such combination is detergent mixed with salt – a duo that might seem unusual at first but offers a range of cleaning benefits. Here’s a closer look at how you can use this mixture for various cleaning tasks.
1. Removing Stains from Clothing
Detergent is already a staple in laundry care, but when combined with salt, its stain-removing power is significantly enhanced. Salt acts as a gentle abrasive, helping to lift stains from fabric fibers. This mixture works wonders on tough stains like red wine, grass, and even blood. Simply apply the mixture to the stain, gently rub it in, and then wash as usual.
2. Cleaning Greasy Pans and Dishes
The grease-fighting ability of detergent is well-known, but adding salt can make it even more effective, especially for stubborn, baked-on grease. The abrasive nature of salt helps to scour away the grease without damaging your cookware. This makes it ideal for cleaning greasy pans, ovens, and stovetops.
3. Refreshing Cutting Boards

Continue reading this amazing article on the next page

Read More

How To Make Hashbrown Casserole

Get ready to elevate your breakfast game with this mouthwatering Hashbrown Casserole recipe. Perfect for lazy weekend brunches or busy weekday mornings, this dish combines the comforting flavors of crispy hashbrowns, savory cheese, and creamy sauce for a satisfying meal that’s sure to please the whole family. Whether you’re hosting a crowd or simply craving a hearty breakfast, learning how to make Hashbrown Casserole will become a staple in your recipe repertoire. Follow along as we guide you through the steps to create this irresistible dish that will have everyone coming back for seconds.

Ingredients:

  • 30 oz frozen shredded hash brown potatoes thawed
  • 2 tbsp olive oil
  • 1 yellow onion diced
  • 3 large garlic cloves minced
  • 1/4 cup…

Continue reading all ingredients & instructions on the next page

Read More