Day: February 15, 2024

The Military Method: Falling Asleep in Just 2 Minutes

In the quest for a good night’s sleep, many of us toss and turn, counting sheep, and trying various tricks to drift off. However, there’s a technique used by the military that’s designed to help you fall asleep in just 2 minutes. It’s surprisingly simple and incredibly effective, making it a perfect addition to anyone’s nighttime routine.

The Origins of the Technique

Developed to ensure soldiers remained alert and refreshed even in the most challenging environments, this method focuses on relaxing the body and mind quickly. It’s said that with practice, anyone can master this technique, enjoying the benefits of a restful night’s sleep.

Step-by-Step Guide to the Military Sleep Technique

1. Relax Your Facial Muscles:

Begin by focusing on your face. Close your eyes and take a deep breath. Exhale slowly and allow every muscle in your face to relax. This includes your jaw, tongue, and the muscles around your eyes.

2. Drop Your Shoulders:

Lower your shoulders as far down as they’ll go. This action releases tension stored in your shoulder muscles. Follow by relaxing your upper and lower arm on one side, and then the other.

3. Breathe Out and Relax Your Chest:

Continue reading preparation on the  next page

Read More

Avoid These 6 Common Cucumber Planting Mistakes for a Bountiful Harvest

When it comes to planting cucumbers, avoiding common mistakes is essential to ensure a successful and productive crop. In this article, we will highlight six crucial errors that you should steer clear of in your cucumber gardening endeavors. By learning from these mistakes, you’ll be on your way to growing healthy, delicious cucumbers in your own backyard.

    1. Neglecting Proper Soil Preparation:
        • Failing to prepare the soil adequately can lead to poor drainage, nutrient deficiencies, and stunted cucumber growth. Learn how to create the ideal soil environment for your cucumbers.

    2. Overcrowding Seedlings:
      • Planting cucumber seedlings too closely together can result in competition for resources, reduced air circulation, and increased susceptibility to diseases and pests. Discover the right spacing for optimal cucumber growth.
    1. Inadequate Sunlight:
      • Cucumbers thrive in full sun, so insufficient sunlight can lead to weak plants and lower yields. Find out how to choose the right location and provide ample sunlight for your cucumber patch.
    2. Irregular Watering:
        • Over- or under-watering your cucumber plants can lead to stress, blossom-end rot, and bitter-tasting cucumbers. Learn how to establish a consistent watering routine to keep your cucumbers healthy and hydrated.

    3. Ignoring Pest and Disease Prevention:
      • Cucumber plants are vulnerable to various pests and diseases. Neglecting preventive measures can lead to devastating infestations. Discover ways to protect your cucumbers from common threats.
  1. Neglecting Pruning and Training:
    • Properly pruning and training cucumber vines can improve air circulation, reduce disease risk, and promote better fruit development. Learn the techniques to maximize your cucumber’s potential.

By avoiding these six common cucumber planting mistakes, you can increase your chances of a bountiful cucumber harvest and enjoy a season of fresh, crisp cucumbers straight from your garden.

Read More

Utilize Salt for Toilet Cleaning

Utilize Salt for Toilet Cleaning: Grandma’s Secret!

Salt, a kitchen staple, emerges as an unexpected hero for maintaining a pristine toilet. Who would have thought that a mere 100 grams of this common ingredient could be the key to ensuring a dazzlingly white toilet?

The Quest for a Gleaming Bathroom:

We all aspire to have a flawlessly clean bathroom, and the toilet often requires special attention. Despite the abundance of cleaning products on the market, many are harsh and pose risks to ceramic surfaces and our health due to their potent chemical composition.

A Simple yet Powerful Salt Solution:

Fear not, as a gentler and effective solution might already be in your kitchen cabinet. Let’s delve into how ordinary kitchen salt can be transformed into a potent cleaning agent for your bathroom fixtures. Here’s an uncomplicated recipe for a DIY salt-based cleaning mixture:

A handful of baking soda

100 grams of coarse salt

100 ml of water

Method:

Mix It Up: Combine coarse salt and baking soda in a bowl. Gradually stir in water until a creamy consistency is achieved. This traditional remedy proves surprisingly effective.

Apply with Care: Spread the mixture in the toilet, using a brush for even application. Don’t flush; let it sit overnight.

Morning Shine: Flush in the morning to reveal a brilliantly clean and whitened toilet.

Additional Tips:

For Limescale: Enhance potency against limescale by adding white vinegar to the mix.

Not Just for Toilets: This mixture works wonders on other bathroom surfaces, including tiles.

This DIY cleaning solution not only delivers an impressively clean and white toilet but also safeguards your bathroom fixtures and your health from the harsh chemicals found in many commercial cleaners.

Rediscover the enchantment of everyday household items for safe, effective, and economical cleaning solutions, starting with this simple yet remarkable salt-based mixture!

Read More

Here’s how to clean your bed pillows so they stay white and smell nice

Here’s how to clean your bed pillows so they stay white and smell nice.

Even with pillowcases protecting them, our pillows can eventually get discolored and yellowed. Sweat and other bodily fluids can leak through the fabric every night, causing dust, oil, dead skin cells, and even mites to accumulate. A clean pillow is crucial for general comfort and a restful night’s sleep for allergy sufferers. In this post, you’ll learn how to effectively clean dirty pillows from your bed, providing good sleep and restful evenings.

As with duvets, sheets, mattresses, or bed linens, selecting the correct pillow is essential for the best possible sleep, regardless of your preferences for firm or soft, feather-filled, polyester fiber, or latex. But just as crucial as the quality of your pillow is how clean it is. You need more than just a pillowcase to shield your pillow from grime and the yellow stains left by your nighttime sweats. The following advice will help you clean pillows and bring back their original white color.

How Often Do Pillows Need to Be Laundered?

Pillows should be routinely washed with bleach to stop discoloration. Sweat secretion or perspiration while sleep is the main cause of pillows turning yellow. These liquids produce an atmosphere that is favorable to the development of mites and bacteria. These microorganisms multiply in your mattress because they like wet conditions. It’s actually advised to wash your pillows at least once every six months, despite the fact that some individuals may discard their pillows at the first hint of yellow stains and others think washing pillowcases is enough to preserve their health and prolong the life of their pillows. You can wash the duvet once a year. It is possible to machine wash your cushions.

Read More

Enhance Your Roses by Planting Them Inside Tomato Slices: Surprising Results Await

Unveiling the Surprising Benefits of Planting Roses Inside Tomato Slices

Why is everyone suddenly intrigued by the idea of planting roses inside tomato slices, and why should you consider giving it a try? The answer might astonish you.

Optimal Rose Growth Tips: Achieving the Perfect Growth for Your Roses

Roses undoubtedly rank among the most captivating flowers to grace our gardens and balconies. However, not everyone is aware of the crucial factors required for their optimal growth, resulting in lush, beautiful blooms.

Here, we present some valuable tips to ensure your rose plants flourish. First and foremost, it’s important to note that roses are not particularly fond of cold temperatures, let alone frost.

Consequently, it’s advisable to cultivate them during the spring and summer seasons. During the winter and autumn months, you can utilize thermal containers to shield them from the plummeting temperatures.

In certain regions, autumn is considered the ideal time to grow roses, as the soil retains the accumulated warmth from the preceding summer. This approach results in vigorous growth, promising a splendid display in the following spring.

Moreover, some rose varieties are sensitive to excessive heat and direct southern exposure. Therefore, it’s generally recommended to position your plants in a well-ventilated area that offers protection from harsh weather conditions and extreme heat.

For those interested in creating climbing rose plants, it’s wise not to plant the roots directly against a wall. The soil near walls tends to be too dry, hindering the luxuriant growth of this magnificent plant. Planting them approximately 30 centimeters away from the wall is a more favorable approach.

But why the recent fascination with planting roses inside tomatoes? Below, we elucidate the rationale behind this practice.

Planting Roses Inside Tomato Slices: Unlocking the Strength and Vitality of Your Roses

A growing number of individuals are experimenting with planting roses inside tomato slices, attributing it to the enhanced strength and vitality it imparts to these beloved flowers.

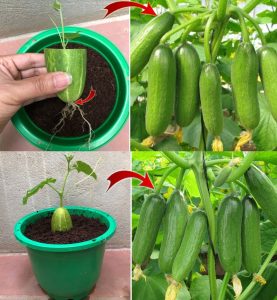
For those keen on trying this method, here are the steps to follow. Begin by selecting rose branches from your plants, ensuring they are approximately 20 cm in length. After removing the thorns, take a tomato and slice it, creating a wedge.

Next, insert the rose branch into the center of the tomato and continue burying it until the fruit completely covers the branch.

Over time, you will observe a rejuvenation in the rose plant, with healthier leaves and more vibrant colors. Furthermore, after roughly a month and a half, you can choose to transplant the rose to a location where it can thrive with more space.

You will be amazed to find that the branch has developed an abundance of roots, rendering it an entirely independent plant. This ingenious technique can be applied to all the rose plants in your home and garden, offering instant and long-lasting benefits, even within a few months.

Read More

The lemon juice trick to recover and make orchids bloom

Orchids are a delightful addition to any home, offering both beauty and a pleasant aroma. To ensure they thrive, it’s essential to understand their daily care needs. Discover the surprising benefits of using lemon juice for their upkeep. This simple yet effective method is likely to become a favorite in caring for these exquisite blooms.

These ornamental plants can be quite challenging to maintain. However, there’s an easy trick to simplify their care – using lemon juice in their water. This little-known secret is key to keeping them in top health.

Orchids require specific care to flourish, mirroring their natural habitat in tropical forests. They thrive in environments that are moist, dimly lit, and warm. Understanding how to water and feed orchids is crucial for their wellbeing.

Why add lemon juice to orchids?

Lemon is packed with vitamins and minerals beneficial for plants. It possesses antibacterial properties and is rich in Vitamin C, B vitamins, potassium, and magnesium. These nutrients contribute to the orchids’ vibrant flowers and glossy leaves. Occasionally adding a few drops of lemon juice to their water can enhance soil acidity, a condition favorable for orchid growth. For glossy leaves, gently wipe them with a cloth dampened with water and lemon juice.

Watering orchids with lemon

Watering orchids should be a weekly routine, but with a twist. Add a few drops of lemon juice to warm water in a saucer, then place the orchid in it. Let it sit for 30 minutes before returning it to its usual spot. This method promotes lush leaves and stunning petals.

Feeding orchids

Orchids don’t require specialized fertilizers for blooming. Lemon juice serves as an effective, readily available fertilizer. It strengthens the root system, prevents root rot, and encourages blooming. Mix 100 milliliters of lemon juice with 3 liters of water for this homemade fertilizer, and use it every six weeks. Lemon’s mineral content nurtures the plant, bolsters its roots, speeds up growth, extends its lifespan, and enhances pest resistance.

Watering frequency for orchids

In summer, water orchids weekly, and in winter, reduce it to 2-3 times a month. Observing your orchid is key. Wilting or bending leaves indicate a need for more water, while soft, rotting leaves suggest overwatering. For optimal growth, use room temperature rainwater.

Read More

Fat Burning Juice Pineapple Lemon and Ginger

Introducing a delicious, sugar-free recipe for Pineapple, Lemon, and Ginger Fat-Burning Juice. This light and refreshing juice is not only easy to prepare but also ideal for aiding in weight loss efforts.

Ingredients:

  • 2 slices of very ripe pineapple (approximately 100g)
  • Juice of one lime
  • 1 cm piece of ginger root
  • 100 ml water

Preparation:

Continue reading preparation on the  next page

Read More

Green Thumbs Up: Grow Green Onions with Just a Towel and Water!

Unlock the wonder of home gardening, even in the smallest of spaces, with a method that’s as simple as it is gratifying. Growing green onions with just a towel and water is not just easy; it’s a delightful way to infuse your kitchen with fresh flavors and greenery. This approach transforms your windowsill into a mini garden oasis, requiring minimal effort for a rewarding experience.
Getting Started is Easy
To embark on this verdant adventure, gather a few basic supplies:
Green onion bulbs with roots
A kitchen or paper towel
A shallow dish or tray
Water
Your Step-by-Step Guide to Cultivating Green Onions
Prepare Your Bulbs:

Continue reading this amazing recipe on the next page

Read More

Southern Chicken Fried Steak with Gravy Recipe

Ah, chicken fried steak, a dish that’s the epitome of Southern comfort food, inviting cozy feelings of home cooking to your dinner table. Its origins blend the simplicity of country cuisine with influences from the German Wiener Schnitzel, creating a delectable fusion. It’s the perfect recipe for those seeking to turn an economical cut of beef into something tender, crispy, and utterly delightful. Indeed, it’s like a warm embrace on a plate after a long day.

This dish is perfectly accompanied by creamy mashed potatoes, ready to absorb all the savory gravy, and a side of buttered green beans or sweet corn on the cob for a fresh, colorful addition. And for the ultimate comfort experience, don’t hesitate to add a flaky biscuit to the spread.

Southern Chicken Fried Steak with Gravy Recipe

Servings: 4 Generous Portions

Ingredients:

For the Steak:

4 tenderized cube steaks (about 1/2 inch thick)

1 cup all-purpose flour

1 teaspoon garlic powder

1 teaspoon…

Continue reading ingredients & instructions on the next page

Read More

Stop buying potatoes

If you eat a lot of potatoes, you’ll want to consider trying this method to grow some. This super easy afternoon project can end up feeding you and your family for weeks, and it requires only minimal care.

What’s even better is that this potato tower can last throughout the growing season. Start one tower in spring to have potatoes through the summer, another in the summer to last until autumn and a final one in late summer to get you through to early winter. These towers keep warm and moist up until November, meaning you can feed your family even longer.

1-Choose the right location

Select a sunny spot in your garden or yard for the potato tower. Potatoes require at least 6 to 8 hours of sunlight daily to thrive. Once you have the location, prepare the site by removing any weeds or debris.

2-Build the tower

Construct a cylindrical tower using fencing or chicken wire. The tower should be about 2 to 3 feet in diameter and 3 to 4 feet tall. The height allows for ample space for the potatoes to grow vertically, maximizing the yield in a small area.

3-Line the tower with straw

Read More