Day: February 4, 2024

Unveiling the Nostalgic Charm of the Old Church Key

This unassuming tool, with its simple design and multifunctional capabilities, played a crucial role in the kitchen. Let’s take a nostalgic journey into the past and explore the art of using the old church key to unlock the delectable world of sardines.

The Old Church Key:

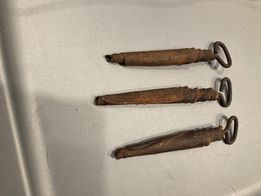
The old church key, also known as a can opener, was a manual device characterized by a pointed, triangular end for piercing cans and a curved, serrated edge for levering and opening them. Made of durable materials like steel, these keys were a staple in kitchens, offering a reliable means of accessing preserved foods, including the beloved sardines.

The Sardine Connection:

Sardines, packed in metal tins for preservation, required a tool capable of puncturing the can and providing an effective means of leverage. The old church key proved to be the perfect companion for this task. Its pointed end easily pierced the lid of the sardine tin, while the curved edge efficiently lifted the lid, revealing the savory treasures within.

Nostalgia and Practicality:

While modern can openers have taken over the kitchen, the old church key remains a symbol of nostalgia, carrying memories of simpler times. Its straightforward design and reliable functionality showcase the ingenuity of past generations in solving everyday challenges.

Read More

Mastering Pecan Tarts

Anyone planning to make pecan pies this Thanksgiving? Well if you’re looking to save a bit of time, and still make a total crowd-pleasing dessert, allow me to recommend these adorable little Easy Mini Pecan Tarts!

Ingredients:

1- 3oz. pkg. cream cheese, softened

1 stick of margarine or butter, softened

1 C. flour

Dash of salt

Blend together cream cheese, margarine, flour and salt. Shape into 24 balls; press each ball into 1 3/4? muffin tins (press dough in bottom and sides with fingers, do not leave any holes).

Filling:

2 eggs, beaten

1 C. brown sugar

2 T. margarine or butter, melted

1 tsp. vanilla

Dash of salt

1 C. pecans, chopped

How to make it :

Read More

Grow Cucumbers in a Herringbone Pattern

Cucumbers are a staple in many gardens due to their relatively easy cultivation process and versatile use in the kitchen. One innovative method to maximize yield and garden aesthetics is growing cucumbers in a herringbone pattern. This method not only optimizes space but also promotes healthier plants. Here’s how and why you should consider this pattern for your cucumber plants.

The Benefits of a Herringbone Pattern

Maximizes Space: The herringbone pattern allows you to plant more cucumbers in a limited area.
Improves Air Circulation: The arrangement promotes better airflow between the plants, reducing the risk of diseases.
Enhances Sunlight Exposure: Each plant receives ample sunlight, essential for growth and fruit production.
Facilitates Harvesting: The clear structure of the herringbone pattern makes it easier to spot and pick the cucumbers.
Aesthetic Appeal: The distinctive pattern adds an element of visual interest to your garden.

Step 1: Planning Your Space

Location: Choose a sunny spot in your garden. Cucumbers require full sun to thrive.
Soil Preparation: Ensure the soil is rich, well-draining, and slightly acidic to neutral (pH 6.0-7.0). Enrich the soil with compost or well-rotted manure before planting.
Spacing: Plan for each cucumber plant to have at least 18 inches of space on all sides to accommodate the spread of the herringbone pattern.

Step 2: Creating the Herringbone Structure

Read More

Raspberry Fudge Jam Recipe

Indulge your taste buds with the luscious sweetness of our Raspberry Fudge Jam!

Ingredients:

  • – 5 cups raspberries
  • – 1/2 cup cocoa
  • – 1 1/2 tsp vanilla
  • – Sure-Jell pectin
  • – 5 cups sugar

Instructions:

Read More

Rust Removal for Doors and Windows

Rain brings with it humidity problems into the home, and is also capable of lifting paint and causing rust stains to appear on metal surfaces, especially those of windows and exterior doors.

Rust is a reaction that occurs when iron in metals comes into contact with oxygen and water, causing corrosion of surfaces. In this article we suggest 4 tricks for removing rust from doors and windows.

Rust is not only an aesthetic problem, but can weaken objects, making them less efficient. In the case of doors and windows, if not resolved in time, the rust problem can negatively affect the functioning of the objects.

1. Remove rust with aluminum foil

As bizarre as it may seem, this method is one of the most effective against rust.

Cut pieces of aluminum foil and make balls of about 3 centimeters in diameter, then immerse them in water for 1 minute. Rub the balls on the rusty metal parts and you will see how they come back like new.

2. Remove rust with lemon

Continued on next page

Read More

Homemade Corn Dogs

These corn dogs will be the hit of the party. A cornbread like batter that’s light and savory with the addition of buttermilk, smothers the hot dog perfectly. Perfectly tender on the inside with a nice crunch on the outside. Exactly how a corn dog should be. Nothing beats a corn dog fresh from the skillet straight to your mouth. Top with your favorite spices and make the party in your mouth.
One of the best things about making corn dogs at home is the fun your kids will have helping you. I let them mix the cornbread mixture, skewer the sausages, and the best part, dip them in! The adults have to do the frying, but the kids will love helping with everything else. And the whole family will love their taste. You may never buy a corn dog at the fair again!
What you need for easy corn dogs
Always use your favorite brand of hot dog to ensure the best flavor your family will love. These corn dogs will become a family favorite in no time! All measurements for your homemade corn dogs can be found in the recipe card below.

Ingredients:

°Canola oil for frying
°12 hot dogs of regular size and thickness
°12 hot dog or lollipop sticks, candy sticks, wooden skewers, etc.
°1 cup all-purpose flour
°1 cup fine cornmeal
°Half a teaspoon of salt
°2 tablespoons of granulated sugar
°1 tablespoon baking powder
°1 large egg
°2 tablespoons of honey
°1 cup of milk
°Half a cup of milk

Directions:

Read More

Optimal Practices for Successful Dragon Fruit Cultivation

Growing dragon fruit is an exciting venture for any gardening enthusiast, offering both aesthetic appeal and delicious rewards. However, the journey to cultivating these exotic fruits can be fraught with pitfalls if one is not careful. In this article, we’ll explore five critical mistakes to avoid when growing dragon fruit, ensuring your gardening efforts lead to bountiful harvests.

1. Underestimating the Importance of Pot Size

A fundamental mistake many new dragon fruit growers make is choosing a pot that’s too small for their plant. Dragon fruit plants require ample space to thrive, as their root systems are extensive and need room to grow. Opting for a large pot, at least 20 gallons in size, is advisable. This not only accommodates the plant’s growth needs over several years but also obviates the need for frequent repotting. A larger pot also allows for the establishment of a sturdy trellising system, encouraging vertical growth and facilitating easier management and harvesting of the fruit.

2. Overwatering: A Common Pitfall

While dragon fruit, being a tropical cactus, requires more water than its desert counterparts, overwatering can lead to detrimental effects such as root rot. The balance in watering is crucial; the soil should be allowed to dry out between waterings to prevent moisture-related diseases. Paying attention to the pot’s size, as mentioned earlier, can help mitigate this issue by providing a buffer against overwatering, thanks to the larger soil volume’s moisture retention properties.

3. Neglecting Proper Training and Pruning

The structural integrity and productivity of your dragon fruit plant can be significantly impacted by how well you train and prune it. Without proper guidance, the plant may grow in an uncontrolled manner, leading to less fruit production and potentially damaging the plant’s structure. Regularly training your dragon fruit plant to grow upwards and pruning excessive growth ensures that energy is directed towards fruit production rather than unnecessary vegetative growth.

Read More

Cookies for a Healthy Indulgence

In today’s health-conscious world, many people are striving to make smarter dietary choices. One common culprit that individuals try to reduce or eliminate from their diets is sugar. Fortunately, you can still satisfy your sweet tooth with delicious and nutritious treats such as sugar- and flour-free energy cookies. In this article, we’ll guide you through a simple recipe to create these delicious, guilt-free, energy-packed snacks.

The Ingredients You Will Need:

Before we delve into the recipe, let’s take a look at the healthy ingredients needed to make these sugar-free and flourless energy cookies:

  1. Walnuts Galore
    • 100 grams of peanuts
    • 50 grams of walnuts
    • 50 grams of almonds
  2. Crispy Seeds
    • 30 grams of pumpkin seeds
    • 40 grams of sunflower seeds
    • Flax seeds, sesame seeds, and poppy seeds (add to taste)
  3. Natural Sweeteners
    • 1 egg
    • Honey (to taste)

Making Your Energy Cookies:

Read More