Day: January 10, 2024

How to Cook and Eat an Artichoke

Ingredients

1 or more large globe artichokes

1-2 cloves garlic, cut in half (can leave skin on)

bay leaf

1 slice lemon

Method

  1. Cut off the tips of the leaves:

    If the artichokes have little thorns on the ends of their leaves, take kitchen scissors and cut off the tips. This step is mostly for aesthetics as the thorns soften with cooking and pose no threat to the person eating the artichoke. But snipping them off will make the artichokes easier to handle.

  2. Slice off the top of the artichoke:

    Slice about 3/4 inch to an inch off the tip of the artichoke. A serrated bread knife works great for this.

  3. Remove small leaves at the base:

    Pull off any smaller leaves towards the base and on the stem.

  4. Cut off excess stem:

    Cut off excess stem, leaving up to an inch on the artichoke. The stems can be more bitter than the rest of the artichoke, but some people like to eat them. The inner cores of the stems taste like the heart.

    Alternatively, you can leave the whole long stem on the artichoke, just cut off the very end of the stem, and peel the tough outside layer of the stem with a vegetable peeler.

  5. Rinse the artichokes:

    Rinse the artichokes in running cold water. While you rinse them, open up the leaves a little so that the water gets inside more easily. (This is where it helps to have cut off the thorny tips, it makes the artichoke easier to open without getting poked!)

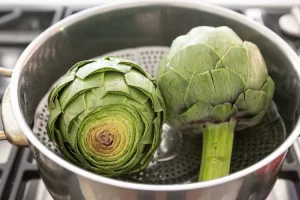
  6. Set up a pot with some water, aromatics, and a steaming basket:

    In a large pot, put a couple inches of water, the garlic, a slice of lemon, and a bay leaf (this adds wonderful flavor to the artichokes). Insert a steaming basket.

  7. Steam the artichokes:

    Place artichokes on top of the steaming basket. Cover the pot. Bring to a boil and reduce heat to simmer.

    Cook for 25 to 35 minutes or longer, until the outer leaves can easily be pulled off. Note you may need to add more water to the pot if the level drops too low, so keep an eye on it.

    Note: artichokes can also be cooked in a pressure cooker (about 5-15 minutes at high pressure). Cooking time depends on how large the artichokes are. The larger, the longer they take to cook.

How to Eat an Artichoke

Read More

Growing Papaya Trees at Home

Papaya trees, with their luscious fruit and tropical charm, can thrive in your home garden. Here’s a step-by-step guide to growing a papaya tree at home:

1. Selecting Papaya Seeds:

  • Opt for seeds from a ripe and healthy papaya.
  • Scoop out the seeds, wash off any residue, and let them dry for a day.
  • Choose non-hybrid seeds for better chances of a fruitful tree.

2. Preparing the Planting Site:

  • Papayas love sunlight. Choose a location that receives at least six hours of direct sunlight daily.
  • Ensure well-draining soil with a slightly acidic to neutral pH.

3. Planting Papaya Seeds:

  • Plant the seeds directly into the soil, about half an inch deep.
  • Space multiple seeds at least 8-10 feet apart, as papaya trees can grow quite large.

4. Watering:

Read More

Broccoli and Cheddar Stuffed Chicken Breasts

Elevate your dinner table with the delectable combination of tender chicken breasts, vibrant broccoli, and gooey cheddar cheese. This Broccoli and Cheddar Stuffed Chicken Breasts recipe is a symphony of flavors and textures, creating a satisfying and wholesome dish that’s sure to become a family favorite. Follow this straightforward recipe to bring a touch of culinary delight to your kitchen.

Ingredients:

  • 4 boneless, skinless chicken breasts
  • 1 cup broccoli florets, finely chopped
  • 1 cup sharp cheddar cheese, shredded
  • 1/4 cup mayonnaise
  • 2 cloves garlic, minced
  • 1 teaspoon Dijon mustard
  • 1 teaspoon dried thyme
  • Salt and pepper, to taste
  • Olive oil, for brushing

Instructions:

  1. Preheat Oven: Preheat your oven to…

Continue reading instructions on the next page

Read More

Don’t wreck your flat screen TV

Flat-screen TVs are great when it comes to picture quality. But they’re kind of a pain when it’s time to clean them. You have to be extra careful to not damage the screen and you can only use certain types of products. Sometimes it doesn’t even seem worth it to have a flat screen!
Before you trade in your flat-screen TV for an older model, try some of these cleaning tips. Just make sure that you always start by wiping away the dust with a soft, dry microfiber cloth. Sometimes that’s all it takes, but for those times when you need to do a little deeper cleaning, we’ve got some tips to help you out.

1. Vinegar

Gently wipe the screen with a dry microfiber cloth to remove any dust particles. Mix a solution of equal parts distilled water and white vinegar. Dip your cloth in this mixture and squeeze out as much liquid as you can. Wipe across the screen carefully with the damp rag and then wipe over it again with a dry rag to remove any excess moisture.

2. Window cleaner

If you have a glass-tube television, then window cleaner (preferably Windex) can be used to clean the screen. Spray the window cleaner on a soft cloth and wipe the screen. Never spray anything directly onto the television screen! After you’ve used the damp side of the cloth, flip it over to the dry side and buff the screen dry.

3. Dish soap

Read More

Grandma’s Zucchini Relish

Most people make relish out of cucumbers, but my Grandma was always known for her zucchini relish.

Since Grandma passed this recipe down to me, I have absolutely fallen in love with it. It requires very few ingredients to prepare and the taste is outstanding!

We use zucchini relish as a condiment for hot dogs and hamburgers. However we also use it to brighten up our deviled eggs, egg salad and even in our ham salad recipes.

It is a great staple to have in the pantry or to share with friends.  Best of all, you know that you made it yourself!

Yields: 8-9 pints

Ingredients:

  • 10 cups zucchini
  • 3 cups onions
  • 4 red bell peppers
  • 5 tablespoons salt
  • 3 cups sugar
  • 1 teaspoon turmeric
  • 3 cups apple cider vinegar
  • 1 teaspoon dry mustard
  • 1 teaspoon coarse black pepper
  • 1 teaspoon celery seed

Instructions:

Continue reading instructions on the next page

Read More

Homemade Canned French Fries

Crispy Perfection: The Art of Canning and Frying Homemade French Fries

Imagine the joy of enjoying perfectly crispy and golden-brown French fries right at home, without the need for a trip to the drive-thru.

With the technique of raw-packing and dry canning, you can preserve the harvest from your potato garden and have a ready-to-fry supply of French fries whenever you desire. In this article, we will explore the process of canning French fries and share tips for achieving that ideal texture. Get ready to delight your taste buds with homemade canned French fries that will take your fry game to the next level.

Recipe: Homemade Canned French Fries

Ingredients:

  • Fresh potatoes (suitable for frying)
  • Water
  • Salt (optional)

Instructions:

Read More

Effortless Plant Watering: Your Solution to Vacation-Proof Greenery

A quick and easy method allows you to water plants even when you are forced to stay away from home for a while.Anyone who has one or more plants in the house or garden knows how important it is to pay special attention  to watering  , in order to make the  plants vigorous and luxuriant  and to guarantee a long life for the plants. Care and dedication are therefore necessary to be able to fully admire the beauty of your plants.

But what do you do when you have to be away from home for a while? The first thing that comes to mind is  to contact a trusted person  (friends, relatives, partners, work colleagues) to water the plants. However, there is also a method that allows plants to continue to get the necessary watering even without turning to other people.

Watering plants even when you’re not at home: the foolproof method

Continue reading this amazing article on the next page

Read More

How to grow lychee from seeds

Lychee, a tropical fruit native to Southeast Asia, is renowned for its distinct flavor and is becoming increasingly popular for home gardening. Growing lychees in pots is an excellent method, particularly for those with limited space or residing in non-tropical climates.

Lychee Seeds: Best Varieties for Potted Growth While specific varieties best suited for pot cultivation were not detailed in the sources, generally, smaller, dwarf varieties of lychee are recommended. These varieties are more manageable in size and are often bred for enhanced flavor and increased fruit production.

Steps for Planting Lychee Seeds in Pots

  1. Seed Preparation: Soak lychee seeds in water for 24 hours to soften the seed coat, aiding in germination.
  2. Potting: Use a well-draining potting mix in a seed tray or small pots. Plant the seeds in the soil after soaking, covering them lightly.
  3. Germination: Maintain consistent soil moisture during germination, taking 2 to 6 weeks. Avoid waterlogging.
  4. Transplanting: Once seedlings develop a few leaves, transplant them into larger pots with adequate drainage.

Lychee Plant Care:

Read More

Yellow Cake Mix Chocolate Chip Bars Recipe

Satisfy your sweet cravings with these irresistibly easy Yellow Cake Mix Chocolate Chip Bars. Perfect for those moments when you’re in need of a quick and delightful treat, these bars come together effortlessly with the help of a yellow cake mix. Packed with gooey chocolate chips and a buttery richness, this dessert requires minimal effort for maximum flavor. Whether you’re a seasoned baker or just starting in the kitchen, these bars are a guaranteed crowd-pleaser. So, preheat your oven, gather your ingredients, and get ready to enjoy a deliciously simple dessert in no time!

Ingredients:

  • 15.25 ounces box yellow cake mix
  • 2 large eggs, beaten
  • 5 tablespoons salted butter, melted
  • 12 ounces semi-sweet chocolate chips

Preparation:

Continue reading preparation on the next page

Read More

How To Make Ricotta Stuffed Shells

Transform a simple pasta dish into a culinary masterpiece with this delightful Ricotta Stuffed Shells recipe. These large pasta shells generously filled with creamy ricotta cheese and savory herbs are baked to perfection in a luscious marinara sauce. A comforting and indulgent dish, this recipe combines the richness of ricotta with the warmth of Italian spices, creating a symphony of flavors in every bite. Gather your ingredients and get ready to impress your taste buds and those around your table with this satisfying and classic Italian-American dish.

Ingredients:

  • 1 box (12 ounces) jumbo pasta shells
  • 2 cups ricotta cheese
  • 1 cup shredded mozzarella cheese
  • 1/2 cup grated Parmesan cheese
  • 1 large egg
  • 2 tablespoons fresh parsley, finely chopped
  • 1 teaspoon dried oregano
  • 1 teaspoon dried basil
  • 1/2 teaspoon garlic powder
  • Salt and pepper to taste
  • 2 cups marinara sauce (store-bought or homemade)
  • Additional shredded mozzarella and Parmesan for topping

Instructions:

  1. Preheat Oven: Preheat your oven to…

Continue reading instructions on the next page

Read More