Day: January 3, 2024

Stop Buying Avocado, Learn How To Grow it at Home

Avocado has gained immense popularity in recent years due to its delicious taste and numerous health benefits. Instead of constantly buying avocados from the store, why not try growing them at home? Growing avocados not only provides you with a fresh supply of this nutritious fruit but also offers a rewarding and fun gardening experience. In this article, we will provide you with a comprehensive guide on how to grow avocados at home.

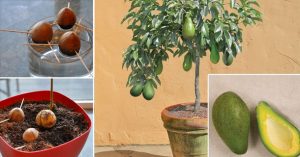
  1. Choosing the Right Avocado Variety: There are several avocado varieties available, but not all of them are suitable for home cultivation. It’s important to select a variety that is well-suited to your climate and growing conditions. Some popular varieties for home growing include Hass, Fuerte, Bacon, and Reed. Research the specific requirements of each variety to make an informed decision.
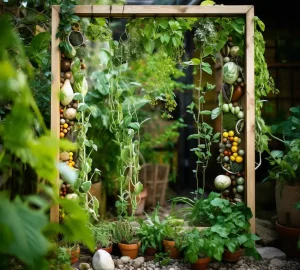
  2. Gathering the Necessary Supplies: To grow avocados successfully, you’ll need a few essential supplies. These include an avocado seed or a nursery-bought avocado plant, a large pot or container with good drainage, high-quality potting soil, organic fertilizer, and a sunny spot in your garden or a suitable indoor location.
  3. Growing Avocado from Seed: If you choose to grow avocado from seed, here’s a step-by-step process:

Continue reading the process on the next page

Read More

The Best Grilled Chicken Wings Recipe. Don’t lose it !

Get ready for a culinary adventure with our Grilled Chicken Wings recipe! Packed with a medley of tantalizing flavors, these wings are a perfect blend of spice and succulence. From the carefully selected combination of seasonings to the grill’s smoky embrace, each step promises to elevate your taste buds to new heights. Join us as we embark on a journey to create the perfect grilled chicken wings that will undoubtedly become a favorite at your table. Let the grilling begin! 🍗🔥

Ingredients:

  • 2 lbs chicken wings
  • 5 tablespoons cornstarch
  • 2 tablespoons cornflour
  • 1 tablespoon brown sugar
  • 2 teaspoons salt
  • 1 teaspoon paprika
  • 1 teaspoon onion powder
  • 1 teaspoon garlic powder
  • 1 teaspoon dried thyme
  • 1/2 teaspoon black pepper
  • 1/2 teaspoon chili powder
  • 2 tablespoons olive oil

Instructions: 

Continue reading instructions on the next page

Read More

7 Good Reasons to Never Throw Away Your Eggshells Again

Eggshells are more than just waste from your breakfast routine; they’re tiny treasures packed with incredible benefits for your garden, health, and household. Before you toss them in the trash, consider these seven compelling reasons to make the most out of your eggshells.

1. Fertilize Your Garden: Crushed eggshells are an excellent source of calcium for your plants. Simply sprinkle crushed shells around the base of your plants to enrich the soil and promote healthy growth. The calcium also helps prevent blossom-end rot in tomatoes and peppers.

2. Pest Deterrent: Save your eggshells to create a natural barrier against garden pests like snails and slugs. The sharp edges of crushed eggshells act as a deterrent, protecting your plants without harmful chemicals.

3. Coffee Buddy:

Continue reading all reasons on the next page

Read More

Easy and Simple Hamburger Stew

Ideal for colder weather, this Easy Hamburger Stew is the epitome of comfort food. Tender beef, potatoes, onions, celery, peas, and carrots simmer in a flavorful broth until melt-in-your-mouth perfection. It’s a comforting journey to food heaven!

Ingredients:

  • 1 (2 lb) boneless beef round steak, cut into 1-inch cubes
  • Salt and pepper to taste
  • 1/4 cup all-purpose flour
  • 1 tbsp smoked paprika
  • 1 tbsp canola oil
  • 3 cups chopped onion
  • 6 cloves garlic, minced
  • 4 tbsp tomato paste
  • 2 cups dry red wine
  • 1 tbsp dried thyme
  • 1 tbsp dried rosemary
  • 1 tbsp herbes de Provence
  • 3 bay leaves
  • 2 cups beef broth (or more as needed)
  • 1 tbsp Worcestershire sauce
  • 3 cups chopped carrots
  • 3 cups cubed Yukon Gold potatoes
  • 1 cup fresh peas
  • 1 1/2 tsp chopped fresh rosemary
  • 1 tsp chopped fresh thyme (or to taste)

Instructions:

Continue reading instructions on the next page

Read More

Yummy Italian Cake Recipe

Embark on a delightful journey with our Yummy Italian Cake, a slice of heaven crafted with love and a dash of Italian flair. Moist layers, rich flavors, and a touch of sweetness come together in this culinary masterpiece. Elevate your dessert experience and savor the taste of Italy in every bite. Let’s indulge in a symphony of flavors with this irresistible treat! 🍰🇮🇹

Ingredients:

  • °1 lemon juice
  • °1 lemon zest
  • °100g. almond powder
  • °2 tablespoon(s) Maizena
  • °100g. sugar
  • °3 expansive eggs
  • °250g. Ricotta

Methods :

1. Preheat your stove to 180°C.

2. Split the eggs into a expansive bowl and include the powdered sugar. Blend everything.

3. Include the Ricotta and the cornstarch, proceed to blend briskly until you get a pleasant homogeneous glue.

4. Include the…

Continue reading all method & tips on the next page

Read More

Rolo Pecan Pretzel Nibbles Recipe

Ingredients:

100 Rolo candies, unwrapped

100 pecan halves

100 little pretzels

Instructions:

Preheat your broiler to 300°F (150°C). Line a cookie sheet with material paper.

Arrange the little pretzels in a single layer on the arranged cookie sheet.

Place a Rolo sweet on beat of each pretzel.

Bake within the preheated stove for approximately 3 minutes.Keep a near eye to anticipate burning.

Remove the cookie sheet from the broiler and promptly press a pecan half into each Rolo whereas it’s still hot. The Rolo ought to relax and follow to the pretzel.

Allow the Rolo Pecan Pretzel Chomps to cool totally some time recently serving.

Once cooled, the candies will have a delightful combination of sweet, chewy caramel from the Rolo, a crunchy pretzel, and a nutty pecan.

Enjoy these scrumptious and easy-to-make treats as a delightful nibble or share them with companions and family!

Popular questions and their answers related to Rolo Pecan Pretzel Chomps Recipe:

Please continue reading popular questions & tips on the next page

Read More

Deliciously Caramelized Sweet Potatoes Recipe

Transform your sweet potatoes into a culinary masterpiece with this simple yet flavor-packed recipe.

A true delight for the taste buds, these oven-baked sweet potato halves are coated in a savory blend of olive oil, pink salt, and dried thyme, resulting in a caramelized perfection.

Easy to prepare and bursting with natural sweetness, this dish is a go-to for those who appreciate simplicity with a gourmet twist. Let’s dive into the delightful world of perfectly baked sweet potatoes!🍠✨

Certainly! Here’s a concise recipe for your sweet potatoes:

Ingredients:

  • 4-5 sweet potatoes, cleaned and cut crosswise
  • Olive oil
  • Pink salt or kosher salt
  • Dried thyme

Instructions:

Continue reading instructions on the next page

Read More

Pineapple Dream Dessert Recipe

Indulge in the dreamy flavors of our Pineapple Dream Dessert, a delightful treat that combines the perfect balance of sweetness and creaminess. The layers of this heavenly dessert are crafted with care, starting with a luscious graham cracker crust made from a blend of graham cracker crumbs, melted butter, and a touch of granulated sugar.

Moving on to the heart of this dessert, the filling features a velvety combination of softened cream cheese, powdered sugar, and the aromatic essence of vanilla extract. The addition of crushed pineapple lends a refreshing and tropical twist, creating a harmonious medley of flavors. To achieve the ideal light and airy consistency, we gently fold in whipped cream or whipped topping, ensuring a smooth and decadent filling.

Assembling this culinary masterpiece is a breeze – simply spread the cream cheese and pineapple mixture over the buttery graham cracker crust in a 9×13-inch baking dish. Elevate the experience with a layer of whipped cream or whipped topping as a sumptuous topping. For those seeking an extra touch of flair, a sprinkle of shredded coconut and chopped nuts provides an optional, yet delightful, garnish.

Before serving, allow the Pineapple Dream Dessert to chill in the refrigerator for at least 4 hours, or preferably overnight, allowing the layers to set and intensify the flavors. Once ready, cut into squares and savor the cool, creamy bliss of this sensational dessert. Embrace the versatility of this recipe by personalizing it with your favorite toppings or adjusting the sweetness to suit your palate. Get ready to treat your taste buds to a dreamy pineapple paradise!

Ingredients:

For the Crust:

Continue reading all ingredients & instructions on the next page

Read More

Ultimate Guide to Raised Garden Beds

Creating a raised garden bed is a rewarding gardening project that can yield plentiful harvests and beautify your outdoor space. Here’s a detailed guide on how to plant a raised garden bed, incorporating best practices and expert advice:

1. Choosing and Preparing the Location:

  • Select a spot that receives at least six hours of direct sunlight daily.
  • Ensure the site is level and well-draining to avoid waterlogged soil.
  • Avoid placing the bed near large trees to prevent shading and root competition.

2. Selecting Materials for the Raised Bed:

  • Avoid using materials like railroad ties, tires, and certain pallets that may leach harmful chemicals into the soil.
  • Newer pallets marked with “HT” (heat-treated) are safe for use.
  • Consider purchasing a raised bed kit if you’re not comfortable building from scratch.

3. Building the Raised Bed:

Read More

DIY Bar Cart

It’s really rusty but we just took an electric drill with a wire brush attachment to it and it took majority of it off. There are still some bumpy spots in places but Its nothing I can’t deal with.

After we removed all the rust We primed and Spray painted the handles and the trays.I don’t have photos of this part but it’s pretty self explanatory. After everything dried I added a herringbone pattern to the trays using a gold Paint pen.

Read More