Month: December 2023

SAVORY CRAB STUFFED MUSHROOMS Recipe

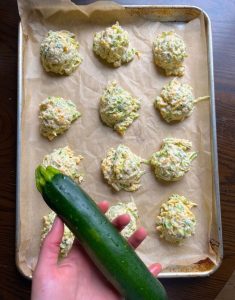
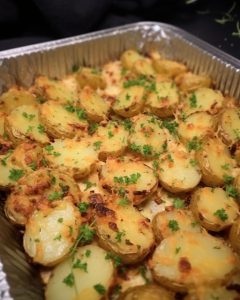
An elegant and delectable appetizer, Savory Crab Stuffed Mushrooms mixes the delicate aromas of fresh crab flesh with the earthy flavors of mushrooms and a combination of savory spices. These ingredients are stuffed inside mushrooms. These delectable treats, each of which can be devoured in just a few bites, are ideal for celebrations, get-togethers, or even just as a sweet indulgence.

These savory crab-stuffed mushrooms are a mouthwatering appetizer that mixes the natural sweetness of crab flesh with the earthy taste of mushrooms. Savory Crab Stuffed Mushrooms are a must-try! The exquisite combination of savory flavors in these bite-sized morsels is guaranteed to leave a favorable impression on your visitors. These Savory Crab Stuffed Mushrooms are the ideal dish to bring to any get-together or celebration because they include a delectable mix of tastes and textures that are sure to wow everyone in attendance.

You may give the crab filling more of a kick by including some cayenne pepper or some hot sauce into it, depending on how much heat you want. Before placing the filled mushrooms in the oven, you may add a layer of cheesy flavor by scattering some shredded cheddar or Gruyere cheese over the top of the mushrooms. If you have any extra filled mushrooms after serving them, you may keep them in the refrigerator for up to two days in an airtight container provided for that purpose. Before serving, warm the items for a few minutes in an oven that has been preheated.

Ingredients:

24 large white button or cremini mushrooms

– 8 ounces lump crab…

Continue reading all ingredients & preparation on the next page

Read More

How To Make Zucchini Drop Biscuits

Any fellow gardener knows that when the summer squash starts coming on you’ve gotta be ready with recipes or else you’ll be drowning in it! We’ve experimented with many uses over the years from “noodles” to baked goods to chips, but this was our first foray into Zucchini Biscuits… and what a successful foray it was! Sweet and nutty shredded zucchini is thoroughly drained and mixed with cheddar cheese for a savory treat that compliments any summer meal. With no kneading or rising, these biscuits couldn’t be much easier to make. Let’s get into the ingredient list…

Ingredients:

  • 1 ½ cups shredded zucchini
  • 2 ¼ cups flour
  • 2 tablespoons baking powder
  • 1 ½ teaspoons salt
  • ½ teaspoon black pepper
  • 1 teaspoon…

Continue reading all ingredients & preparation on the next page

Read More

LEMON AND GARLIC CLOVES IN A JAR

As winter sets in, the absence of fresh produce can be a challenge for home cooks seeking to infuse their dishes with vibrant flavors. However, a solution lies in the age-old technique of preserving lemons and garlic cloves in a jar. This culinary preservation method not only ensures a readily available source of bright, zesty lemons and pungent garlic throughout the colder months but also opens up a world of possibilities for enhancing a wide range of recipes.

THE METHOD:

Selecting the Ingredients: To embark on this culinary journey, start with fresh, unwaxed lemons and firm, unblemished garlic bulbs. Look for lemons with bright, unblemished skins, as these will yield the best results.

Preparing the Lemons: Wash and thoroughly dry the lemons. Cut them into quarters, lengthwise, stopping just short of the base so that the quarters remain attached.

Salting the Lemons: Generously sprinkle salt on the exposed flesh of the lemons. The salt acts as a preservative and also helps draw out the lemon juice.

Packing the Jar: Take a clean, sterilized glass jar with an airtight seal. Place a layer of coarse sea salt at the bottom of the jar, creating a bed for the lemons.

Layering with Lemons and Garlic: Nestle the salted lemon quarters into the jar, pressing them gently to release more juice. As you layer the lemons, intersperse them with peeled garlic cloves. The garlic imparts its distinct flavor and aroma to the preserved lemons.

Additional Flavorings (Optional): For added depth of flavor, consider including bay leaves, whole black peppercorns, or even a cinnamon stick. These optional additions infuse the jar with nuanced aromatic notes.

Please…Continue reading this article on the next page

Read More

City Chicken: A Culinary Classic Revisited

City Chicken, despite its name, has little to do with poultry. This cherished dish, originating from the industrial cities of the Midwest, is a testament to culinary creativity born out of necessity. Composed of cubes of veal or pork, skewered, breaded, and then baked or fried to golden perfection, City Chicken offers a tantalizing blend of flavors and textures that have stood the test of time.

City Chicken transcends generations and occasions. Its enduring popularity lies in its ability to adapt to various culinary styles and preferences. Whether served at a family gathering, a casual weeknight dinner, or a festive celebration, City Chicken’s versatility and nostalgic charm make it a beloved staple on our table.

City Chicken is more than just a dish; it’s a culinary tradition that speaks to the resourcefulness and creativity of cooks throughout history. As you savor each succulent bite, you’re not just enjoying a delicious meal, but also a piece of culinary heritage. So, roll up your sleeves, gather your ingredients, and let the enticing aroma of City Chicken fill your kitchen, creating new memories while honoring the past.

Ingredients:

Continue reading ingredients & instructions on the next page

Read More

BEEF WELLINGTON TURNOVER

A delightful variation of the classic Beef Wellington, the Beef Wellington Turnover offers the sumptuous blend of beef, mushrooms, and puff pastry in a convenient handheld format. Whether served as elegant appetizers or a unique main course, this recipe is guaranteed to leave a lasting impression on your guests. Follow these steps to create Beef Wellington Turnovers:

Ingredients:

For the Filling:

1 pound trimmed beef tenderloin

Salt and black pepper to taste

2 tablespoons olive oil

1 cup finely chopped mushrooms (cremini or button mushrooms)

2 cloves garlic, minced

1 tablespoon fresh thyme, chopped

2 tablespoons Dijon mustard

1/2 cup pâté (optional)

For the Assembly:

Continue reading all ingredients & instructions on the next page

Read More

I brought this to a potluck once, and everyone scrambled to get some

Unearth the Magic of Parmesan Baked Potatoes!

Ever found yourself completely entranced by a side dish? A dish so delightful that one serving simply doesn’t do justice? Let us introduce you to our show-stopping Parmesan Baked Potatoes. Simplicity meets extraordinary flavor in a way you’ll cherish every time.

Picture this: A sunny summer afternoon, the sizzle of burgers and hot dogs on the grill, and a gathering of loved ones in the backyard. Amidst this classic setting, a star side dish emerges – our Parmesan Baked Potatoes. Fresh out of the oven, their enticing aroma promises a culinary treat. A tantalizing crispy layer welcomes you, leading to a lusciously creamy core bursting with notes of garlic, aromatic herbs, and the crowning touch – the rich, umami goodness of Parmesan.

It wasn’t just me; these spuds captivated everyone at the barbecue. Now, they’re not just a recipe; they’re a tradition. Whenever there’s a get-together, the call for these iconic potatoes is unanimous. Dive into this flavor fest and make your next gathering unforgettable!

Ingredients:

Read More

Laundry dries in 10 minutes in this part of the house and no one thinks about it

Hey, let’s talk laundry! Specifically, about those winter months where you don’t have a dryer and need to get creative with where and how you hang up your clothes to dry. It can be a real challenge, can’t it? Clothes sprawled everywhere, taking ages to dry… But don’t worry! We’ve got some awesome tips to get your laundry dry, nice and quick.

Quick Tips for Faster Drying:

First off, did you know your washing machine has a secret weapon for faster drying? Yep, it’s the spin cycle! This super handy feature gets rid of a lot of that excess water, meaning your clothes will dry a lot faster once they’re out. People often skip it thinking it’ll make their clothes super wrinkled, but trust us, a good spin (especially at high speeds) is your friend when it comes to laundry day.
Here’s a tip: when you’re hanging up your clothes, do it carefully to avoid creases, and you might even skip the need to iron!

Using Heat Safely :

Using a heat source can speed things up, too! Pop your drying rack in front of a radiator, a warm oven, or even a fireplace (with caution!). Just make sure that your clothes aren’t too close together – they need good air circulation to dry effectively, and you want to avoid any unwanted damp smells.

Remember: If you’re using a stove for heat, keep that room well-ventilated to avoid mold!

Finding the Perfect Drying Spot:

Read More

The Ultimate Mexican Corn Dip Recipe: A Fiesta in Your Mouth!

Are you on the hunt for a dip that’s not just delicious, but also dippin’ fantastic? Look no further! Today, we’re unveiling the exact recipe for the most mouth-watering Mexican Corn Dip you’ll ever taste. Bursting with flavors, it’s the ideal accompaniment to your next taco night, BBQ, or any gathering with family and friends. Plus, it’s incredibly easy to make!

The Secrets Behind Perfect Mexican Corn Dip:

Every recipe has its secrets, and this dip is no exception:

  • Fresh Ingredients: Always use the freshest ingredients. Fresh cilantro, in particular, can make a huge difference in the overall flavor.
  • Quality Mayo and Sour Cream: The base of the dip plays a crucial role. Opt for full-fat versions for a richer taste and smoother texture.
  • Drain Well: Ensure that Mexicorn and Rotel are thoroughly drained. Too much liquid can make your dip runny and dilute the flavors.
  • Prep Time: 10 minutes
  • Cook Time: 0 minutes (That’s right! No cooking!)
  • Total Time: 10 minutes
  • Servings: 8-10 servings

Ingredients:

  • 2 cans of Mexicorn, drained
  • 1 can of Rotel (you choose – regular or hot), drained
  • 2 cups shredded cheddar cheese
  • 8 green onions, finely sliced
  • 1 cup mayo
  • 8 oz sour cream
  • 1 bunch of fresh cilantro, chopped

Instructions:

Read More

How to save an orchid after returning from vacation? Here’s how to restart your wilted plant!

Have you just returned from your summer holidays to discover that your orchid is in real agony? What to do? Is it possible to get it started again? How do I know if she’s dead? Since orchids are particularly sensitive and capricious plants, long periods without watering can be fatal. There are, however, some tips and tricks that could be very useful for giving life to this sophisticated and delicate plant. Our gardening experts explain how to save an orchid after a long absence. Follow.

How do you know if an orchid is dead?

In fact, maintaining an orchid is not that complicated, especially when you master its watering and location. But, no matter how much you worry, your longer absence, especially the lack of water intake, affects you negatively. Before taking any action, it is important to check whether your orchid is still alive and whether it can really be saved. First, examine the crown of the plant, that is, the part that joins the leaves to the base. If the leaves turn yellow, brown or fall off, your orchid is in agony. Secondly, if the roots have become all brown or dry or the main stem has lost its beautiful green color, your plant has very little chance of surviving.

However, it is crucial to note that orchids are full of surprises. So don’t be discouraged and take the necessary care to get it started. Decryption in the following paragraphs.

How to save an orchid after the holidays?

When you return from vacation, you find that your orchid is dying and dry from lack of watering. Don’t panic! If he doesn’t show any of the above signs, there is still hope. The first trick to do is to find the source of the problem. This can manifest itself in the roots or leaves. As for the roots, some may be soft, brown or rotten. Cut them using a sharp, disinfected pruning shear. The leaves of the plant would likely be yellow and wilted, or even blackened, which is usually due to lack of watering. Then, soak the orchid in water for 15 to 20 minutes to keep it hydrated.

To save the orchid after the summer holidays and give it a real boost, fertilization is also in order. However, some experts warn against using fertilizers when the plant is very fragile, as it can further damage the roots. However, you can practice this essential step when the plant has recovered a bit. In this context, it is best to use a natural orchid fertilizer and avoid harmful chemicals.

How to water an orchid when you are away to avoid saving it later?

Read More

Okra stew

Ingredients:

⅓ Cup.Of Olive Oil
A Large Chopped Onion
6 medium Carrots
2 Pounds.Of Okra
6-Ounces. Tomato Paste
Fresh Spinach; I used 1 pound
3 Garlic Cloves -Chopped
2 Tbsp.Of Bouillon Vegetable Paste
1 Tsp.Of Salt
4 Cups.Of Water
¼ Cup.Of Fresh Parsley
3 Garlic Cloves – Chopped
1 Tbsp.Of Allspice
½ Tsp.Of Black Pepper
1 Tbsp.Of Cayenne Pepper

How To Make Okra Stew:

Read More