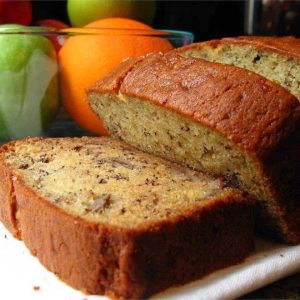
Ingredients:
- 1/2 cup butter, melted
- 1 cup white sugar
- 2 eggs
- 1 teaspoon vanilla extract
- 1 1/2 cups all-purpose flour
- 1 teaspoon baking soda
- 1/2 teaspoon salt
- 1/2 cup sour cream
- 1/2 cup chopped walnuts
- 2 medium bananas, sliced
How to Remove a Broken Key from a Lock
Minor accidents can happen anywhere and every day. Sometimes due to poor maintenance, manufacturing faults, or too much haste. One of the most common accidents is breaking a key and getting it stuck in the lock.
The worst part of this problem is that the solution cannot be postponed when it happens with house keys. Before you call a locksmith, try these tricks to remove a broken key from the lock without having to dismantle everything.
You only need a very strong magnet. If the key is stuck in a vertical position, it is very easy to remove.
Apply some lubricant on it, then take the magnet and place it on the key so that it can act. The key should stick to the magnet and come out easily.
You need needle-nose pliers or scissors with very thin tips. Lubricate the area around the key and then use pliers or scissors to grasp the end of the key protruding from the lock.
Try to gently pull out the key. Perform this movement gradually, without pulling hard: you risk pushing the key deeper into the lock.
If the key has broken in the lock but the door has remained open, you can try one of the following tricks.
Minor accidents can happen anywhere and every day. Sometimes due to poor maintenance, manufacturing faults, or too much haste. One of the most common accidents is breaking a key and getting it stuck in the lock.
The worst part of this problem is that the solution cannot be postponed when it happens with house keys. Before you call a locksmith, try these tricks to remove a broken key from the lock without having to dismantle everything.
The effectiveness of natural fertilizer is a common question, especially among those less experienced in gardening. The answer is a resounding yes, and today we’ll guide you on how to craft this fertilizer, saving money and avoiding environmental contamination.
This fertilizer is ideal for enriching the substrate, promoting plant growth, and fostering a thriving microbiota. It works exceptionally well with various plants, including cacti, succulents, Anthuriums, and Peace Lilies. Packed with essential nutrients like nitrogen, phosphorus, potassium, magnesium, boron, calcium, and more, this substrate supports robust plant development.
To create this natural fertilizer, the key ingredient is the everyday fruit – apples. Begin by drying them either in the sun or your oven. Once dried, use a food processor to grind them into a powder. Combine this powdered apple substance with your regular organic fertilizer to enhance its quality and accelerate microbiota activation.
As your plants’ roots absorb this nutrient-rich mixture, you’ll witness remarkable growth. Feel free to repeat this process as needed to continually nourish your plants and transform your garden into a stunning oasis.
Discover the secret to achieving white and wrinkle-free skin with this face cream that boasts only three ingredients.
We unveil the recipe for an incredible cream that is sure to enhance the magnificence of your skin.
As the years pass, it’s common to observe changes in our facial complexion, and hormonal shifts may contribute to dull and compromised skin. While aging is inevitable, there are ways to counteract the onset of wrinkles.
Engaging in exercises and massages can help maintain skin elasticity, and prudent sun protection is crucial. Always apply a face cream to shield your face from harmful UV rays. Additionally, avoiding the use of chemical products and refraining from excessive touching of the skin are essential measures. Incorporating regular exercise and maintaining a balanced diet contribute to keeping facial skin youthful and wrinkle-free.
Unlock The Mystical Power Of An Antique Relic
In an age where contemporary gadgets take center stage, there’s a captivating allure in stumbling upon timeless tools reminiscent of a graceful, bygone era. One such treasure is the vintage marble razor knife sharpener, a masterful blend of design and function, echoing an age when true artistry was revered.
The marvel of the vintage marble razor knife sharpener lies in its reflection of past brilliance. Typically mounted on a wooden or metal foundation, these intricate devices incorporate a steel blade or rod, crowned with a gleaming marble or glass sphere, epitomizing the height of craftsmanship prevalent in the late 1800s to early 1900s.
4-5 carrots, peeled and rough chopped
4-5 celery spears, rough chopped
1 can of diced tomato with juice
2 small onions, rough chopped
6-8 cloves of garlic, chopped
1 small can tomato paste
6-8 red potatoes, rough chopped
1 bottle or can of your favorite beer (I usually prefer Guinness)
2-3 lb chuck roast, fat trimmed and cubed (you can use stew meat if you’d rather not slice the roast yourself).
Flour for dredging (I use gluten free flour)
About 1 cup beef broth/stock
Salt and pepper for seasoning the meat and to taste
2 bay leaves
Smoked hot and sweet paprika to taste
Chili powder to taste
Oil for cooking
Unlock the secrets to caring for yellow Cycas leaves with insights known only to seasoned nurserymen. Discover straightforward measures to bring back the lush greenery of your Cycas leaves.
Cycas, resembling a palm tree, is a distinctive plant with a history dating back to ancient times, akin to conifers. Its unique features include “pinnate” leaves extending from the stem’s apex, some reaching up to 20 meters in length.
The plant exhibits two types of leaves: green and non-green. Maintaining the green hue of these leaves is a key challenge for growers. Inside, near the roots, the plants harbor coral-like growths rich in cyanobacteria. Reproduction occurs through wind and insect pollination, with artificial reproduction involving the extraction of male strobilium and pollination on the female flower.
For those cultivating Cycas plants or witnessing the onset of yellowing leaves, fear not. Below, we share valuable advice to prevent and address the issue.
Both cats and dogs may exhibit indoor urination, often as a way to mark their territory. This behavior commonly targets walls, furniture, or new objects. To curb this tendency, especially in puppies and kittens, establishing an early routine is crucial.
Ensure it’s not a medical issue by consulting a veterinarian. Implementing a routine, such as set times for walks or introducing a designated litter box or bed, helps them understand where it’s appropriate to relieve themselves.
If your pets persistently target specific spots, like a carpet or sofa, you can utilize a simple recipe to deter them from doing so again. Instead of resorting to harsh scolding, try this solution:
Recipe to Prevent Indoor Urination:
Okra
Smoked sausage
Shrimp
Crawfish tails
Chicken wings
Onion
Green chime pepper
Roasted ruddy pepper
Chicken stock
Cajun seasoning
Onion powder
Garlic powder
Poultry seasoning
2 quarts new okra, cut (PicSweet Solidified will work in the event that new Isn’t accessible, fair not as great as fresh)
1 pound little to medium shrimp, peeled and deveined
3 mugs diced tomatoes
¼ container vegetable oil
3 to 4 cloves chopped garlic
1 container diced onions
1 glass diced celery
½ glass diced yellow chime peppers
½ glass chicken stock or shrimp stock on the off chance that available
Slap Ya Mom to taste or salt and broken dark pepper to taste