Month: November 2023

Lose Weight by Cleansing Your Colon? in 7 Days

Maintaining a clean colon is crucial for overall health and weight management. While our digestive system is efficient, it can sometimes struggle to eliminate everything we consume, leading to issues like bloating, weight gain, and a buildup of digestive germs and gas.

Problems of an Unhealthy Colon

A dirty colon can cause a range of health issues, despite having good digestion.

Toxins can accumulate and potentially enter the bloodstream, causing serious health problems.

Common issues include abdominal bloating, weight problems, mood swings, slow digestion, constipation, back pain, headaches, energy deficiency, weakened immune system, loss of appetite, bad breath, body odor, skin issues like pimples and blackheads, diabetes, stress, insomnia, anxiety, various types of cancer, hair loss, and varicose veins.

Benefits of Colon Cleansing

Regularly cleansing the colon can lead to a lighter feeling, better nutrient absorption, improved digestion, reduced cravings, and better appetite control.

A clean colon can also contribute significantly to weight loss.

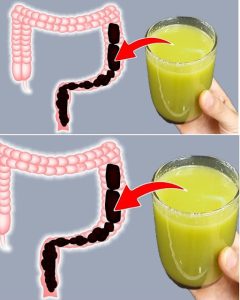
A Juice Cleanse for Colon Health

Try this juice cleanse for a week to see impressive results, including weight loss.

Ingredients:

Read More

Can someone help identify this plant for me?

When it comes to the world of squash, the Italian squash stands out as a unique and delightful addition to your garden and kitchen. With its distinctive shape, flavor, and culinary versatility, it’s no wonder that this vegetable has gained popularity among food enthusiasts.
In this article, we’ll delve into what Italian squash is, where it can be found, and how it differs from regular squash. We’ll also provide a step-by-step guide for growing this delectable vegetable in your very own garden.

What is Italian Squash?

Italian squash, often known as zucchini or courgette, belongs to the species Cucurbita pepo. While it shares its botanical name with various types of squash, what makes Italian squash special is its elongated shape and tender, thin skin. Unlike traditional round or bulbous squash varieties, Italian squash typically has a slender, cylindrical appearance. This characteristic makes it ideal for various culinary applications, especially when it comes to grilling, sautéing, or stuffing.

Where is Italian Squash Found?

Italian squash, as its name suggests, has strong roots in Italy. It’s a prominent ingredient in Italian cuisine and is used in dishes like zucchini alla scapece and pasta primavera. However, its popularity has spread far beyond Italy’s borders, and it’s now cultivated and enjoyed in various parts of the world. You can easily find Italian squash in farmers’ markets, grocery stores, and, if you’re a gardening enthusiast, right in your own backyard.
How is Italian Squash Different from Regular Squash?
Italian squash differs from regular squash in several key ways:
  • Shape: The most noticeable difference is its shape. Italian squash is long and slender, resembling a cucumber, while regular squash varieties are typically round or bulbous.
  • Texture: Italian squash has a tender, thin skin that does not need to be peeled before consumption. In contrast, some regular squash varieties have thicker, tougher skin that is usually removed before cooking.
  • Flavor: Italian squash has a mild, slightly sweet flavor and a delicate, crisp texture when cooked. Regular squash varieties can vary in flavor, but they often have a denser, earthier taste.
  • Versatility: Italian squash is incredibly versatile in the kitchen. It can be sliced and grilled, used in stir-fries, added to soups, or even baked into bread and cakes. Regular squash varieties may have more specific culinary uses.

Growing Italian Squash in Your Garden: A Step-by-Step Guide

Read More

Savory Slow-cooked Northern Beans

Embark on a culinary journey with our Savory Slow-cooked Northern Beans—a delightful fusion of hearty flavors and tantalizing aromas. As your kitchen transforms into a haven of slow-cooked perfection, this unique take on a classic promises to elevate your dining experience. Let the aromatic symphony unfold as you savor each moment of this bean-filled adventure.

Ingredients:

  • 1 large onion, finely chopped
  • 1 tablespoon olive oil
  • 6 cloves garlic, finely chopped
  • 2 pounds dry northern beans
  • 4 cups water
  • 4 cups chicken broth or stock
  • 1 teaspoon optional chicken bouillon paste for an extra burst of flavor
  • 1 cup baby carrots
  • Salt and pepper to taste
  • 1 tablespoon herbes de Provence
  • 1 meaty ham bone or a couple of meaty ham hocks

Instructions:

Read More

Grab a handful of mismatched orange buttons and make the quaintest wall decor

Do you have piles of old buttons lying around in a box in the back of your closet? Or do you keep them stashed away in your sewing kit, never to see the light of day? Buttons are in plentiful supply whether you have them already or not; they’re easy to find at craft stores and also your local secondhand stores.
You can give those old buttons new life through creative DIY decor for your home. These projects are easy to incorporate into your existing color schemes and are a fresh take on repurposed buttons. So let’s take a look at these fun ways to reuse buttons in your decor!

1. Grab a handful of orange buttons to create this decorative pumpkin:

You can trace just about any image you can print, and then follow the outline with your colorful buttons. You put together the buttons like a little puzzle, and your decor is complete!

2. Who needs button eyes when you can make a whole snowman out of buttons?

Read More

Leave a Glass of Water With Salt And Vinegar In Your Home And See The Changes In 24 Hours!

I really think that we can all agree on one thing – when everything isn’t working, home is usually the best place to be. Home is where we feel secure.

But, did you know that if there is too much negative energy in our homes, it has a tangible effect on your emotions as well as health? Just take a look at the article below and find out more about this.

Can I ask you a simple question – do you often feel down when you are at home? Well, if your answer is YES, then you should definitely read the article below. Why – because in this article we’re going to show you how to cleanse your home from all negative energy and you’ll feel much better.

And remember – you cannot see energy with the naked eye, but you can certainly feel it as the energy of your home often reflects your own inner emotional state. It is time to banish those negative, sad and downright depressing vibes that can have a dramatic effect on your mood once and for all. Try this simple, but extremely effective homemade technique and drive all those negative energies away!

Note: this cleansing method is very simple and easy to make. You just have to follow the simple instructions.

You will need the following ingredients:

1 glass (it must be completely transparent)
White vinegar
Granulated salt
Water

Directions:

Here’s what you need to do – you just have to add a little salt, little vinegar and little water in the glass. Put the glass in some of the areas where you spend time the most and where other people visit you. And yes, you need to leave it there for 24 hours. After some time, check how the salt is acting, if the level only rose or the water overflew. Rinse the glass with plenty of water after 24 hours, and repeat the procedure whenever you think it’s necessary. Put it in all the areas of your home until the salt stops rising.

And, make sure you put the glass in an area where it could not be seen so that it manages to absorb the bad energies effectively! Use only a glass of water with grain salt and vinegar and get rid of all the negative energies surrounding you. And trust me – you’ll be amazed by the results. We really hope you find this article helpful and don’t forget to share it with your friends and family. Thank you and have a good day.

Read More

Impossible Coconut Custard Pie !!!

Have you ever tried something so delicious you can barely stand it…and something that you’re even more shocked that you actually made. This is one of those recipes. When you make this Chinese Pepper Steak with Onion Salad you’ll feel like you’ve died and gone to heaven.

I love those recipes that we all grew up with, they are just too good to miss out on.I still remember the first time I ordered Coconut Custard Pie at the cafeteria and was instantly enthralled with its tropical flavors and texture. It took some years before I got around to making this delicious dessert myself, but when I did, it immediately became an all-time favorite with our family, too.To Make this Recipe You’ Will Need the following ingredients:

Ingredients:

2 cups milk
1 cup shredded coconut
4 eggs
1 teaspoon vanilla extract
1/2 cup all purpose flour
7 Tablespoon butter
3/4 cup sugar
1/4 teaspoon ground nutmeg

Directions:

Read More

How to take care of a Syngonium Plant and reproduce it at home

This beautiful plant is highly sought after for its foliage and ease of cultivation. You just have to keep in mind that it is a climber, so its location must be in a considerable space.

Next, we show you the basic care and how to reproduce this plant in the comfort of your home.

  1. It requires light, but not direct sun.
  2. It does not tolerate temperatures below 13º C.
  3. It needs a location where air flows.
  4. It requires a lot of moisture, especially in spring and summer, so you should provide it with water when you notice that the top soil is dry.
  5. Spraying its leaves at least 3 times a week is recommended.
  6. For the hot months, provide liquid fertilizer with the irrigation water.
  7. This plant does not require pruning, simply as you notice that the lower leaves are falling, proceed to remove them.
  8. When you want to transplant, it will be the best time to cut the stem and replant so that it grows strong.

How to reproduce the Syngonium plant:

PROMOTED CONTENT

Read More

Solving the Problem of Burnt Oil in the Oven with Natural and Effective Tricks

The oven is a wonderful appliance, especially when used for delicious recipes. However, one annoying problem we sometimes encounter is burnt oil stains in the oven. Removing them might seem like a daunting task, but fear not; there are natural and effective solutions.

Natural Ways to Remove Oil Stains in the Oven

Marseille Soap:

First, ensure the oven is turned off and unplugged for safety. Marseille soap is an excellent choice for this purpose because it offers powerful cleaning properties without damaging the oven surface. Here’s how to use it:

Dissolve a spoonful of Marseille soap in half a liter of hot water.

Mix well and pour the solution into a spray bottle.

Spray the mixture onto the oil stains inside the oven.

Scrub with a sponge. The degreasing action of Marseille soap will soften even the most stubborn stains for easier removal.

Vinegar:

Read More

HOMEMADE CHICAGO STYLE DEEP DISH PIZZA!!!

I love those recipes that we all grew up with, they are just too good to miss out on.
Yes, you can absolutely make Chicago style deep dish pizza, right in your own home. It’s hard to beat the chewy, crunchy crust and melty cheese beneath the luscious sauce.To Make this Recipe You’ Will Need the following ingredients:

INGREDIENTS:

For the Dough:

3¼ cups all-purpose flour
½ cup yellow cornmeal
1½ teaspoons salt
2 teaspoons sugar
2¼ teaspoons instant yeast
1¼ cups water, room temperature
3 tablespoons unsalted butter, melted
4 tablespoons unsalted butter, softened
1 teaspoon + 4 tablespoons olive oil, divided

For the Sauce:

2 tablespoons unsalted butter
¼ cup grated onion
¼ teaspoon dried oregano
½ teaspoon salt
2 garlic cloves, minced
1 (28-ounce) can crushed tomatoes
¼ teaspoon sugar
2 tablespoons coarsely chopped fresh basil
1 tablespoon olive oil
Freshly ground black pepper
For the Toppings:
1 pound mozzarella cheese, shredded (about 4 cups)
(Pepperoni)
¼ cup grated Parmesan cheese

HOW TO MAKE IT:

Read More

Try Hydrogen Peroxide on Your Feet and Watch the Unexpected Happen

Here’s a step-by-step guide to using hydrogen peroxide for a foot soak and to help remove dead skin and calluses:

Materials Needed:

  • Hydrogen peroxide (3% solution)
  • Warm to hot water
  • A basin or bucket
  • A pumice stone or foot file
  • Towel
  • Moisturizer or foot cream (optional)

Instructions:

Read More