Month: November 2023

How to Remove Moisture from Walls and Never Let It Come Back

We have spoken on several occasions about excess  humidity in the walls  and the resulting mold, a problem that can affect our homes especially when they are located in humid contexts and it is not possible to ensure adequate ventilation.

Over time, concrete walls end up  absorbing moisture from the ground  , which rises through them until it becomes visible through  patches of mold  . But mold growth on walls can also occur in apartments if they are not properly ventilated.

Usually when this problem arises we try to fix it with generic cleaning products, perhaps by repainting the wall. However, if the problem is not completely eliminated, it will only be a few weeks before the mold returns.

1. Eliminate moisture with talcum powder:

Talc is an excellent ally against humidity and acts on walls in the same way as on shoes: it extracts and absorbs humidity.

Simply pour a little talcum powder on the walls, then rub with a cloth to work it into the walls. Repeat the process several times to make it even more effective in removing all traces of moisture.

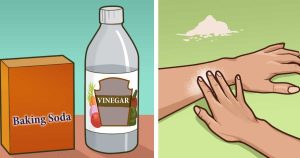
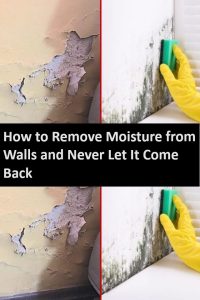
2. Get rid of mold with bleach:

In this case, the solution is a palliative, since it is able to completely eliminate the mold, but not the humidity present in the walls.

Mix two equal parts water and bleach in a spray bottle. Remember to use rubber gloves, goggles and a mask. Open all windows when you apply this method.

Spray the solution on the mold and use a toothbrush to scrub it vigorously. A little patience is required, stubborn mold may require more than one hand to get rid of.

Warning: Bleach can discolor painted walls, so this method is best suited to white walls.

3. Remove the mold with hydrogen peroxide:

Read More

Place it in the kitchen: it keeps flies, mosquitoes and other insects away

Dealing with an influx of pesky insects like flies and mosquitoes can be overwhelming. Their relentless invasions test our patience and have become a universal grievance. While store shelves are brimming with commercial insect repellents packed with chemicals, pivoting to nature’s simplicity offers a safer and environment-friendly choice.
Deciphering the Culprits:
Every insect has its own quirks and preferences that bring them into our living spaces. While mosquitoes have a knack for hunting down blood, flies and other tiny invaders are tempted by light, food sources, and breeding grounds in our homes. Their fascination with sweets, sugary delights, and fermented items is well-known, yet, interestingly, they show disdain for breadcrumbs and trivial food remnants.

The First Line of Defense: Hygiene:

A strategic shield against the impending wave of insect invaders is anchored in cleanliness. Keeping food waste covered, ensuring food containers are tightly sealed, and maintaining an overall hygienic space can ward off these uninvited guests. While mosquitoes pose a distinct challenge, natural repellents come as an effective and budget-friendly respite.

Embrace Homemade Repellents:

Home-crafted repellents, formulated from accessible natural ingredients, shine as a prime solution in keeping insects at bay. These repellents utilize a blend of odors and tastes that repel insects, making them think twice before turning your home into a breeding ground.

DIY Natural Insect Repellant Recipe:

Rice vinegar is a potent ally in formulating an efficient natural insect repellent, suitable for year-round use.

Steps:

  • Take a plastic bottle and cut off its top. Invert the cut top to form a funnel-like shape inside the bottle.
  • Add a cup of dishwashing liquid and stir until you get a consistent blend. While the scent might be delightful to us, insects detest it, making it a great deterrent.
  • For an alternative, consider using white wine vinegar, recognized for its robust aroma.

Cautionary Tip:

Position the repellent container in a safe spot, inaccessible to kids and pets, preventing any accidental mishaps.

Dip your toes into the wonders of this natural concoction, and you might just pave the way for a serene, insect-free haven. Embrace nature’s genius, and say goodbye to those irksome intruders.

Read More

Ginger lemon water the healthiest drink for burning fat!

The digital realm brims with numerous diet suggestions, culinary recipes, and organic weight loss remedies. While many have been tried and tested, only a few have stood out with proven results. One such remarkable formula is Ginger Water.

Why Ginger Water for Weight Loss?

Ginger Water isn’t just another natural remedy. It promises efficient weight loss, especially targeting stubborn areas like the hips and stomach. The days of struggling with these problem zones are over with this potent solution.

More than Just Weight Loss

Not only is it an effective weight loss solution, but Ginger Water also brings a plethora of health benefits:

Lowers Cholesterol:

Ingredients:

  • 1 organic ginger root (cut into thin slices)
  • 2 liters of water
  • Lemon juice (2-3 lemons)
  • Grab your wooden spoon now and start cooking with these great video instructions

Preparation and use:

Read More

Ideal Turkey Gravy

Creating homemade gravy might seem daunting initially, but the process is surprisingly straightforward. Once you get the hang of it, you’re likely to prefer it over pre-packaged mixes. The key to achieving a superb gravy lies in understanding the steps and using the right ingredients.

Ingredients:

  • 4 cups turkey drippings or a combination of turkey/chicken stock
  • 1/2 cup (1 stick) butter
  • 1/2 cup all-purpose flour

Preparation:

Read More

Add a spoonful to the water and water the peace lily. New leaves will appear quickly

The peace lily, scientifically known as Spathiphyllum, stands tall as an emblem of tranquility in indoor plant collections. Native to the warm and humid forests of South America, and also found in certain tropical regions, this green beauty flourishes indoors when tended with a loving hand. If you’re looking to see those pristine white blooms unfurl, here’s a golden nugget of advice.

While the peace lily, like all plants, thrives with a combination of light and water, its unique attributes demand special care. Even as an indoor plant, it showcases its adaptability, growing contentedly in both well-lit and shaded spots. Nevertheless, regulating the amount of light and shade it receives will help its leaves stay lush and prevent them from drying. Its bloom season peaks between May and October, presenting an exquisite show of flowers.

Caring for Your Peace Lily:

1. Annual Repotting:

This plant enjoys a change of soil each spring, a routine to adopt until it matures. Mature plants simply benefit from a top layer soil refresh, about 4 cm deep. Consider enriching the soil with special fertilizer for green plants during spring. Also, ensure proper drainage when repotting to avoid water stagnation.

2. Foliage Focus:

Peace lilies, being tropical natives, have an affinity for moisture. A neglected plant might droop, but a generous watering will perk it right back up. If your peace lily faces prolonged water deprivation and appears desiccated, immerse its pot in a water-filled tray for a few hours for revival. Regularly prune wilted or dead leaves to keep the plant healthy.

3. Humidity and Hygiene:

Read More

Natural ways to treat a bee sting

Bees produce some of the sweetest stuff around. Though we may love their honey, bees can be some of the most irritating and painful insects. When a honey bee stings, it is doing so to protect its hive. This is why a lone bee pollinating a flower or searching for nectar will typically leave you alone. However, if you do happen to be the victim of a bee sting, , you will likely experience the mild symptoms of sharp, burning pain and a red welt at the site of the sting, as well as swelling around the wound.
Only a small percentage of the U.S. population (five per cent according to the Asthma and Allergy Foundation of America) is actually allergic to bees. More often, people think they are allergic because their panic triggers new symptoms similar to those of a severe allergic reaction, such as difficulty breathing and a rapid pulse. If you are not allergic to bees, the first thing you should do after being stung is remove the stinger and clean the wound. Next, follow one or more of the following home remedies to relieve the pain and heal the sting.
1. Honey:
Who knows a bee sting better than honey? Dabbing honey on the wound and then covering it with gauze for 30 to 60 minutes.
2. Garlic:
Garlic is an excellent healer. Press a crushed clove or two against the wound. Cover with a moist towel and relax for 20 to 30 minutes.
3. Rhubarb:
Rhubarb not only tastes good, but its juices are also effective at relieving the pain from a bee sting, according to beekeeper Claire Goodall . To use this home remedy, break the stem of fresh rhubarb and apply the juice directly to the site of the sting.
4. Parsley:

Read More

The foolproof method of propagating lemons from leaf cuttings in minutes

Lemon is a tree native to India. It is an evergreen plant that is scientifically called Citrus limon. This plant, unlike other citrus fruits, manages to produce flowers and fruits several times during a year. He then donates different crops to taste lemons at different times.

Usually the lemon has an elliptical shape and is yellow in color. It has a tip also called umbone and is used a lot in the kitchen and beyond. From a simple salad to other preparations. The peel of the lemon, on the other hand, is very thick and rich in glands that contain very fragrant oils.

Having a lemon in your garden is definitely a value and now we want to show you how you can grow new lemons from cuttings of sheetsand. Below, in the next paragraph, we will see how to make a plant only from a branch. A very popular method of multiplication.

New lemons from leaf cuttings: here’s how:

Read More

How to make a DIY mosaic bird bath

The creative mind behind this colorful mosaic bird bath that puts old CDs to good use. If you’re a member of the MP3 generation, you’ll find an ample supply of CDs at your local thrift shop (or you already have them sitting in a dusty corner of your home).

Besides the obvious beauty, a DIY birdbath has a lot to offer. For example, attracting birds to the garden is one of the best ways to keep the mosquito and aphid populations under control.More importantly, birds need water to survive, and a helping hand is always appreciated,

Your mosaic birdbath begins with a large plant saucer. Terracotta and terracotta look-alike saucers are reasonably priced and easy to find at garden centers or big-box home improvement stores.  

Keep in mind that CDs snap when you break them and the pieces are likely to fly everywhere. To protect your hands (and your eyes), put the CDs in a canvas bag first. Then, if the broken pieces are too large, use a pair of scissors to cut them into smaller or more interesting shapes. Break several CDs and choose the pieces that work best in your mosaic.

Wipe the saucer with a clean cloth to remove dust and debris, then spread a thin, even layer of heavy-duty adhesive with a sponge paintbrush. Apply adhesive to only a small section of the saucer at a time. Otherwise, the adhesive may set up before you’ve arranged the CD pieces to your liking. An area you can complete in five minutes is just right.

Read More

Natural trick to accelerate plant growth and keep pests away

Surprisingly, it can be used in the garden as a fertilizer, as a pesticide or to clean your tools.

Next, we show you a homemade trick to accelerate the growth of plants and keep pests away in a natural and effective way.

Fertilizer:

Thanks to its high calcium content, milk can be used as a natural fertilizer. It is especially suitable for plants that tend to rot, such as courgettes, tomatoes and peppers. Also, it is better to use cold whole milk, as it is more nutritious.

To make milk fertilizer, use a bottle and mix equal parts milk and water. Mix, then pierce the bottle cap and use it to water the plants.

In addition, according to the opinion of some experts, milk is an excellent foliar fertilizer that allows for larger leaves and fruits.

Pesticide:

The milk can also be used as a pesticide, especially on mites, aphids, and other small parasites.

According to some studies, these insects are unable to ” digest ” the enormous amount of sugar contained in milk, so they are eliminated naturally. This is particularly the case when using whole milk diluted 50 % with water.

Against plant fungi:

Read More

Philly Cheesesteak Casserole !!!

This Philly Cheesesteak Casserole recipe is made with ground beef, sweet onions, green peppers, and bisquick for an easy dinner.
Looking for a delicious and easy dinner idea your whole family will love? This simple dish combines all the classic flavors of traditional
Philly cheesesteaks into one easy-to-prepare dish that’s perfect for any night of the week.
Philly Cheesesteak Casserole is a delicious spin on the classic sandwich, perfect for a hearty, comforting dinner. This recipe features ground beef, sautéed onions, bell peppers, and lots of melted cheese.
 This recipe will be loved by the whole family.
Simple Ingredients: Popular, easy-to-find ingredients make dinnertime less stressful

ingredients :

  • 1 1/2 pounds lean ground beef
  • 2 bells
  • 1/2 yellow
  • 1 clove of garlic
  • 1 teaspoon seasoned salt (Lowry’s or Morton’s)
  • 4 slices of provolone cheese
  • 4 large eggs
  • 1/4 cup heavy cream
  • 1 teaspoon hot sauce
  • 1 tsp Worcestershire sauce

Methods :

  • Preheat oven to 350 degrees. Spray a 9″ x 9″ baking dish with nonstick spray.
  • Cut the pepper and onion into small pieces. Since garlic.
  • Insert the meat into a skillet, then cook over medium heat, parting as it cooks.
  • when the flesh is broken and remains pink; Add garlic, pepper, onion and seasoned salt. Continue to cook, stirring often, until beef is tender and vegetables have softened slightly.
  • Drain the fat from the skillet and pour the mixture into the prepared baking dish.
  • Cut the cheese into small pieces and place it on top of the beef mixture.
  • Add eggs, cream, hot sauce, and Worcestershire sauce to mixing bowl and whisk until well combined.
  • Pour the egg mixture over the meat and put the dish in the oven.
  • Bake for 35 minutes or until eggs are set.
Enjoy !

Read More