
Month: November 2023
Use Salt in the Toilet: Grandma’s Foolproof Tip!

How To Make Butterscotch Cake with Caramel Icing
Ingredients :
2 Cups Brown Sugar
1/2 Cup Butter
1 teaspoon vanilla
2 Eggs
2 Cups Flour
1 teaspoon Baking Soda
1 teaspoon Baking Powder
1/2 teaspoon salt
1 Cup Buttermilk
Instructions :
Preheat oven to 350 degrees. Grease and flour (or line with parchment) two 9″ or three 6″ round pans.
Cream the butter and sugar with an electric mixer on medium until fluffy. Add vanilla, then add eggs one at a time, beating on low just until they are mixed in.
In a separate bowl, sift together the flour, baking soda, baking powder and salt. Starting with the flour mixture, add the flour and the buttermilk (alternating one then the other) into the sugar/egg mixture on low speed. When everything is mixed in, scrape down the bowl by hand.
Pour batter into the pans and bake for 25-30 minutes, until a toothpick inserted in the middle comes out clean.
Cool before frosting.
Caramel Icing:
Continue reading instructions on the next page
Whole Roasted Cauliflower
Ready for a veggie centerpiece that’s as tasty as it is eye-catching? Try this Whole Roasted Cauliflower recipe! It’s a simple yet flavorful dish that’s sure to impress.
Ingredients:
1 head of cauliflower
Fresh thyme
2 bay leaves
4 cups (1 liter) of vegetable or chicken broth (quantity may vary based on cauliflower size)
1/3 cup (70 g) of melted butter
Freshly ground bell pepper
How to Make It:
Continue reading how to make on the next page
CARMELITAS: A Gourmet Caramel Delight
Embark on a heavenly journey of sweet indulgence with our Carmelita Bliss Bars. These delightful treats are a caramel lover’s dream come true, featuring a tantalizing combination of soft, gooey caramel and velvety chocolate nestled between layers of buttery oatmeal crumbs. With every bite, experience the perfect harmony of flavors and textures that will transport you to dessert paradise.
Ingredients:
For the Cookie Base:
-
- 1 cup all-purpose flour
- 1 cup rolled oats
- ¾ cup packed light brown sugar
- ½ teaspoon baking soda
-
- ½ teaspoon salt
- 12 tablespoons unsalted butter, melted
- 1 teaspoon vanilla extract
- 1 cup semi-sweet chocolate chips
- For the Caramel Sauce:
- 36 caramels, unwrapped (Kraft brand recommended)
- ½ cup heavy cream
Method:
Cookie Base:
-
- Preheat your oven to 350 degrees. Line an 8×8 inch baking pan with parchment paper or aluminum foil sprayed with nonstick spray.
- In a medium bowl, combine the flour, rolled oats, brown sugar, baking soda, salt, melted butter, and vanilla extract. Mix using a fork until a crumbly texture forms.
- Press slightly more than half of the oat mixture into the prepared pan. Bake for 10 minutes until lightly golden.
Caramel Sauce:
-
- While the base bakes, prepare the caramel sauce. In a microwave-safe bowl, combine the unwrapped caramels and heavy cream. Microwave in 60-second intervals, stirring well after each, until the caramels are fully melted and the sauce is smooth. Use a whisk for a silky caramel texture.
Assembly:
-
- Remove the baked oat base from the oven and sprinkle with chocolate chips.
- Pour the warm caramel sauce evenly over the chocolate chips.
-
- Crumble the remaining oat mixture over the caramel layer.
- Bake for an additional 15-20 minutes or until the top is golden brown and caramel is bubbly.
- Cool the bars completely before cutting. For a quicker cooling process, place the pan in the fridge.
Conclusion:
In every bite of our Carmelita Bliss Bars, savor the heavenly blend of caramel, chocolate, and buttery oat goodness. These bars are not just a dessert; they’re a sweet escape, a moment of pure bliss. Treat yourself and your loved ones to the irresistible charm of Carmelita Bliss Bars – your ticket to a world of caramel-infused delight!
Source of the picture : small town woman
Cleaning Your Glass Stovetop: A Step-by-Step Guide
You don’t have to admit that you clean your cooktop twice a year or twice a day, but it deserves a good cleaning. How you do it is a topic worth discussing.
Quick cleanings don’t always get rid of the gunk that has embedded itself on the surface. Like the pot spills that build up around the burners. Or sauce splatters. Or dried oil splatters from whatever you cooked four days ago.
You’ve got to get rid of them. If you don’t have a store-bought oven cleaner (this works for stoves too) or a commercial cleaning solution on hand, you can do the job yourself. Make your glass plate, ceramic burners or stainless steel stove look fresh without any scratches. Check out the tips below!
1- Baking soda + towels
Make a little magic with baking soda! It’s all about sprinkling baking soda generously on your cooktop. Soak rags or towels in warm soapy water, then lay them on the surface. Check out the method by clicking on Clean My Space to see how easy and effective this method is!
2- Razor blade scraper:
You probably have a small razor scraper in your toolbox or garage, but did you know they are great for removing old food? Spray the surface first, then carefully scrape away burnt food and other debris. Push it down and away with gentle pressure. If you don’t have a scraper, you can buy one at a hardware store. Rubber scrapers are also an option.
3- Ammonia:
Whenever you work with ammonia, ventilate! For this method, you need to gather rags or paper towels and plastic wrap to cover them. This method is very effective for areas around the burners where dirt accumulates. You can remove the material from the burner if you wish.
Place rags or paper towels around the edges of the burner where they get very dirty. Pour ammonia on the rags until saturated. Use a small cup or spoon if necessary. Cover the stove top with plastic wrap for at least 3 hours or overnight. Remove the covers and wipe off.
4- Vegetable oil:
Chef Layers Banana Slices Over Cool Whip, Ends Up With The Most Decadent Dessert Of All
What You Need:
Ingredients:
2 cups crumbled graham crackers
1/3 cup melted unsalted butter
1 teaspoon salt
Filling:
16 ounces cream cheese, room temperature
1/2 cup sugar
8 ounces Cool Whip
1 teaspoon vanilla extract
Toppings:
Bananas, sliced
1 can crushed pineapple, drained
Strawberries, sliced
Cool Whip
Chopped hazelnuts
Chocolate sauce
Directions:
Start with the crust: mix crushed graham crackers with butter and salt.
Press the mixture into a greased 9×13-inch baking dish and chill.
Top with Cool Whip, chocolate drizzle, nuts, and optional cherries.
Chill for 4 hours or overnight.
Customize Your Cake!
The beauty of this cake? Its versatility. Swap out fruits, or add chocolate chips, peanut butter chips, or any topping that tickles your fancy. It’s your summer, your rules!
Get ready to slice into this no-bake wonder and indulge in a burst of flavors that scream summer fun. Whether it’s for a family gathering or a personal treat, this banana split cake is set to be a crowd-pleaser. Happy no-baking!”
Lemon Velvet Cake + Lemon Cream Cheese Frosting
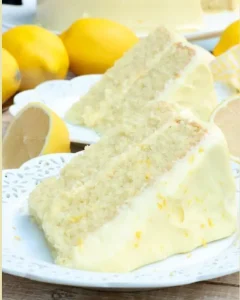
Prepare to be tantalized by the exquisite Lemon Velvet Cake, paired with a luxurious Lemon Cream Cheese Frosting. This harmonious blend of flavors and textures is a true delight for lemon enthusiasts. The soft, velvety cake base, infused with the brightness of lemons, is perfectly complemented by the creamy and zesty cream cheese frosting. Let’s embark on this delightful culinary journey to create a Lemon Velvet Cake that will leave your taste buds singing.
Ingredients:
For the Lemon Velvet Cake:
-
- 1½ cups all-purpose flour
- 1 cup cake flour
- 1 teaspoon baking soda
-
- 1 teaspoon baking powder
- 1 teaspoon salt
- 1¾ cups granulated sugar
-
- 3/4 cup vegetable oil
- 1/4 cup butter-flavored shortening
- 2 eggs
-
- 1-2 teaspoons pure vanilla extract
- 1 tablespoon pure lemon extract
- 1 heaping teaspoon lemon zest (from 1-2 lemons)
-
- 1 cup buttermilk
- 1/2 teaspoon white distilled vinegar
- 1/3 cup hot lemon water (hot water mixed with 2 tablespoons fresh lemon juice)
- 4-6 drops yellow food coloring
For the Lemon Cream Cheese Frosting:
-
- 2 (8 oz) cream cheese, room temperature
-
- 8 tablespoons unsalted butter, room temperature
- 1 ½ teaspoons pure vanilla extract
- 1 ½ teaspoons pure lemon extract
-
- 1 ½ heaping teaspoons lemon zest (from 2 lemons)
- 4-5 cups powdered sugar, sifted
- 1-2 teaspoons lemon juice (if needed)
- 4-5 drops yellow food coloring
Instructions:
Lemon Velvet Cake:
-
- Preheat your oven to 325°F. Grease and flour two 9-inch cake pans with dark interiors, then set them aside.
- In a large bowl, sift together the all-purpose flour, cake flour, baking soda, baking powder, and salt. Set this mixture aside.
- In another large bowl, blend together granulated sugar, vegetable oil, and butter-flavored shortening.
-
- One at a time, add the eggs and mix well after each addition.
- Incorporate the pure vanilla extract, lemon extract, and lemon zest into the wet mixture.
- Gradually combine the dry ingredients with the wet ingredients, alternating with buttermilk.
-
- Mix the white distilled vinegar and hot lemon water, then blend this into the batter.
- Adjust the food coloring until you achieve your desired shade of lemony yellow.
- Pour the batter evenly into the prepared cake pans and tap them gently to release any trapped air bubbles.
- Bake for 25-30 minutes, checking at the 25-minute mark and adjusting the time if needed. The cake is ready when moist crumbs cling to a toothpick inserted into the center.
- Allow the cakes to cool in the pans until they are safe to touch. They will continue to cook as they cool. Once cooled, carefully remove the cakes from the pans and place them on a cooling rack to cool completely.
Lemon Cream Cheese Frosting:
-
- In a spacious bowl, combine the cream cheese and softened butter.
- Mix in the pure vanilla extract, pure lemon extract, and lemon zest.
- Gradually add sifted powdered sugar until the frosting is creamy. You can incorporate lemon juice to adjust the consistency if needed.
- Stir in food coloring if desired, and place the frosting in the refrigerator to firm up slightly before frosting the cakes.
- Once the frosting is creamy and spreadable, frost the cakes, and garnish with extra lemon zest if desired.
Enjoy your homemade Lemon Velvet Cake with Lemon Cream Cheese Frosting – a burst of lemony indulgence in every bite!
In conclusion, our journey through the creation of Lemon Velvet Cake with Lemon Cream Cheese Frosting has led us to a delectable masterpiece that’s as visually appealing as it is palate-pleasing. This dessert, with its soft and velvety crumb, embodies the essence of lemon, while the zesty and creamy frosting elevates it to another level of indulgence. The harmonious blend of sweet and tangy flavors encapsulated in every slice is a testament to the art of baking.
As you savor each bite of this Lemon Velvet Cake, the bright and refreshing lemon notes dance on your taste buds, leaving you with a feeling of satisfaction and delight. Whether you’re sharing it with friends and family or savoring it in solitude, this cake is sure to leave a lasting impression.
So, go ahead, treat yourself and your loved ones to this Lemon Velvet Cake, and relish the simple pleasure of a well-crafted dessert. Whether it’s for a special occasion or just a delightful everyday treat, this creation will always be a sweet reminder that life is made better with a touch of lemony elegance.
Place three bay leaves under the bed before bed: here’s why

Serenity Inducer:
The pressures of daily life weigh heavy on many. Slipping bay leaves under your resting place might just provide a tranquil escape from the hustle, setting a peaceful bedroom aura.
4-Echoes of Tradition:
For generations, in numerous cultures, bay leaves were reputed protectors, believed to repel negative energies and night terrors. Such beliefs imply more restful, uninterrupted sleep.
Harbingers of Positivity:
There’s a notion that bay leaves channel positive vibes into one’s sleep space. Such positivity might be conducive to restorative rest.
Guide to Bay Leaf Placement:
To introduce this tranquility-inducing ritual to your bedtime routine, here’s a quick guide:
Opt for Freshness: While dried bay leaves work, fresh ones pack a more potent aromatic punch.
Prep the Spot: Ensure the space beneath your bed is devoid of dust or clutter for a purer experience.
Strategic Placement: Slide three fresh or dried bay leaves between your mattress layers or within the bed linen. If you wish, encase them in a small cloth pouch for tidiness.
Drift into Calm: Now, all that remains is to lie down and let the bay leaf’s magic infuse your night.
Final Thoughts:
Nestling bay leaves beneath your bed is an age-old, yet refreshingly simple way to elevate your sleep sanctuary. Whether you’re drawn to its aroma, traditional tales, or therapeutic vibes, this ritual promises to add a touch of calm to your nightly reprieve. Why not give it a whirl and savor the serenity firsthand?
NO BAKE COOKIE CAKE
No-Bake Cookie Cake takes the classic no-bake cookie and turns it into a cake!
My son’s birthday was a last month. When I asked him what he wanted for dessert on his birthday he said that he wanted a no-bake cookie cake.
I was not sure exactly what he meant so I asked him a few questions.
He said he wanted me to make my no-bake cookie recipe and turn it into a cake.
I have made no-bake cookies into a bar with my no-bake cookie bar recipe but wasn’t sure how it would work as a cake. I had never seen it made into a cake recipe, but I was willing to give it a try.
My daughter has a peanut allergy so instead of using the classic no-bake cookie recipe I used my Peanut Butter Free No-Bake Cookie Recipe.