Month: November 2023

Here’s how to get infinite tangerines from just one fruit

The tangerine is a citrus fruit appreciated for its scent and its flavor that is both sweet and tangy. This fruit is very beneficial for health, in particular thanks to its content of antioxidants and vitamin C. To benefit from the benefits of this citrus fruit and taste organic mandarins, you can grow a mandarin tree at home. Growing this fruit tree is easy and suitable even for people who don’t have a green thumb! Find out how to plant tangerines at home to have unlimited them, and without a trace of pesticides.

Mandarin should not be confused with clementine. The latter is a hybrid of the mandarin. That is to say, it comes from the fertilization of a mandarin flower with the pollen of a sweet orange. There is also a difference in taste. Mandarin is sweeter than clementine and contains more seeds. This fruit is also the least acidic compared to the rest of the citrus fruits.

How to plant tangerines in pots?

Continue reading on the next page

Read More

Smothered Oxtails

Avory BBQ Oxtails: A Mouth-Watering Delight

Ingredients:

  • 3 lbs of succulent oxtails
  • 1 medium yellow onion, finely chopped
  • 2 tbsp of our signature homemade BBQ rub (or your favorite store-bought BBQ seasoning)
  • 2 tbsp of high-quality vegetable oil
  • 3 cups of rich BBQ sauce
  • A dash of liquid smoke for that authentic BBQ flavor (we recommend a little over 1 tbsp)
  • 3 cups of beef, chicken broth, or simply water for versatility

Cooking Instructions:

Read More

Cockroaches and other insects will be eliminated from your home.

Any pests in your home are cause for concern. They’re annoying, could bite and spread diseases, and they can damage your house. Fortunately, there are some home pest control methods designed for prevention, and others that will fix a current problem.

If you’re interested in avoiding harsh chemicals found in commercial pesticides, this DIY home pest control method might do the trick instead. In several hours, mice, cockroaches and other insects will be eliminated from your home.

Please prepare the following ingredients:

– A cucumber
– Banking soda (3 tbs)
– Sugar (1 tbl)
– Flour (2 tbls)

Instruction:

Read More

A quick and delicious 2-ingredient dessert: For the weekend!

I mixed these 2 ingredients and made a quick and delicious dessert for the weekend. quick dessert recipe is the most loved dessert here at home, in addition to being extremely delicious, it is perfect to serve after a lunch or dinner. Follow the steps below and prepare this delicious treat that is a delight from start to finish! At my house, there is no shortage of dessert, everyone goes crazy for this recipe, when I don’t feel like cooking, everyone flatters me. I love getting compliments once it’s ready! Let’s go!

How to Make A Quick and Delicious Dessert!!

Ingredients:

Read More

How to perfume the whole kitchen in 1 minute with a sprig of rosemary and a lemon

Using natural ingredients like rosemary and lemon to eliminate kitchen odors is an excellent idea. Both ingredients have pleasant aromas and can help freshen up your kitchen after cooking. Here’s how you can create a natural air freshener using rosemary and lemon:

Ingredients:

  • 1 lemon, sliced
  • A sprig of fresh rosemary
  • Water

Instructions:

Read More

4 Easy Methods to Restore Burnt Pans and Make Them Look Brand New

Cleaning and restoring a burnt pan can be a challenging task. While modern dish soap formulas are effective, some extra tricks can help you bring your pans back to their former glory without causing damage. Here are four DIY methods to recover burnt pans and make them shine again:

  1. White Vinegar and Baking Soda:

    • Pour 1/2 cup of white vinegar into the burnt pan.
    • Add 1 cup of water and bring the solution to a boil.
    • Turn off the stove and add baking soda. Wait for the effervescent reaction to finish.
    • Let it cool, then use a non-abrasive sponge to remove residues, which should come off easily.
  2. Potato and Salt:

    • Rinse the burnt pan and sprinkle coarse salt on its surface.
    • Cut a potato in half and rub it on the pan’s surface for a few minutes.
    • Rinse and, if necessary, repeat the application.
  3. Coarse Salt and Aluminum Foil:

    • This method is particularly effective for iron pans, which are sensitive to water.
    • Rub a tablespoon of coarse salt on the pan’s surface.
    • Create a ball with aluminum foil and use it to rub the burnt areas.
    • After a few minutes, the aluminum foil ball will turn dark.
    • Wash the pan as usual.
  4. Baking Soda and Lemon:

    • Both baking soda and lemon have degreasing and slightly abrasive properties that help remove burnt food residue.
    • Sprinkle 0.7 ounces (about 2 tablespoons) of baking soda on the pan’s surface.
    • Rub with half a lemon.
    • Rinse thoroughly with water.

Read More

This ingredient is capable of making the orchid grow and bloom endlessly

Orchid, how to have it flowered endlessly? To make it grow beautiful, healthy and lush, you need this ingredient. Your plants will thank you.

Those who have an orchid at home often complain about this problem: failure to flower . How to fix it? You only need this ingredient and your plant will grow healthy and lush forever.

Orchid, everything about the most loved plant in the world:

Read More

5 brilliant ways to add privacy to a door without curtains

In every home, privacy is paramount. Doors with windows, whether they be at the front, sliding glass doors, or interior ones, can often compromise this privacy. While curtains are the common go-to for many, they might not align with everyone’s style or practicality needs. Here, we present five chic, affordable, and effective alternatives to curtains for ensuring privacy through your doors.

1. Frosted Window Film:

A top pick for many homeowners, frosted window films seamlessly stick to your door’s window, providing a beautiful frosted effect. They ensure outside views are obscured yet allow natural light to come in. With an array of patterns and designs available, you can find one that resonates with your decor theme.

2. Decorative Window Clings:

Read More

Chicken Lettuce Wraps

Indulge in a delightful culinary experience with our Chicken Lettuce Wraps, a tantalizing fusion of savory ground chicken, crisp vegetables, and a harmonious blend of Asian-inspired flavors. This recipe transforms a pound of ground chicken into a symphony of tastes and textures, featuring the crunch of water chestnuts, the warmth of fresh ginger, and the umami richness of hoisin and soy sauces. Served elegantly in butter lettuce leaves, these wraps offer a light yet satisfying dish that is perfect for sharing or enjoying as a wholesome meal. Embark on a journey of culinary delight with each bite, as the aromatic medley of ingredients comes together seamlessly in this simple yet impressive recipe.

Ingredients:

1 pound ground chicken
1 tablespoon olive oil
1 finely diced yellow onion
3 cloves garlic, minced
1 (8 oz.) can water chestnuts, drained and finely diced
1/4 cup hoisin sauce
1/4 cup low-sodium soy sauce
1 tablespoon rice wine vinegar
1 tablespoon sriracha hot sauce (optional)
1 tablespoon fresh grated ginger
1/4 teaspoon red pepper flakes (optional)
Salt and freshly ground pepper, to taste
2 tablespoons thinly sliced green onions, plus more for garnish
1 head butter lettuce, rinsed and spun dry

Preparation:

Step 1
Heat olive oil in a large pan or skillet over medium-high heat, and brown the ground chicken on all sides for 5-7 minutes.
Step 2
Drain excess fat, then add diced onions, cooking until translucent (4-5 minutes). Season with salt and pepper.
Step 3
Add minced garlic and grated ginger, cooking for an additional 1 minute until fragrant.
Step 4
Stir in hoisin sauce, soy sauce, rice wine vinegar, sriracha, and red pepper flakes (if using). Cook for 2-3 minutes to allow flavors to blend.
Step 5
Mix in diced water chestnuts and green onions. Taste and adjust seasoning as needed.
Step 6
Serve the flavorful chicken mixture in butter lettuce “bowls.” Garnish with additional sliced green onions. Enjoy!

Read More

5 Secrets to Growing Chili Peppers from Seeds

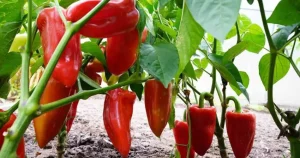
Chilli peppers are fun to grow from seed with the many shapes and varieties available but seedlings can sometimes be tricky to get off to a good start. You may often ask yourself “why aren’t my peppers growing?” » and be tempted to throw the whole bin into the compost.

I’ve been starting chili peppers indoors for a few years and have finally figured out the best ways to avoid the biggest problem growing chili peppers and get the results everyone wants – good lateral growth and strong stems and thick.

First of all, be aware that peppers can take a long time to germinate. Don’t expect to see green until about 2 weeks after sowing the seeds.

Discover 5 secrets to growing chili peppers from seeds below:

1. Sow two pepper plants per pot:

Peppers grow well on their own but are more productive if you plant two together. I started the peppers separately in pots and then grouped them together when it was time to move them to larger pots.

Stem growth is not affected and the plants will be very healthy.
Growing chili peppers from seeds is not an impossible task! Even a beginner can grow a lot of peppers in his vegetable garden, put the odds in your favor with seeds and good quality soil.

2. Start chili peppers from seed indoors 8 to 10 weeks before the last frost date:

When is the best time to start chili peppers? Ideally, you’ll start seeds indoors 8 to 10 weeks before your last frost date, harden them off to survive outdoors the week after your last frost date, then plant them in the ground the following week.

Chili peppers have a longer growing season, so if you garden in areas with fairly short warm spells, you should start them within that time frame. This often means starting mid-February early March, hardening them off mid-May, then putting them in the garden in late May or even early June.

Of course, they will get quite large and you will have to maintain them but you will be able to harvest peppers throughout the season, as opposed to one pepper at the end of summer.

3. Maintain Good Grow Light (or Use a South-Facing Window):

Read More