Month: November 2023

Easy Meatballs & Mashed Potatoes

This Meatballs & Mashed Potatoes meal is straight up comfort food. Easy to make meatballs on a bed of creamy mashed potatoes and a rich gravy that brings it all together for one satisfying meal.

When you’re running low on time to get dinner on the table, or just looking to use up some of your pantry staples, this meal is a great solution. The meatballs and potatoes cook at the same time, so it’s ready in just 30 minutes.

The gravy is the icing on the cake. You can keep it really simple by using a packet of brown gravy mix, or you can make your own gravy from the pan drippings of the meatballs.

Ingredients:

Continue reading ingredients on the next page

Read More

Step by step how to plant an avocado tree correctly

There is a certain mystery surrounding the correct method for planting the seeds of this rich fruit that we are surely all familiar with. Many of us have tried and failed at this endeavor a few times.

The truth is that there are two methods. A more well-known one, which we are probably all familiar with, and another which is not so popular but which also works. Beyond that, it must be said that  planting avocado seeds is a task that requires a lot of patience. 

Today we decided to share these methods with you so you can try both  and with a little luck (and of course patience) your seeds will germinate and in no time you will have a free avocado. Pay close attention below.

Characteristics of the lawyer

The  avocado  , also known as  “palta”  , is a fruit that grows from the avocado tree originally in  Mexico and Guatemala  . It is known for its unmistakable flavor and the large seed it contains inside.

Nutritionally, it is  a truly healthy food  , loaded with vitamins (C and A), various minerals (iron, potassium, calcium and others) and healthy fats.

Its texture is creamy and certainly unmatched. It can be eaten alone, with lemon, or as part of a more elaborate recipe. One of its most famous versions is the tasty and well-known  guacamole  . The versatility in its use is one of its main characteristics.

How to plant the avocado tree?

Probably all of the above makes many of us want to have our own avocado tree at home. Imagine being able to enjoy all the “avocados” we love and, above all, without paying anything.

Below we explain  two methods by which you can plant avocados. 

Method 1 for Sprouting Avocados

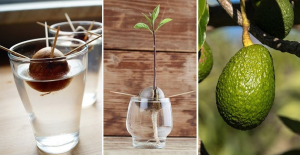
1. Extract the seed from the fruit

The first thing to do is cut the avocado in half and  carefully separate its pit  . Then you need to wash it as best as possible so that there are no remains attached to its surface.

2. Stick chopsticks

For the second step you need  to take 4 toothpicks or “toothpicks” and stick them in the middle of the seed  . When doing this, you need to make sure that they are arranged in an “X”, so that they can serve as support for the next step.

3. Put the seed in water

Find a glass jar that will fit the seed and fill it with water. Then rest  your chopsticks on the edge of the container so that the seed is “suspended” and half submerged  .

4. The eternal wait

This part is sometimes the hardest. The avocado seed takes about 6 weeks to germinate, no less. At this point we just have to wait. 

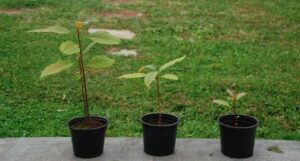
5. Place it in a jar

Once the sprouted root of the seed reaches about 10 cm, you can take it out of the water  , remove the toothpicks and transfer it to a medium-sized pot with soil.

Read More

This tip for multiplying roses is worth gold: never seen results like this before

To make the roses in your garden grow indefinitely, you only need one natural and effective ingredient, and that’s what it’s all about. Roses are one of the most  loved flowers  of all time, thanks to their  beauty  and their  delicate , unmistakable scent   . However,  growing them can be a  challenge  for many, especially those who live in  apartments  or in areas where the  climate  is not  favorable  . Fortunately, there is a  simple and effective tip  for  propagating roses at home  , using simple  aloe vera leaves  . Let’s look at the  detailed procedure  to achieve this result.

How to propagate roses with aloe vera

The  process  of propagating  roses  with  aloe vera  is relatively  simple  . Let’s start  by cutting a rose  with the  whole stem  , cutting  15-20 cm diagonally  . Then we cut  up to 2-3 cm  below the  bud  , thus obtaining  two pieces of stem  . At this point we must cut the   aloe vera  leaves Aloe vera has a  gel-like substance  inside the  leaves  , which is what we will use to grow  roses . Therefore, we cut an   aloe  leaf into two parts  and insert the  stems  of the  rose  into the  gelatinous part  of the leaf.

Transplanting rose bushes in pots

So once the   rose  stems  have formed their  roots  , they must be transferred to  pot  with  soil  . To do this we must make a  hole  in the center of the  potting soil  and insert the  leaf  and  stem  of aloe into it. We cover  everything well with  soil  , so that the  aloe leaf  continues to release its  properties  and helps the  rose  to become  strong and healthy. 

Because aloe vera makes plants grow

But why does this  tip  work so well? Aloe  vera  is known for its   healing and  regenerative properties  , and that is exactly what makes it  effective  in  growing roses  . The  jelly-like substance  inside  aloe leaves  contains many  nutrients  and  substances  that promote  plant growth. For example, it contains  plant hormones  such as auxin  and  gibberellin  ,  which help  to stimulate root  growth  and to promote the formation of  new cells.

By following the  procedure  we have described and using  aloe vera leaves  , it is therefore possible to grow  new rose plants  in a  natural and healthy way  , adding a touch of  beauty and fragrance  to your  home  .

Read More

Savory Herb-Infused Beef Noodle Delight

Indulge in the warmth of a delectable Savory Herb-Infused Beef Noodle Delight, where succulent pieces of beef chuck roast mingle with a symphony of mushrooms, onions, carrots, and egg noodles, all immersed in a perfectly seasoned broth. This comforting soup, a true embodiment of fall and winter, promises to be a culinary journey through layers of flavor and wholesome goodness. Let’s dive into the heartwarming embrace of this revamped classic.

Ingredients:

  • 2 ½ tablespoons vegetable oil
  • 1 tablespoon butter
  • 8 ounces cremini mushrooms, sliced
  • 1 medium yellow onion, finely chopped
  • 2 ribs celery, finely chopped
  • 3 large carrots, peeled and diced
  • 3 cloves garlic, minced
  • 2–3 lb beef chuck roast, trimmed and cut into bite-size pieces
  • Kosher salt and freshly ground black pepper
  • 8 cups low-sodium beef broth
  • 1 teaspoon dried marjoram (or oregano)
  • ½ teaspoon dried thyme
  • ½ teaspoon crushed rosemary
  • 2 bay leaves
  • 8 ounces wide egg noodles
  • Fresh parsley, thyme, or rosemary for garnish

Instructions:

  1. In a large Dutch oven or soup pot over medium heat, combine 1 tablespoon of vegetable oil and butter. Sauté sliced cremini mushrooms until they begin to brown (2-3 minutes).
  2. Add chopped onions, celery, and carrots. Cook until onions and celery are tender, and carrots start to soften. Reduce heat, add minced garlic, and cook for an additional minute. Transfer the vegetable mixture to a bowl, covering it with a loose paper towel.
  3. Season beef chunks with kosher salt and black pepper. Heat more vegetable oil in the pot and brown the beef on both sides. Add beef broth, marjoram, thyme, rosemary, and bay leaves. Bring to a boil, cover, and simmer for approximately 1 hour until the beef is fork-tender.
  4. Introduce egg noodles to the pot and cook for 5 minutes. Return the reserved veggies to the pot, simmering for an additional 5-7 minutes until noodles and carrots are tender.
  5. Discard bay leaves and garnish with fresh parsley, thyme, or rosemary. Serve promptly for optimal enjoyment.

Conclusion:

Savor the comforting embrace of Savory Herb-Infused Beef Noodle Delight, a culinary masterpiece perfect for warming hearts during chilly seasons. With its carefully balanced blend of flavors and wholesome ingredients, this revamped classic promises to be a staple on your comfort food list. Enjoy the richness of each spoonful and relish the joy it brings to your table.

Read More

Did You Know How To Whiten And Brighten Your Old Yellow Pillows?

Sure, you can clean your pillowcases once a week or so, but what about your pillows? Over time, they can turn yellow and stain (and just plain gross). And when that happens, luckily there’s a way to restore them to their clean, white glory. One Good Thing by Jillee shares a miraculous laundry bleaching solution and technique that works like magic on dingy pillows.

It’s a gross topic, but it happens to all of us: we sweat when we sleep. Our bodies are working to keep us at a comfortable temperature, and that often requires a little excretion in the process. It’s not very pleasant to think about, we know.

But think about this. All that sweat, dirt, old makeup and everything else you can imagine is absorbed by our pillowcases and on our pillows. No wonder they get so yellow and dingy! They are in desperate need of not only bleaching, but disinfecting as well.

Jillee’s method is incredibly simple and only requires a few cleaning products, most of which are probably in your laundry room right now.

Here’s what you’ll need to get started:

Continue reading this amazing article on the next page

Read More

Spicy Jalapeño Bliss – A Gourmet Twist on Grilled Cheese

Indulge your taste buds in a symphony of flavors with our unique and original recipe for Spicy Jalapeño Bliss – a tantalizing Jalapeño Popper Grilled Cheese that takes the classic sandwich to a whole new level. This culinary creation combines the heat of baked cream cheese-filled jalapeños, the richness of gooey cheddar and Monterey Jack cheese, and the savory crunch of crispy bacon. Elevate your sandwich game with this delightful fusion of textures and tastes!

Ingredients:

  • 2 Jalapeños, sliced lengthwise, seeds, and membranes removed
  • 4 ounces cream cheese
  • 4 slices crispy cooked bacon
  • 2 slices Monterey Jack cheese
  • 2 slices sharp cheddar cheese
  • 4 slices Italian bread
  • Chopped cilantro (optional)
  • Pats of butter

Instructions:

  • Preheat your oven to 375 degrees.
  • Fill each jalapeño half with approximately 1 ounce of cream cheese. Bake the stuffed jalapeños on a baking sheet for 25-30 minutes, then remove from the oven.
  • On two slices of bread, place 1 slice of cheddar cheese each. On the other two slices, place 1 slice of Monterey Jack cheese each. Slice the cooked stuffed jalapeños into bite-size pieces and distribute them on the cheddar-covered slices. Add the bacon to the Monterey Jack-covered slices. Optionally, sprinkle chopped cilantro on one side.
  • Combine the slices to create 2 sandwiches.
  • Top each sandwich with several pats of butter. Place them in a skillet over medium-low heat, butter side down. Grill each side until lightly browned, ensuring that the cheese becomes melted and gooey.

Conclusion:

Savor the harmonious blend of spice, creaminess, and crunch in every bite of our Spicy Jalapeño Bliss. This gourmet twist on the classic grilled cheese is not just a sandwich; it’s a flavor adventure that will leave your taste buds craving more. With the right balance of heat, cheese, and bacon, this sandwich is an ode to culinary indulgence. Enjoy it with confidence, knowing you’ve created a unique masterpiece that transcends the ordinary grilled cheese experience.

Notes:

  • Use gloves when handling jalapeños to avoid irritation, and wash hands thoroughly afterward.
  • Optimal results are achieved with a modest amount of cream cheese in the jalapeños.
  • Adjust cooking time if you prefer your jalapeño poppers less soft.
  • Choose high-quality smoked nitrate-free bacon for an enhanced flavor profile.
  • Elevate the experience with thick slices of bakery-style white, Italian, or European artisan bread, ensuring the cheese takes center stage.

Read More

You’ll want to try this pecan pie recipe for Thanksgiving dinner

Indulge your taste buds with an exquisite twist on the classic pecan pie – a luscious Chocolate Pecan Pie that promises to elevate your dessert experience. Crafted with love and a touch of decadence, this recipe is destined to become your new dessert obsession.

Decadent Chocolate Pecan Pie

Ingredients:

  • Dough for a single-crust pie (9 in.)
  • 1-1/4 cups golden corn syrup
  • 3 large eggs
  • 1/2 cup granulated sugar
  • 3 tablespoons velvety butter, softened
  • 1-1/2 teaspoons pure vanilla extract
  • 1/3 cup all-purpose flour
  • 1/3 cup rich baking cocoa
  • 1/4 teaspoon sea salt
  • 1 cup pecans, coarsely chopped
  • Optional: Whipped cream for garnish

Directions:

  • Begin by preheating your oven to 350°F. On a floured surface, delicately roll out the pie crust to achieve a thin 1/8-inch circle. Gently transfer it to a 9-inch pie plate, allowing the edges to extend about 1/2 inch beyond the rim. Create a beautifully fluted edge and then refrigerate the crust while you prepare the delectable filling.
  • In a generously sized bowl, whip together the golden corn syrup, eggs, granulated sugar, softened butter, and vanilla extract until the mixture achieves a heavenly smoothness. In a separate bowl, combine the flour, cocoa, and sea salt. Gradually incorporate this dry mixture into the corn syrup blend, stirring until a harmonious union is achieved. Introduce the coarsely chopped pecans into the filling, ensuring they are evenly distributed.
  • Pour this divine concoction into the awaiting pie crust, allowing the chocolatey goodness to envelop the pecans in a symphony of flavors.
  • Bake your creation in the preheated oven for approximately 55-60 minutes or until the filling is set, creating an irresistible aroma that permeates your kitchen.
  • Once the Chocolate Pecan Pie has achieved its decadent perfection, let it cool gracefully on a wire rack. For those who crave an extra layer of indulgence, feel free to crown each slice with a dollop of whipped cream.

Conclusion:

Allow this Chocolate Pecan Pie to be the pièce de résistance at your dessert table, captivating your senses with the perfect balance of chocolate fudge and the nutty richness of pecans. Each velvety bite is a journey into dessert paradise, making this recipe an instant favorite. Share this delightful treat with loved ones, or savor it slowly, relishing the sweet symphony of flavors and textures that make this dessert truly exceptional.

Read More

CHICKEN LO MEIN

Say goodbye to takeout and welcome the aromatic world of “Homemade Chicken Lo Mein” right into your own kitchen. In just 20 minutes, you can savor the authentic flavors of this Chinese classic, featuring tender chicken, an array of fresh vegetables, and a savory sauce that’s as satisfying as it is simple to prepare. Put down that takeout menu and join us in crafting this quick and easy masterpiece.

PREP TIME : 5 minutes

COOK TIME : 15 minutes

TOTAL TIME : 20 minutes

INGREDIENTS :

CHICKEN

  • 1 Tbls canola oil
  • 1 pound chicken breasts, , cut into thin strips
  • 3 cloves garlic, , minced
  • 2 Tbls ginger, , grated
  • 2 Tbls soy sauce

VEGGIES

  • 1 (8 oz) mushrooms, thinly sliced (baby bellas or shittake)
  • 1 small onion, , finely choped
  • 1 1/2 cup napa cabbage, , finely shredded
  • 1 cup matchstick carrots

SAUCE

  • 1/4 cup chicken stock
  • 1 tsp cornstarch
  • 1 Tbls sesame oil
  • 1/4 cup soy sauce
  • 1 tsp brown sugar
  • 12 oz pasta, , cooked according to package directions.

Instructions:

  • Begin by heating canola oil in a large skillet over high heat. Add the thinly sliced chicken, minced garlic, grated ginger, and soy sauce. Sauté for approximately 4-5 minutes until the chicken takes on a beautiful golden-brown hue. Once done, remove the chicken from the pan, leaving any residual juices or oil behind.
  • Next, introduce the sliced mushrooms and finely chopped onions to the same pan. Allow them to cook for about 3-4 minutes until the onions turn soft and the mushrooms develop a lovely golden-brown color. Now, add the finely shredded napa cabbage and matchstick carrots, and let them mingle in the pan for another 3 minutes.
  • While your vibrant medley of vegetables cooks, whisk together the ingredients for the sauce. Combine chicken stock, cornstarch, sesame oil, soy sauce, and brown sugar in a bowl. Once the sauce is well mixed, pour it over the vegetable mixture in the pan, and bring it to a brisk boil for just 1 minute.
  • Reintroduce the sautéed chicken strips to the pan. Stir everything together until the savory sauce envelops each ingredient, and you notice it beginning to thicken, creating a mouthwatering blend of flavors.
  • To complete this culinary masterpiece, gently toss the cooked pasta into the pan, ensuring it’s thoroughly coated with the delicious sauce and infused with the essence of all the ingredients.
  • For that perfect finishing touch, garnish your “Homemade Chicken Lo Mein” with a generous sprinkling of sliced green onions.

Conclusion:

With every bite of this “Homemade Chicken Lo Mein,” you’ll relish the satisfaction of creating a restaurant-quality dish in the comfort of your own home. It’s a delightful alternative to takeout, offering a symphony of flavors that’s sure to become a family favorite. Enjoy the convenience and authenticity of this quick and easy recipe – dinner is served!

Read More

Savory Skillet Chicken Delight

Indulge your taste buds with a culinary masterpiece — our Savory Skillet Chicken Delight. This delectable dish boasts a creamy texture, harmoniously blending fresh vegetables with a heavenly flaky crust. Get ready to embark on a journey of flavors that will leave your senses in awe.

Ingredients:

For the Irresistible Dough:

  • 1 2/3 cups unbleached all-purpose flour, plus extra for the work surface
  • 3/4 teaspoon table salt
  • 10 tablespoons unsalted butter, cold, cut into 1/2-inch pieces and frozen for 10 minutes
  • 2 tablespoons sour cream
  • 4 – 6 tablespoons ice water

For the Chicken and Veggie Harmony:

  • 1 teaspoon vegetable oil
  • 1 whole chicken, approximately 4 1/2 pounds, expertly cut into 4 pieces
  • 24 frozen pearl onions, thawed and drained
  • 1 medium onion, cut into 1/2-inch pieces
  • 4 medium carrots, sliced into 1/2-inch pieces
  • 3 medium ribs celery, diced into 1/2-inch pieces
  • Salt and ground black pepper to taste

For the Luxurious Sauce:

  • 4 1/4 cups low-sodium chicken broth
  • 4 tablespoons unsalted butter
  • 1/2 cup unbleached all-purpose flour
  • 3/4 cup heavy cream
  • 3/4 cup frozen peas, kept unthawed
  • 2 teaspoons fresh lemon juice
  • 1 teaspoon minced fresh parsley leaves
  • 1 teaspoon minced fresh thyme leaves

Instructions:

  • Creating the Perfect Dough: Begin with the heart of our dish. In a food processor, blend flour and salt until perfectly combined. Add cold, buttery pieces and pulse until they resemble large peas. A mixture of sour cream and ice water brings it all together, resulting in a dough that’s both tender and flaky. After a brief chill, it’s ready to elevate your culinary creation.
  • Roasting the Chicken and Vegetables: Kickstart the savory symphony by browning chicken pieces in a sizzling skillet. Once golden, transfer them to heavenly heights in the oven. In the same skillet, dance pearl onions until browned, then add a medley of veggies. Return the chicken to the spotlight for a succulent roast, delivering a melody of flavors that will leave you yearning for more.
  • Perfecting the Dough: Our delectable crust deserves a moment of its own. Roll out the dough to perfection on a floured parchment sheet, creating a 14-inch circle. With artistic finesse, fold and crimp to form a heavenly 12-inch round with a fluted edge. Adorn with oval vents and intricate cutouts, turning your dish into a visual masterpiece.

Conclusion:

Savor the culmination of flavors in every bite of our Savory Skillet Chicken Delight. From the meticulously crafted dough to the succulent roast, this dish transcends the ordinary, making every meal a delightful journey into the extraordinary. Elevate your dining experience and treat yourself to the extraordinary fusion of textures and tastes that define this culinary masterpiece.

Read More

No need to scrub, put the oven rack in a bag: it becomes like new again

Keeping your oven’s rack sparkling can be a real challenge, especially if it’s frequently used and has accumulated grime over time. Let’s dive into how to make it look brand new.
Why Oven Racks Get Dirty
The oven is an essential kitchen tool. Whether it’s conventional or fan-assisted, inside are racks that hold the trays or containers for baking. It’s inevitable – as we cook, these racks will get dirty, just as our stovetops do. Cleaning these racks can be daunting. Sometimes, even the chemical cleaners that promise wonders fail to deliver.
But there’s a natural, efficient method that might seem unusual but works wonders.
Effortless Oven Rack Cleaning
Here’s what you’ll need:

Continue reading this article on the next page

Read More