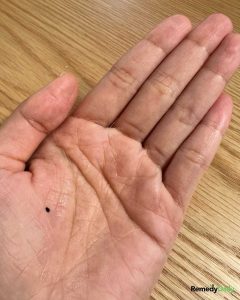
Day: November 25, 2023
If you see a black dot on someone’s hand, pay attention. Here’s what it means
BEAN AND HAM HOCK SOUP
When the pantry is bare and the grocery budget is empty, this is the meal I lean on—ham and bean soup or, as we call it in my house, ham and beans. This recipe can feed an army for just a couple of dollars, the flavor is excellent, and thanks to the Crock-Pot, the hands-on cooking time is almost nothing.
Ingredients :
1 lb package dried northern beans
ham bone, hocks, shanks or diced ham (about 1 pound)
2 tsp onion powder
6 cups water
salt & pepper to taste
HOW TO MAKE:
10 fasting growing shrubs that create privacy
1. Leylandii
2. Pines
3. Laurels
4. Holly
5. Pyracantha
6. Bamboo
7. Lilac
8. Forsythia
9. Roses
10. Hydrangea

We love making batches of this and handing these out as gifts. Pure deliciousness in a jar
Ingredients:
1 gallon pulp-free orange juice
1.5 cups granulated sugar
3 cups 190 proof everclear
2 tbsp vanilla extract
1/2 cup French vanilla liquid coffee creamer
1/2 cup vanilla-flavored vodka
Instructions:
1. In a large pot, heat to boil the following ingredients: orange juice, sugar, coffee creamer, vanilla extract.
2. Continuously stir until the coffee creamer is completely blended.
3. Allow the mixture to cool down to room temperature. This takes about 1 hour.
4. Combine the everclear and vodka with the orange mixture.
5. Stir the mixture thoroughly to ensure even distribution.
6. Carefully pour the moonshine into mason jars and seal them tightly. Let the moonshine sit for a minimum of 2 weeks. Refrigerate
To serve, pour the orange creamsicle moonshine into shot glasses or use it as a base in your favorite cocktails. Garnish each glass with an orange slice for a touch of visual appeal. Remember to drink responsibly, as this moonshine packs a flavorful punch.
How to Make an Eggshell Tea Fertilizer for Plants
Here’s how to make an eggshell fertilizer for your plants.
You need:
2 liters of water
shells of 6 eggs
epsom salt or magnesium sulfate
Plastic bottle
Strainer
Procedure:
Use the eggshells with the inner membrane.
Place 2 liters of water in a pot and bring to the fire until it boils.
Place the shells in a mortar and try to grind them very well. Sand type or similar.
Once the water begins to boil, add the ground egg shells and cook for 5 minutes.
Also add about 15 grams or 1 tablespoon of epsom salt (very rich in magnesium).
Remove from heat and place the pot in a cool, dry place.
Cover the pot and let stand for 24 hours.
After this time you will proceed to strain the preparation and pour the strained water into a plastic bottle.
Do not throw away the residues that remain in the strainer, because they are used for plants, such as preventing snails or slugs from approaching.
With the water from the bottle you will proceed to water the plants at least once a month.
If you have leftover water in the bottle, you can store it in a shady place and use it again. Just keep in mind to shake it before using.
This plant is called ‘Christmas cactus.’ Here’s how to successfully grow it in a pot at home
Selecting the Right Container:
Watering and Humidity:
Dormancy and Blooming:
Vegetable Beef Soup
Vegetable Beef Soup is the perfect cozy soup and such a good way to use up all those veggies stocked in the fridge!
It’s perfectly hearty and filling thanks to the tender chunks of protein-rich beef and abundance of nutritious vegetables. Plus it’s a versatile recipe so feel free to replace veggies with others you may have on hand.
Ingredients
- 1 1/2 lbs beef stew meat
- 2 1/2 Tbsp olive oil, divided
- Salt and freshly ground black pepper
- 1 3/4 cups chopped yellow onion (1 large)
- 1 1/4 cups peeled and chopped carrots (3 medium)
- 1 cup chopped celery (3 medium)
- 1 1/2 Tbsp minced garlic (4 cloves)
- 8 cups low-sodium beef broth or chicken broth
- 2 (14 oz.) cans diced tomatoes
- 1 1/2 tsp dried basil
- 1 tsp dried oregano
- 1/2 tsp dried thyme
- 1 lb red or yellow potatoes, chopped into 3/4-inch cubes
- 1 1/2 cups (5 oz.) chopped green beans (trim ends first)
- 1 1/2 cups frozen corn
- 1 cup frozen peas
- 1/3 cup chopped fresh parsley
How To Make Vegetable Beef Soup
- Heat 1 Tbsp olive oil in a large pot over medium-high heat.
- Dab beef dry with paper towels, season with salt and pepper then add half of the beef to pot and brown about 4 minutes, turning halfway through.
- Transfer to a plate add another 1/2 Tbsp oil to pot and repeat process with remaining half of beef.
- Add another 1 Tbsp oil to now empty pot then add onions, carrots, and celery then saute 3 minutes, add garlic saute 1 minute longer.
- Pour in broth, tomatoes, browned beef, basil, oregano, thyme and season with salt and pepper. Bring to a boil then reduce heat to low, cover and simmer, stirring once or twice throughout, for 30 minutes.
- Add potatoes then continue to simmer, covered, 20 minutes (you can also add green beans with potatoes if you like them very soft).
- Stir in green beans and simmer 15 minutes longer, or until all of the veggies and beef are tender.
- Pour in corn and peas and simmer until heated through, about 5 minutes. Stir in parsley and serve warm.
Why Pillows Turn Yellow, and How to Clean Them
Those yellow spots on the pillows may be disgusting, but they are not permanent.
Although we know that the human body – including our own – can sometimes be disgusting, we prefer not to remember it. So when you change your sheets and find that your once perfectly white pillows are now covered in a web of yellow and brown stains, it can be unsettling.
But these discoloured pillows look worse than they really are. There is a reasonable explanation for the origin of these stains, and they can be removed. Here’s what you need to know.
Why do pillows turn yellow?
There are several reasons why pillows turn yellow, but the most common cause of these spots is sweat. People sweat while they sleep, some more than others. The more you sweat, the more moisture seeps into the pillowcase and onto the pillow, causing the stains. And when you think about how many hours your head and face are on that pillow, that’s a lot.
In addition to sweat, your hair can be the culprit: specifically, if it’s particularly oily or if you often go to bed with wet or damp hair. Certain types of make-up and skin care products can also be the cause of these yellow spots. It can also be drool. Putting a waterproof pillow protector before your pillowcase can help prevent much of the discoloration.
How to wash pillows in the washing machine
Make sure your washing machine is large enough.
If your washer is big enough, you can wash small pillows in it. But if you have queen or king-sized pillows, head to the laundromat to use their extra-large front-loading washers. “What cleans is not the water, but the tumbling motion of the items inside the washer,” Roberts says. “If you put pillows in the washer, they get wet but they don’t get turned over.”
Use the gentle cycle.
Too much agitation may break apart the fill.
Use cold or warm water.
Avoid hot water, which can break down the filament in your pillows.
Don’t use too much detergent—and skip the softener.
Reduce the amount of laundry detergent you usually use; say, ¼ capful if you use one full cap during regular loads (too much is harder to rinse out). Don’t use fabric softener, which can collect on pillows and cause a sheen that attracts more dirt and oils.
Rinse well.
If possible, choose a second or deep rinse option to completely flush out any residues.
Now time to dry.
Place the pillows in the dryer on low heat. Add a couple of dryer balls or clean tennis balls to prevent the filling from clumping. Down may take longer to dry, which is normal, says Roberts. A dryer sheet is fine to use to reduce static. And triple-check to ensure pillows are totally dry (so they don’t get mildew!) before making the bed.
More Pillow Tips
Clean pillows by hand if you can’t use a washing machine.
If your pillow’s label can’t be found, you can always wash it the old-fashioned way too. Wait for a sunny day, and take the pillows outside to beat them with a clean broom handle (or rug paddle if you have one like your great-grandmother’s!). Then let them air out outdoors for a few hours. For foam pillows, you can pull out your vacuum and use the upholstery attachment brush instead.
Use pillow protectors.
Cover pillows with pillow protectors before you put on pillowcases. Then wash these every week when you wash your sheets.
Fluff daily.
In between washes, fluff up your pillows when you make the bed each day. This helps keep them plumped and redistributes the filling to restore their shape, says Roberts.
Keep extra pillows on hand.
If you find a pillow you love, buy a few extra, suggests Roberts. That way, when your favorite doesn’t support your head and neck like it used to, you can replace it with the same type. Plus, it’s always nice to have extra pillows handy for overnight guests.
Know when to say goodbye to your pillow.
If your pillow is lumpy and flat, it’s probably time to part ways. Ditto if the pillowcase itself is stained and yellowed. Old pillows also can accumulate allergens such as dust mites and pet dander, so go ahead and treat yourself to a new pillow every year or so (or as needed).
Rosemary in Oil Overnight: The Benefits You Need to Know
Rosemary and oil are not only excellent ingredients for cooking, enhancing the flavors of various dishes, but they also have medicinal properties that can alleviate muscle problems, inflammation, pain, and discomfort.
These two readily available ingredients, when applied to affected areas, can provide significant relief, even from acute pain. Here’s how to utilize the muscle-relaxing powers of rosemary and oil:
Preparing Rosemary Oil:
To start the healing process, prepare a natural remedy using extra virgin olive oil and fresh rosemary. You’ll need 4 tablespoons of extra virgin olive oil and fresh rosemary.
- Mix the olive oil and fresh rosemary.
- Rub the mixture onto the affected area and leave it on for at least 20 minutes.
- It’s advisable to repeat this process until the pain subsides or significantly improves.
Alternative Preparation:
If you don’t have fresh rosemary, dried rosemary can also be used, as it possesses the same properties as fresh rosemary.
- Take a tablespoon of dried rosemary or a few sprigs of fresh rosemary and place them in a jar with a capacity of at least 250 ml.
- Pour olive oil over the rosemary.
- Seal the jar and wrap it in a cloth.
- Store it in a dark place for at least 10 days.
Afterward, you can use the infused oil to alleviate various problems, but it requires commitment and persistence.
Rosemary Tea:
Rosemary is rich in antioxidants, making it beneficial for various ailments. You can enjoy its benefits through a delicious tea.
- Take a sprig of fresh or dried rosemary and place it in a pot.
- Add 300 ml of water and simmer for 10 minutes.
- Strain the tea into a glass using a strainer, and it’s ready to be consumed.
You can enjoy rosemary tea either hot or cold, as it retains its properties in both forms. For optimal results, consume rosemary tea at least twice a day for three months. After this period, you’ll notice its numerous benefits, including relief from discomfort and minor headaches.
How to Plant Avocados at Home for Dozens
Avocados are undoubtedly among the fruits richest in nutrients and benefits. Its consumption is associated with benefits such as reduced risk of cardiovascular disease, cancer prevention, better digestion and weight loss.
Below we explain how to grow avocados at home , to save money and always have them available, completely natural and organic.
Take an avocado seed, clean it well and insert 4 toothpicks, equidistant from each other, then dip it in 3 centimeters of water. Place the glass in a warm, sunny place.
The root will take 2-8 weeks to grow and once it reaches a length of around 15cm it will become visible and will need to be cut to a length of 8cm. After a few days, the leaves will also appear.
Fill a fairly large pot with nutrient-rich potting soil and poke a hole in the center. Insert the seed, leaving half of it above the soil.
Place the pot in a sunny location and water it daily. The tree may take several years to bear fruit.