Day: November 22, 2023

5 tips for one day of cebolla and added otoño

No better time to plant more and more cebollas than in the otoño. This is not the only thing that allows you to keep part of your garden space productive during the winter months, otherwise it can also produce a large amount of greenery in the near future.

Aunque el ajo y las bollas can be planted and cultivated as a traditional primary crop in the majority of climates, for those who experiment with more of an invierno greenery, planting a principios del otoño can maintain important variations in the primary season.

To do this, the egg layer allows the bulbs of the cebola to grow significantly. Planting in the otoño, the bulbs have the opportunity to germinate and start a temporary growth. Luego, tired of sleeping during the winter months, recovered quickly to life in the first place.

Planting ajo and cebollas in the otoño can  produce large heads of ajo  and larger bulbs, but they are even more sabrous.

Then there is a base loaded on the bottom, the bottom of the vent is unbelievable when it comes out and it increases. Even if you include better than cultivar bulbs larger, allow your ambos cultivars not to be invierno in the only one that lasts longer to achieve a better health profile.

5 tips for a few days of this bowl and one added to it:

1- Plant it and add it at the right time

To plant a layer of added or cebolla in the otoño, the moment is essential. For vegetal plants, this plant means that it will allow you to have these weeks of growth before the cold starts in winter.
Siempre plant ajo y cebolla con la punta hacia arriba. This will allow the crop to germinate and grow quickly on the surface.

This time of increase in harvests over the last few weeks is essential for growing crops. This allows them to remain inactive for a long time during winter. These are good reasons to prepare the scenario for a further development of the basic principles. Why not plant included before? Because the climate in the room requires fresh air to bloom.

If you plant it too early in the verano, the seed bulbs and the seeds of the seed may have problems germinating and growing.

2- Prepare your bombs and vanes with anticipation

Consigue tus bulbos lo antes posible para plantarlos. It can be difficult to encounter these balls and the roots of the plant. Unfortunately, the majority of gardening and living businesses have to reduce the existence of plants and seeds in the middle of the verano.

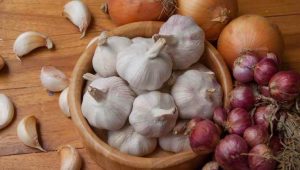
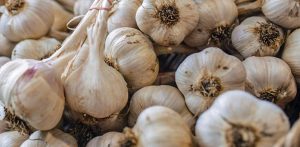
All juegos de cebollas y dientes de ajo se pueden amacenar temprano para plantar. Ambos will be maintained well in a fresco and seco hasta la siembra. The cebolla games are a better option than the cebola seeds to plant in the otoño, because the cebollas are much larger than the next one. The sets are also easier to remove and maintain in boxes than the third-party plants.

When it comes to garlic, select healthy seed stock for planting. If using garlic from your own harvest, select the largest and best bulbs for planting. This will give you the best chance of success and producing big buds.

3- Prepare your soil for planting

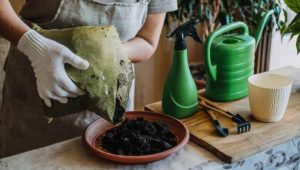
Garlic and onions both need loose, fertile, well-drained soil to grow best. This not only allows the bulbs to grow larger but also prevents them from rotting in the sometimes overly humid conditions of late fall and early spring.

Prepare your soil well before planting to ensure harvest success. The best way to do this is to add generous amounts of compost to the bottom of each planting furrow. The compost will provide both the nutrients and improved drainage that the bulbs need to thrive.

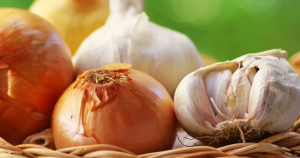
As for planting depth, we plant garlic bulbs 7cm deep and our onions 5cm deep. Whether you are planting garlic cloves or onion bulbs, always plant with the pointed end of the bulb facing up. This is where they will germinate and allows for faster growth upwards from the soil.

To plant, you first dig a furrow in the ground to create a row. Then we add about 3 cm compost to the bottom of the trench. Once the compost is in place, we then plant the bulbs in the compost layer. This allows the seed to be surrounded by vital nutrients as it germinates and grows.

4- Soak the bulbs before planting them

Here’s another big tip before planting in the fall, soak your bulbs before planting. Soaking allows the bulbs to absorb moisture before sinking into the soil. And without moisture, the bulbs simply won’t germinate.

This can be essential in late summer and early fall when the soil may be quite dry. After summers which are particularly hot and dry. To soak your plants, fill a bucket with water the day before planting and throw the bulbs in.

Some gardeners even add a few tablespoons of pure baking soda to the water. It is said to help speed germination and protect bulbs from insects and rot. The simple task of soaking the bulbs can speed up germination time by a week or more.

Always be sure to use distilled or untreated water for soaking. Chemicals in tap or treated water can often affect the ability of bulbs to germinate.

5- Mulch your crops

Quiz the main secret of all for a good container of cereals or ajos planted in the otoño are mantenerlos siempre cubiertos with a good capa de mantillo. The mantle will not only protect the crops during the winter, but will also protect the competitive males and the mantle will retain moisture on the ground.

Immediately after leaving the plant, cover the sole with a 2 cm coat cap. The pajamas work very well as mantillo, just as the crushed hojas or the hierba recorts. Once you see that the crops begin to emerge in just a few weeks, they continue to grow. To leave the end of the ear and the principles of winter, our crops must be covered with a mantle to a depth of 10-15 cm.

This will help protect your cebolla and even harsh temperatures and winter weather. Once you leave the primavera, simply add a bit of mantillo fresco to the upper part of the threads and prepare it for a large cosecha a principios del verano.

Let’s plant a good layer of ajo and cebolla this is otoño.

Read More

Chicken Philly Cheesesteak Sandwich

Ingredients for Chicken Philly Cheesesteak

The chicken Philly cheesesteak is just like the classic beef Philly cheesesteak. Build your sandwich with any or all of the toppings you enjoy most.

  • Chicken breast: Instead of using beef, chicken philly cheesesteak uses boneless skinless chicken breast as the protein base of the sandwich. Substitute with boneless skinless chicken thighs for an even juicier, softer meat.
  • Green bell pepper: Bell peppers are a necessary veggie for both Philly versions. Swap out green peppers with the slightly sweeter yellow or red bell peppers.
  • Onion: The flavor of caramelized onions is to die for! Use yellow, sweet, or white onions.
  • Mushroom: Softened, cooked mushrooms provide a mild sweetness combined with an umami taste to your philly sandwich.
  • Cheese: The traditional Philly cheesesteak cheese of choice is provolone for its neutral flavor and easy melting. Sliced white American cheese and Swiss cheese are great alternatives. Many Philadelphia food trucks swear by using Cheez Whiz, too!
  • Hoagie: A classic Philly is made with a hoagie roll (long flat roll). However, any white roll or sandwich bread will work. Use what you’ve got!
  • Seasoning: Add a dash of salt and pepper to add more flavor to the chicken as it’s cooking or to the sandwich at the end.

Level Up Your Chicken Philly Cheesesteak With These Ingredients

There are no hard rules when it comes to building your own chicken philly. Level up your sandwich with our favorite list of customizations.

  • Veggies: If you like a bit of heat or tang, jalapeños or banana peppers will do the trick. Lettuce is a great option if you’re craving a bit of crunch.
  • Sauces: Add mayo to your hoagie before broiling it, or hot sauce if you need the heat. Ranch can be used directly on the sandwich or as a dipping sauce, as well.
  • Seasoning: Italian seasoning, paprika or garlic powder are all solid options if you’re needing something more than salt + pepper.
  • Protein: Add pieces of cooked crisp bacon to really send your chicken cheesesteak sandwich over the top.

How To Make a Chicken Philly Cheesesteak Sandwich

Chicken Philly cheesesteak requires only a few simple ingredients, thirty minutes, and one pan. Here’s an overview of the simple steps to get you started

  • Prepare the ingredients: Slice the chicken into thin strips. Cut up peppers, onions, and mushrooms.
  • Sauté the vegetables: In a large skillet, sauté the onion, bell peppers, and mushrooms one veggie at a time. Remove to a separate bowl.
  • Cook the chicken: Cook the chicken in the same skillet until golden brown. Place veggies back in and season.
  • Top with cheese: Add sliced cheese on top, then cook on very low heat until cheese fully melts.
  • Serve: Add filling into hoagie buns and serve!

3 Tips to Make Your Chicken Philly Even Better

Make your chicken philly cheesesteak sandwich even better with these three easy tips.

  • Slice ingredients thinly and evenly: For even cooking, use a Mandolin Slicer to quickly and easily slice the ingredients. Place chicken breasts in the freezer for a bit so they slice really easily with this slicer.
  • Toast the hoagie: Spread some softened butter and garlic salt on the hoagie and broil for 15 seconds for a crispy, garlic-butter bun. Alternatively, use mayo.
  • Use a lid for the skillet: After adding cheese slices to the skillet to melt, place a lid on top to trap the heat and help the cheese melt quicker.

How to Serve a Chicken Philly Cheesesteak Sandwich

Chicken Philly cheesesteak is great for a weeknight family meal, a get-together, or as a sandwich to take to work the next day. Serve it with sweet and spicy canned pickles, air fryer potato chips, or air fryer french fries. For a light and fresh side dish, this tomato, mozzarella, and lettuce salad is perfect.

Ingredients

  • 2 lbs chicken breast boneless & skinless
  • 2 green bell peppers
  • 1 large yellow onion
  • 1 lb mushrooms
  • 2 tbsp oil
  • 1 tbsp salt
  • 1 tsp ground black pepper
  • 8 oz provolone cheese sliced
  • 6 Hoagie buns

Instructions

  1. Slice chicken into thin strips. Cut bell peppers into long strips, onion into half rings, and mushrooms into bite-sized pieces.
  2. Preheat a skillet with oil. Add in onion, cook until golden. Set aside. In the same skillet, sauté bell peppers until golden, set aside and do the same with mushrooms.
  3. In the same skillet, cook chicken until golden brown. Add veggies back into the mix. Season with salt and pepper.
  4. Add slices of provolone on top, allow it to sit on very low heat until the cheese is fully melted.
  5. Add the filling to hoagie buns, serve while the cheese is melted. Enjoy!

Read More

Surefire Method to Turn One Soap Bar into Three Liters of Liquid Detergent

The classic bars of soap that you find in supermarkets were, until recently, the primary option for handwashing laundry. Over time, with the advent of new technologies like washing machines, their use has decreased, but they haven’t completely disappeared.

Some people still prefer to use bars of soap today, especially Marseille soap, as it’s more effective at treating localized stains. In this article, we’ll explain how to transform a bar of soap into 3 liters of liquid detergent.

Liquid detergent is recommended not only to protect your hands but also to avoid leaving residues on your laundry. Additionally, it’s more convenient and versatile for use with washing machines. Its one drawback is the cost, which can be quite high at times.

Here’s what you’ll need:

  • 1 bar of Marseille soap
  • 120 ml of white vinegar
  • 1 tablespoon of baking soda
  • 3 liters of water A kitchen grater A clean bucket

Procedure:

  1. Grate the Marseille soap bar into the bucket.
  2. Pour one liter of water over the grated soap until it’s completely covered, and let it sit overnight.
  3. The next day, transfer the contents of the bucket into a pan, add the other 2 liters of water, and mix everything with a wooden spoon. Then, add 120 ml of white vinegar and 1 tablespoon of baking soda.
  4. Once it starts to boil, turn off the stove and wait for 10 minutes.
  5. Let the mixture cool for 20-30 minutes, then pour it into your final container.
  6. Use this liquid detergent in the same way as commercial detergent. You’ll notice that your laundry comes out cleaner and more fragrant.

Read More

Creole-Style Shrimp and Sausage Gumbo

It’s been a while since I’ve had homemade cajun style shrimp creole. I absolutely love the stuff. I swear It’s amazing, especially when it’s served with hot steamed rice and cornbread…. LAWD HAVE MERCY!! It’s almost like a shrimp gumbo, but without the roux. It is truly one of my favorite southern dishes. It must be some of your favorite dishes as well, because I’ve been getting a TON of request for it. So in this post, I’m going to show & tell you how I make my homemade Shrimp & Sausage Creole.

My version of shrimp & sausage creole is simple. I don’t use any fancy ingredients. I just use the basic stuff. The only ” fancy” thing about this recipe are the tomatoes that I use. I like to use Heavenly Villagio Marzano Tomatoes, as well as Zima tomatoes. Why? because I LOVE the sweetness of the tomatoes… If you have a different tomato that you’d like to use feel free to use it.

Ingredients:

2 cans (14 oz (420 ml) each) stewed tomatoes
1/4 pound (120 g) reduced-fat smoked sausage, sliced
1 red bell pepper, chopped
1 clove garlic, peeled and minced
1/8 teaspoon crushed red pepper
1/2 pound (240 g) fresh sliced okra
3/4 pound medium shrimp, peeled and deveined
salt, to taste
3 cups (750 ml) cooked rice, warm

Method:

  • Step 1
    In 6-quart (6 l) slow cooker, combine all ingredients, except okra, shrimp, salt, and rice. Mix well.
  • Step 2
    Close cooker and cook on low-heat setting for 6-7 hours, adding okra during last 30 minutes and shrimp during last 10 minutes.
  • Step 3
    Turn off slow cooker. Serve shrimp and sausage mixture with salt. Serve over cooked warm rice

Read More

Bacon Cheeseburger Quesadillas

Bacon Cheeseburger Quesadillas

You are going to be in love with this amazing easy dinner recipe! These Bacon Cheeseburger Quesadillas are so delicious, are easy to make and are only 6 net carbs a serving! Salty bacon and ground beef are combined with a delicious Worcestershire and tomato sauce, then cream cheese is added to make everything melt together. This savory blend is then combined with sharp cheddar and seared inside a tortilla, making the perfect keto dinner recipe!

Ingredients in Cheeseburger Quesadilla

As always, here is a quick overview of the ingredients used in our Keto Quesadillas. For the complete recipe, just scroll to the bottom of the page.

  • Bacon, ground beef
  • Onion, tomato paste, mustard, Worcestershire sauce
  • Cream cheese, cheddar cheese
  • Tortilla- low carb, gluten free or regular

How do I make these beef quesadillas?You can have this delicious keto dinner recipe on the table in only 4 easy steps!

  1. Brown your bacon and set aside to drain.
  2. Add the beef and onion and cook. Drain any grease.
  3. Add the tomato paste, Worcestershire sauce, mustard and cream cheese and stir until combined.
  4. Add cheese to your tortilla and add the beef and bacon mixture. Cook for 2-3 minutes on each side or until golden brown.

What should I serve with these keto quesadillas?

The first thing that comes to mind is the perfect dip! Try this Chuy’s Jalapeno Ranch, Smoked Queso or my favorite Avocado Ranch Dip! If you want to incorporate some more veggies in this dish, serve with Zucchini Tortillas or Fajita Veggies. Ranch Zucchini Chips or Chili Cheese Collard Green Chips are a great keto alternative to tortilla chips! For dessert, try these Keto Cinnamon Twists or No Bake Cheesecake!

How to Store and Reheat these keto quesadillas

To store these quesadillas, place into a container with an airtight lid and keep in the fridge. These quesadillas will stay fresh for up to four days. You can reheat this meal in a number of different ways. To warm in the microwave, place onto a microwave safe plate and heat in 30 second increments until it’s hot enough for you. You can also warm on the stove top over medium low heat, or in the Air Fryer for 2-3 minutes.

Can I freeze this keto ground beef recipe?

Yes, you can! These Cheeseburger Quesadillas freeze well. Just prepare, allow to cool completely and place in a freezer safe bag. I recommend adding a layer of wax or parchment paper in between each of the quesadillas so they don’t stick together. To defrost, just place into the fridge overnight.

Ingredients:

  • 3 slices of bacon, chopped into small pieces
  • 1 pound of ground ground beef
  • 1/2 cup chopped onion
  • 2 tablespoons tomato paste
  • 2 teaspoons Worcestershire sauce
  • 1 teaspoon mustard
  • 2 ounces cream cheese
  • 5 tortillas (regular, low carb, or gluten free)
  • 1 1/4 cup shredded cheddar cheese

Instructions

  1. In a large skillet brown the bacon until crisp over medium heat. Using a slotted spoon, remove the bacon from the skillet and set aside. Drain off the bacon grease.
  2. Add the ground beef and onion and brown until cooked through, drain off any grease.
  3. Reduce the heat to low and add the cooked bacon, tomato paste, Worcestershire sauce, mustard and cream cheese to the skillet and stir until the cream cheese has melted.
  4. Sprinkle each tortilla with 1/4 cup shredded cheese and top with the beef mixture, fold the tortilla over to close.
  5. Heat a clean skillet or griddle to medium heat and lightly spray with oil or melt butter in the skillet. Cook each quesadilla 2-3 minutes on each side until golden brown.

Read More

Onions and garlic: how to grow them at home and save a lot of money

Organic growing practices are becoming more widespread, and many people are choosing to grow onions and garlic at home.

Whichever variety we choose, we can   grow them all in pots   and get excellent results in   about 6-7 months. To reap the fruits of growing garlic and onion at home, a small   balcony and   some pots are enough. Over time we can appreciate the many benefits offered by these two vegetables, beneficial for the health and   well-being of the body.

The Liliaceae family    includes garlic, onion and shallots   , highly appreciated in the kitchen for their organoleptic characteristics and the benefits they bring to our body. If you also want to successfully grow   these edible bulbs   , it is important to know the right techniques. For example, you need to know   when is the best time   to plant or sow them and what  maintenance practices   to adopt to encourage their growth. By following these instructions you will be able to obtain an   abundant and quality harvest.

How to grow onions and garlic at home

Garlic, onion and shallot belong to the  Liliaceae family   , but they have different shoots. While shallots produce   3 or 4 bulbs per plant, onions usually  produce only   one. Regardless of the type of onion, such as white, red, yellow or spring onion, taking care of it is simple. These plants   do not require a lot of water   , but they need soil enriched with organic substance. However, too nutritious soil could cause the bulbs to rot.

The right time for sowing and choosing the soil

To prepare   growing onions,   you must first   obtain seeds or bulbs   . It is important to know that onions are usually planted   in spring   , preferably in March or April, or in September or October for those who live in the southern hemisphere. For cultivation the pot should be   about 30 cm deep and about 30 cm wide   . In each pot it is possible to plant at least two onions, using different seeds or two bulbs. Finally, it is advisable to choose a light soil enriched with   natural fertilizer.

Grow onion

To start growing onions, the first thing to do is prepare the soil, which   should not be too clayey or sandy   . It is best to have loose soil so that the onion can grow freely. In this way it will be possible to obtain adequate nutrients also through the use of   natural fertilizers.

If you decide to plant seeds, it is important to introduce them to a depth of about   2.5 cm. Furthermore, it is important to keep in mind that in this case it will be advisable to keep the onions indoors for at least a month, until the onion cut outside has sprouted   . .

grow garlic

To start, take the   head of garlic and separate the cloves one by one   . The next step is preparing the pot, which requires the   presence of drainage at the bottom,   so that excess water can drain easily every time you water the pot.

Gravel is the most common solution for this purpose. Then   the garlic cloves are placed in the jar. It is important to do this precisely, positioning them   10 centimeters deep and with the pointed part facing upwards.

Multiple cloves can be planted in the same pot, but they should be at least   8 centimeters apart   .

Finally, it is recommended to place the vase in a place where   it receives direct sunlight   , as previously indicated. Garlic does not tolerate excess moisture, so it is enough   to water it once a week.

To   successfully grow garlic   , it is important   to avoid competition with other plants   and therefore hoe the soil regularly.

How to harvest and store garlic and onion

To ensure the   good preservation   of garlic and onion, it is essential to harvest them  well.

Onion. For immediate consumption it is possible to harvest the   bulbs when they are still “green”   , that is, when the leaves are still green, and in this case all parts of the plant are edible. Instead, if you want to save your crop for future use, you have to   wait for the right time   . The ideal time for harvesting is determined by the state of the plant cover:

Garlic:   To harvest garlic and shallots you need to wait until   at least two thirds of the leaves are dried   , and this generally happens at the end of   June or early July   for garlic and gray shallots, while for   pink shallots you have to wait until July or August   . As for the red onion, it should be harvested when all the leaves have withered, that is,   in July or August   . The white onion, however, which is planted in autumn, should be harvested and consumed in spring.

Read More

Savory Tot Medley Casserole

Indulge in the culinary symphony of our delectable “Savory Tot Medley Casserole.” This unique twist on the classic Tater Tot Casserole elevates your dining experience with an array of flavors and textures. Brace yourself for a mouthwatering journey through layers of seasoned ground beef, vibrant vegetables, and golden tater tots, all harmoniously united in one savory dish. Follow along as we guide you through the simple steps to create this extraordinary comfort food sensation.

Ingredients:

  • 1 pound ground beef
  • 1 1-pound package of crispy tater tots
  • 2 10-ounce cans of rich condensed cream of mushroom soup (opt for 3 cans for an extra creamy delight)
  • 1 or 2 14-ounce cans of assorted vegetables (consider whole-kernel corn, green beans, etc.)
  • Onion and garlic powder (optional, for personalized seasoning)

Directions:

  1. Preheat your oven to 350 degrees, allowing anticipation to build for the culinary masterpiece about to unfold.
  2. In a culinary ballet, brown the ground beef while seasoning to your liking, then skillfully drain off any excess grease.
  3. Artfully spread the savory beef at the base of a 2- to 2½-quart baking dish, creating a foundation for the layers to come.
  4. Drain the liquid from the vegetables, letting them take center stage as they gracefully adorn the beef layer.
  5. With the finesse of a kitchen virtuoso, spread the canned soup directly over the vegetables and meat. Allow the unadulterated richness of the soup to shine without any additional mixing.
  6. Create a crescendo of flavor by arranging a layer of golden tater tots atop the savory symphony.
  7. Unveil your creation to the oven and bake, uncovered, at 350 degrees for 50 minutes, letting the aromas and flavors meld into a culinary masterpiece.

Conclusion:

As the timer signals the completion of your culinary opus, savor the moment as you bring forth the “Savory Tot Medley Casserole” to the table. This unique rendition of the classic Tater Tot Casserole promises a delightful symphony of flavors that will leave your taste buds applauding. Elevate your comfort food experience with this original creation that transforms a simple casserole into a culinary masterpiece.

Read More

Why you should cook your turkey upside down this Thanksgiving

This innovative twist on the traditional Thanksgiving turkey preparation guarantees a succulent and perfectly cooked centerpiece for your feast. Embark on a culinary adventure with the Upside-Down Turkey method, a seemingly unconventional yet foolproof approach that promises to elevate your holiday dining experience.

Ingredients:

  • 1 whole fresh turkey (around 18 pounds)
  • 1 loaf of unsliced artisan bread
  • 1 stick of unsalted butter
  • 2 tablespoons of sea salt
  • 2 teaspoons of freshly ground black pepper
  • Optional: Spice blend of your choice
  • Optional: Your favorite stuffing
  • Butcher’s twine
  • Roasting pan

Instructions:

  1. Prepare the Pan with Bread Base: Begin by cutting the loaf of artisan bread in half, creating a solid foundation for your turkey. Line the roasting pan with the bread halves.
  2. Butter and Season the Turkey: Gently massage the turkey with a generous amount of unsalted butter, ensuring an even coating. Sprinkle the sea salt and freshly ground black pepper over the turkey. For an extra flavor boost, consider incorporating your preferred spice blend.
  3. Upside-Down Placement: Place the prepared turkey upside down on top of the bed of bread in the roasting pan. This unconventional position allows the juices to flow towards the breast, ensuring a moist and tender result.
  4. Flip and Baste: Throughout the cooking process, periodically flip the turkey to ensure uniform cooking. Baste the turkey with its own flavorful juices and melted butter to enhance the taste and maintain moisture.
  5. Optional Stuffing: If you prefer, you can add an extra layer of flavor by incorporating your favorite stuffing into the cavity of the turkey.
  6. Butcher’s Twine Magic: Use butcher’s twine to secure the turkey’s wings and legs, promoting an even cooking process and a picturesque presentation.
  7. Cooking Time and Temperature: Follow standard turkey roasting guidelines, adjusting the cooking time and temperature according to the weight of your bird. Regularly monitor the internal temperature, ensuring it reaches the recommended level for safe consumption.
  8. Resting Period: Allow the turkey to rest before carving, giving the juices time to redistribute and the flavors to intensify.

Conclusion:

Embrace the unexpected this Thanksgiving with the Upside-Down Turkey method. As you carve into this moist and flavorful masterpiece, savor the satisfaction of a holiday meal that breaks traditions while delivering exceptional results. Elevate your culinary skills and make this innovative recipe the talk of your Thanksgiving table.

Read More