Day: November 22, 2023

Honey Bun Cheesecake Recipe

Honey Bun Cheesecake Recipe is an easy-to-make and delicious dessert. This recipe is a simple “Nutella” honey bun cheesecake.

This recipe is a perfect dessert for one. Cheesecake has the danger of being too rich and high in calories, but that problem is avoided with Honey Bun Cheesecake Recipe.

It’s also nice to know that despite the cream cheese and nutritional yeast used in this cheesecake, it still contains less than 300 calories per serving!

Honey Bun Cheesecake Recipe

Prepare Time: 20 minutes

Cook Time: 30 minutes

Yield: 2 servings

Recipe Ingredients:

Continue reading ingredients, instrctions & notes on the next page

Read More

How To Make Chicken Lombardy

Ingredients:

  • 3 boneless, skinless chicken breasts (about 1 3/4 lb.), halved lengthwise
  • ¼ teaspoon black pepper
  • 1 teaspoon kosher salt, divided
  • ½ cup (about 2 1/8 oz.) all-purpose flour
  • ½ cup (4 oz.) unsalted butter, divided, plus more if needed
  • Cooking spray
  • 8 ounces cremini mushrooms, thickly sliced (about 1 1/2 cups)

  • ¾ cup Marsala
  • ½ cup chicken stock
  • 2 ounces Fontina or mozzarella cheese, shredded (about 1/2 cup)
  • 2 ounces Parmesan cheese, grated (about 1/2 cup)
  • Chopped fresh flat-leaf parsley, for garnish

Directions:

Continue reading directions on the next page

Read More

Catch A Husband Cake Recipe

Ingredients:

For the Cake:

1 can condensed milk
1 can evaporated milk
1 cup coconut milk
500 grams flour (2½ cups)
1/2 cup sugar
3 large whole eggs
3 tablespoons margarine

For the Icing:

1 cup coconut milk
2 tablespoons sugar
1 cup shredded coconut

Directions:

Continue reading directions on the next page

Read More

CHEESY TACO CREAM CHEESE PASTA

Looking for a simple and delicious pasta recipe the whole family will love? My Cheesy Taco Pasta with Cream Cheese is easy and delicious! This creamy taco pasta skillet recipe is made with beef, cheese, pasta shells, and taco seasoning and takes just 20 minutes to make.

This cheesy taco pasta recipe combines the wholesomeness of pasta with all the delicious flavors of cheesy, beef tacos and will be enjoyed by even the pickiest eaters out there.

This creamy taco pasta is made with light cream cheese and makes for a healthy balanced meal when paired with a fresh salad and corn.

Even better, you can have this creamy, cheesy taco pasta on your table in just 20 minutes, making it the perfect pasta recipe for busy weeknights.

Ingredients:

Continue reading ingredients & instructions on the next page

Read More

1965 Grandma’s Chocolate Hershey Brownies

Ingredients:

1/2 cup butter, melted

1 cup sugar

4 eggs

1 teaspoon vanilla extract

1 cup flour

1 (16oz) can Hershey syrup

1 cup of chopped nuts (optional)

Icing
3 cups powder sugar

1/2 cup butter. melted

4 tablespoons Hershey cocoa

4 tablespoons milk

1 teaspoon vanilla

Directions:

Continue reading directions on the next page

Read More

HONEY-BALSAMIC BBQ MEATBALLS

Sassy, sticky, and saucy! These stick-to-the-bone Honey-Balsamic BBQ Meatballs are to die for!

INGREDIENTS:

  • 1 pound lean ground beef
  • 1/3 c. uncooked quinoa, rinsed well
  • 1 Egg, whisked
  • 2/3 c. water
  • 2 garlic cloves, microplaned or minced
  • 1 large shallot or 1/2 small onion, grated or minced
  • 1 tbsp Worcestershire sauce
  • salt and pepper
  • 1/4 tsp dried thyme
  • 1/8 tsp dried rosemary

Honey-Balsamic BBQ Sauce:

  • 3/4 c. ketchup
  • 1 tbsp Worcestershire sauce
  • 1/4 c. honey
  • 1/3 c. brown sugar
  • 1 tbsp Dijon mustard
  • 1/4 tsp garlic powder
  • 1 c. balsamic vinegar
  • salt and pepper

DIRECTIONS :

  • Step 1: In a saucepan, combine the Honey-Balsamic BBQ Sauce ingredients. Stir and bring to a boil over medium-high heat, stirring occasionally. Decrease the heat and simmer the sauce for about 45 minutes or until thick and the vinegary bite is gone.
  • Step 2: In the meantime, cook the rinsed quinoa in a small saucepan with boiling water, covered. Once the water is boiling, adjust the heat to medium-low and cook the quinoa for approximately 10 minutes until tender. Using a fork, fluff the quinoa, then let it cool for a bit.
  • Step 3: Prepare the oven. Preheat it to 400 degrees. Using a foil, line a baking sheet. On top, place a cooling rack and grease well with nonstick spray. Set aside.
  • Step 4: Combine the cooled quinoa, egg, shallot, garlic, Worcestershire sauce, dried thyme, and rosemary in a large bowl. Mix well, then add the beef. Stir again using your hands until mixed. Into eighths, separate the mixture and shape each into meatballs (24 meatballs). On the prepared cooling rack, place the meatballs.
  • Step 5: Place in the preheated oven and bake the meatballs for about 15 to 17 minutes or until browned.
  • Step 6: To the sauce, add the meatballs. Decrease the heat to keep the meatballs and sauce warm. Alternately, you can transfer everything to a crockpot and set it to “warm”

Read More

How To: Clean a Toilet Tank

Fight germs and mineral buildup that almost always escape you on chore day with these simple steps.

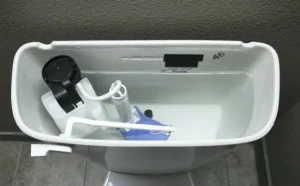
If the last time you shined the bathroom, you couldn’t completely mask a foul odor or had to work hard to remove brown rust stains from the rim of the toilet bowl, your work may not be done. Don’t beat yourself up for missing a spot, because this one is often overlooked: the toilet tank. Its lid keeps dirt, bacterial contamination and mineral buildup out of sight until you need to lift it to reach the tank and stop manual toilet operation or evaluate parts for another repair. These poor conditions can also lead to corrosion of the metal parts of your toilet tank and cause stains on the bowl – the first indication of a problem for most homeowners.

By cleaning your toilet tank regularly – at least twice a year – you can extend the life of your toilet and all its parts, freshen up the smell of your bathroom and save yourself elbow grease the next time you clean the bowl. It’s a win-win situation! So what are you waiting for? Get a task done quickly and keep it fresh by following this guide on how to clean a toilet tank.

HOW TO CLEAN A TOILET TANK

TOOLS & MATERIALS

  • White vinegar
  • Rubber gloves
  • Disinfectant cleaner
  • Scrub brush with long handle
  • Sponge
  • Natural toilet tank cleaner

STEP 1
First, empty the tank. To do this, locate the water valve (the “faucet” valve on the wall behind or near the base of the toilet) and close it. Next, lift the tank lid so you can see the water level inside and flush the tank until it is completely empty. Depending on your flow rate, you may need to flush two or three times.
STEP 2
Assess the condition of your tank. If it’s just surface dirt, it’s a simple cleanup that a little brushing should alleviate. Proceed to step 3. If, on the other hand, you see discoloration from mineral deposits and residue accumulating at the bottom of the tank and working its way up the sides, opt for a more aggressive method: vinegar. This natural star is an excellent line of defense against mold, hard water deposits and more. You’ll need enough vinegar to fill the tank to the overflow valve, which can be up to three gallons depending on the size of your tank. (Fortunately, at about $3 a gallon, it’s not that expensive!) Pour in the vinegar and let it sit for 12 hours without flushing. When you’re ready to clean, drain the vinegar. Again, this may take two or three rinses.

STEP 3
Wearing rubber gloves, generously spray the inside of the tank – along the sides and bottom – with your favorite disinfectant cleaner. Do your best to direct the spray away from metal parts, in case corrosive additives react with the metal (bleach, for example, is very corrosive). ) Check the label for the manufacturer’s recommended dwell time. Generally, you will leave the disinfectant on for 10 to 15 minutes.
STEP 4
Get a scrub brush! Some instructions recommend using your toilet brush to clean the inside of the tank, but because of the cleaning work it does on a regular basis, we recommend that you use a new scrub brush. (This way you won’t accidentally introduce other contaminants from previous work into the tank.) ) It should be a long, narrow scrub brush with medium to firm bristles and a shape that allows you to scrub the corners and bottom of the tank. Once the waiting time is over, scrub thoroughly – in the corners, around the accessories, all over the bottom – to remove any grime and/or build-up. Apply additional cleaner if necessary.

STEP 5 (optional)
As you remove the lid, consider whether your toilet needs maintenance. If your toilet is not working optimally, it’s time to replace any parts that need replacing, such as the flapper, but if it’s working well, go to Step 6.
STEP 6
Clean all parts of the tank. Instead of spraying them directly and dousing the metal parts with a cleaner that may or may not be corrosive, dilute it first. Simply soak a sponge with clean, warm water and spray a little cleaner on the sponge itself. Next, wipe down the ball float, flapper and other parts of the toilet tank with the diluted disinfectant. Rinse and re-soak the sponge if necessary.
STEP 7
Turn on the faucet again and allow the tank to fill. Flush once or twice. Does the tank look clean enough? If not, empty the tank again as you did in Step 1, then repeat Steps 3 through 6. When you are satisfied that your tank is clean, turn the faucet back on, refill it, and off you go!

KEEPING THE TOILET TANK CLEAN
To make your life easier in the future, here are a few things you can do to keep the tank cleaner day after day.

Consider putting tank lozenges in the toilet. They help minimize mold, minerals and contaminants. Be sure not to buy tank lozenges that contain bleach, as bleach is known to corrode metal. Do your homework and read online reviews carefully before purchasing. To reduce chemical use in the home and the risk of damage, keep in mind that tablets marketed as “natural” or “chemical-free” may be best for the job.
If you don’t use tablets, empty your toilet tank and refill it more regularly with vinegar (as in step 2). Vinegar kills mold and mildew and dissolves accumulated mineral deposits before they become a problem. Simply leave the vinegar in the tank overnight and flush the next morning.
You may hear about monthly toilet tank cleaning, but we think twice a year will be sufficient for small households that share more than one toilet. But it’s the situation that dictates maintenance needs. If you have hard water, mineral deposits can build up more quickly. If the toilet is located in a high-traffic area, whether it’s a home with a large family or your workplace, the heavier use will also require more frequent cleaning. Lift the lid of the tank to inspect it every couple of weeks, and you’ll know what kind of cleaning cycle your toilet might need. Keep track of your inspections and cleanings on a calendar so you don’t lose track.

Read More

CREAMY GARLIC PESTO CHICKEN

PREP TIME: 15 MINS | COOK TIME: 20 MINS | YIELD: 4 servings

Creamy, delicious, and very impressive – this easy creamy garlic pesto chicken is a must! The chicken is pan-fried in tomato oil with Italian seasoning and crushed chili pepper and smothered in a mouthwatering pesto sauce with sun-dried tomato and bell peppers. And do not forget the garlic! For a quick, filling weeknight meal, serve this dish over rice, zucchini noodles, pasta, or bulgur.

INGREDIENTS

  • 3 garlic cloves, minced
  • 3-4 chicken breasts, boneless, skinless
  • 1/2 tsp Italian seasoning
  • 1/4 tsp red pepper flakes
  • 1/2 red onion
  • 3 bell peppers (1 red, 1/2 yellow, and 1/2 green)
  • 1/2 c. sun-dried tomatoes, drained of most oil, chopped (keep the drained oil for cooking)
  • 1/2 c. basil pesto
  • 1/2 c. chicken stock
  • 1/2 c. heavy whipping cream
  • Salt and fresh cracked pepper
  • Parmesan, for garnish
  • Chopped fresh basil, for garnish

DIRECTIONS :

  • Step 1: In a large nonstick skillet, heat 1 tbsp of the drained tomato oil along with Italian seasoning and crushed chili pepper. Then, add the chicken breasts and cook for about 4 to 5 minutes per side. Decrease the heat if the chicken begins to brown too quickly. Set the chicken aside when done.
  • Step 2: In a mixing cup or bowl, place the sauce ingredients (basil pesto, cream, and chicken stock). Mix well until combined. Set aside.
  • Step 3: In the now-empty skillet, add the onion, garlic, and sun-dried tomato. You can add a bit more oil from the sun-dried tomato jar if the skillet is dry. Cook for about 1 minute over medium-high heat or until just aromatic. Next, add the bell peppers and cook further until the bell peppers are a little bit cooked but still crisp.
  • Step 4: To the skillet, pour in the prepared pesto sauce. Bring everything to a simmer. In the meantime, slice each chicken breast into strips and add them back to the skillet. Cook for another 2 to 3 minutes or until heated through.
  • Step 5: Remove from the heat when done and garnish the creamy garlic pesto chicken with some Parmesan and basil. Serve right away over rice, pasta, zucchini noodles, or bulgur. Enjoy!

Nutrition Facts:

Energy 610.51 cal, Fat 32.43 g, Protein 67.98 g, Carbs 11.48 g, Saturated Fat 10.68 g, Polyunsat Fat 6.02 g, Monounsat Fat 12.59 g, Sugar 2.17 g, Cholesterol 199.73 mg, Sodium 360 mg, Potassium 1190.69 mg, Fiber 6.38 g

Read More

TATER TOT SAUSAGE BREAKFAST CASSEROLE

Prep Time: 10 mins | Cook Time: 1 hr | Total Time: 1 hr 10 mins | Yield: 6 people

I love recipes that I can throw together easily and quickly. Especially those that I can make ahead for a quick meal. And this tater tot sausage breakfast casserole hits all the right spot! Filled with sausage, cheddar cheese, tater tots, eggs, milk, garlic, onion, and black pepper. You have found the perfect breakfast casserole that you can also serve for lunch, even dinner. Everyone loves a great casserole for any meal!

INGREDIENTS :

  • 8 Eggs
  • 1 (30-32 ounces) bag of frozen tater tots
  • 2 pounds hot breakfast sausage
  • 1/4 teaspoon onion powder
  • 1/4 teaspoon garlic powder
  • 1/2 c. mozzarella cheese
  • 1-1/2 c. shredded cheddar cheese
  • 2 c. milk
  • 1 teaspoon salt
  • 1/2 teaspoon pepper

DIRECTIONS :

  • Step 1: Prepare the oven. Preheat it to 350 degrees F. Using cooking spray, lightly grease a 9 x 13-inch pan.
  • Step 2: Cook the sausage in a large skillet until brown. Drain the grease when done.
  • Step 3: Place the tater tots, cooked sausage, and cheeses in a large bowl. Mix well, then empty the contents into the prepared pan.
  • Step 4: Combine the eggs with salt, pepper, garlic powder, onion powder, and milk. Pour this over the tater tot mixture.
  • Step 5: Place in the preheated oven and bake for about 60 to 70 minutes, uncovered, until the eggs are set. Or you can cover the unbaked casserole and keep it in the fridge until ready to bake.

Notes:

  • Feel free to whip this casserole up ahead and just keep it in the fridge or freeze it for later.
  • When baking after refrigerating, you may need to add a couple of minutes to the baking time.
  • Thaw the frozen casserole completely before baking.
  • Thaw the casserole fully before reheating. Tent with aluminium foil and bake for about 30 to 40 minutes at 350 degrees F or until heated through.

Read More

CHICKEN BACON RANCH PIZZA

Prep Time: 15 mins | Cook Time: 15 mins | Total Time: 30 mins | Yield: 8 Servings

Enjoy homemade pizza like never before! This Chicken Bacon Ranch Pizza is ready in just half an hour! From the dough to the melted cheese on top, everything about this is spectacular! Dinner with your loved ones is going to be awesome! Try this recipe now!

INGREDIENTS :

  • 3 c (340g) shredded mozzarella cheese
  • 1½ c (200g) chopped cooked chicken
  • 1 lb (550g) homemade pizza dough or store-bought
  • 4 strips bacon, cooked and crumbled
  • ⅔ c (155ml) ranch dressing

DIRECTIONS :

  1. Prepare the oven and preheat it to 218 degrees C or 425 degrees F.
  2. Sprinkle flour onto a flat surface, then place the dough on it. Unroll it to about a 15-inch round shape. Put it onto a pizza pan.
  3. Add the Ranch dressing over the dough and spread it evenly. Scatter the shredded mozzarella cheese on top.
  4. Add the chopped chicken and crumbled bacon on top of the cheese.
  5. Place the pan in the preheated oven and bake the Chicken Bacon Ranch Pizza for about 15 minutes or until the top turns golden brown.
  6. Remove from the oven and let it rest for a few minutes before serving.
  7. Serve and enjoy!

Notes:

  • Place any leftovers in an airtight container, then put them in the fridge. Reheat for a few minutes before serving again.
  • You can use your preferred type of Ranch for this recipe.
  • Feel free to use your preferred type of cheese as well.
  • Feel free to use any part of the chicken for this recipe. If you have leftover chicken, that would be perfect!
  • I like to serve this with one of these things:
  • Cheesy Breadsticks
  • Salad with Homemade Buttermilk Ranch
  • Simple Caesar Salad
  • Fresh fruit slices

Nutrition Facts:

Calories 364 | Calories from Fat 175 | Fat 19.4g30% | Saturated Fat 4.7g29% | Cholesterol 62mg21% | Sodium 881mg38% | Potassium 143mg4% | Carbohydrates 28g9% | Fiber 1g4% | Sugar 1.3g1% | Protein 17.5g35% | Vitamin C 1mg1% | Calcium 119mg12% | Iron 3mg17%

Read More