Day: November 21, 2023

How to make a bougainvillea bonsai tree step by step

About 18 different types of plants belong to the bougainvillea genus, all native to South America and all capable of giving us a unique and wonderful show through their blooming.

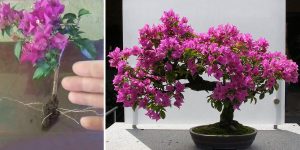
These climbing shrubs can reach up to 12 meters in height and, depending on the climate, can bloom all year round. In a climate like ours, they bloom from spring until late fall.

Contrary to what it may seem, bougainvillea flowers are small and white, surrounded by bracts that take on different colors and have a paper-like texture.

Bougainvillea needs full sun in order to bloom properly. For this reason, this species should not be treated as an indoor bonsai tree.

Bougainvillea bonsai should be protected from frost and wind. In any case, do not be alarmed if the plant loses its leaves during the cold months-it is part of its life cycle.

Potting soil for bougainvillea bonsai.

Bougainvilleas have a very thin and sensitive root system, and therefore it is essential to use a porous and acidic potting soil

You can choose a solution consisting of akadama and add 30 percent kiryzuna or kanuma.

Watering the bougainvillea bonsai tree

Water when the potting soil begins to dry on the surface. It is important to keep the potting soil moist, but avoid waterlogging.

Remember to use osmosis water, as the presence of dissolved salts in the water could change the pH of the potting soil.

Pinching and pruning bougainvillea bonsai trees

Bougainvilleas are climbing shrubs and therefore have a tendency to form shoots at their apices, which in turn serve to cling to other trees.

To form the bonsai structure pinch more intensely on the acids, be able to distribute the “vigor” to the lower branches. Carry out pinching after flowering.

It is recommended to prune to two buds to strengthen the plant and stimulate the growth of new branches directly from the old trunk.

Wiring the bonsai tree

It is not recommended to over-wire a bougainvillea bonsai, as its branches break easily or may dry out from the wire.

In any case, do it on shoots that are still tender to give direction to their growth.

Read More

Sizzling Spinach Artichoke Symphony: A Dip to Remember

Elevate your appetizer game with our “Sizzling Spinach Artichoke Symphony.” This hot dip recipe is not just a crowd-pleaser; it’s a flavorful journey that unfolds in less than ten minutes of prep time. Versatile enough to complement an array of dippables, from carrot sticks to crostini, this Italian-inspired creation is a testament to the ease of culinary indulgence.

Recipe:

Ingredients:

  • 2 cloves garlic, minced
  • 1 (8-ounce) box cream cheese, softened to room temperature
  • 1/3 cup mayonnaise
  • 1/3 cup sour cream
  • 1/2 cup grated Parmesan cheese
  • 1 1/2 cups shredded mozzarella cheese
  • 1 (14-ounce) can artichoke hearts, drained and chopped
  • 10 ounces frozen spinach, thawed, drained, and chopped
  • 1/2 teaspoon kosher salt
  • 1/2 teaspoon fresh ground black pepper

Instructions:

  1. Preheat the oven to 375 degrees and grease a small baking dish.
  2. In a medium bowl, blend together garlic, softened cream cheese, mayonnaise, sour cream, Parmesan, 1/2 cup mozzarella, artichoke hearts, spinach, salt, and black pepper.
  3. Spoon the mixture into the prepared baking dish and generously sprinkle with the remaining mozzarella.
  4. Bake for 25-30 minutes until the cheese is gloriously melted, and the dip is invitingly warmed through. For optimum enjoyment, serve promptly.

Conclusion:

“Sizzling Spinach Artichoke Symphony” isn’t just a dip; it’s an experience. Let the enticing aromas and rich flavors linger as you and your guests delve into a culinary masterpiece. Whether it’s a gathering or a solo indulgence, this hot spinach artichoke dip recipe is your ticket to a savory sensation that’s sure to be remembered.

Read More

Cajun Shrimp Fusion Toasts

Prep Time: 5 minutes

Cook Time: 20 minutes

Total Time: 25 minutes

Yield: 12 toasts

Category: Appetizer

Method: Stovetop

Cuisine: Southern

Ingredients:

  • 1 small French baguette, sliced into 1/2-inch thick pieces
  • 1 tablespoon olive oil
  • 1 lb shrimp, peeled, deveined, and minced
  • 1/2 small onion, finely chopped
  • 1 stalk celery, finely chopped
  • 3 cloves garlic, minced
  • 1/4–1/2 teaspoon Cajun seasoning
  • 1/4 teaspoon fresh cracked black pepper
  • 4 ounces cream cheese, cut into small cubes
  • 1/4 cup shaved Parmesan cheese
  • 1/4 cup shaved Fontina cheese
  • Kosher salt and fresh ground black pepper
  • 1/4 teaspoon crushed red pepper
  • 1 green onion, thinly sliced

Instructions:

  1. Prepare Baguette Slices: Turn the broiler to low. Arrange the bread slices on a baking sheet in a single layer. Broil for 3-5 minutes until lightly browned. Flip the slices and broil the other side until lightly browned.
  2. Sauté Shrimp Mixture: In a skillet, heat olive oil over medium heat. Add shrimp, onion, and celery. Cook for 1 minute, stirring frequently. Add garlic, Cajun seasoning, and black pepper. Cook for an additional minute, stirring constantly. Reduce heat to very low.
  3. Cheesy Blend: Add cream cheese, Parmesan, and Fontina. Stir until the cheese is blended and almost fully melted. Season with kosher salt and fresh ground black pepper.
  4. Assemble and Bake: Evenly top the toasted baguette slices with the shrimp mixture. Sprinkle with crushed red pepper. Place in a 400-degree oven for 10 minutes or until lightly browned and bubbly.
  5. Finish with Freshness: Sprinkle green onions over the baked shrimp toasts. Serve immediately.

Notes:

  • Broil on low to control the process; monitor the baguette slices closely.
  • Opt for high-quality wild-caught shrimp; thaw frozen shrimp in advance.
  • Peel shrimp carefully, and remove the black intestine under cool running water.
  • Keep ingredients close during the quick recipe execution to avoid overcooking the shrimp.
  • If pre-shaved Fontina and Parmesan are unavailable, use a vegetable peeler on a block of cheese.

Indulge in the exquisite blend of Cajun-spiced shrimp and creamy cheeses on perfectly toasted baguette slices, creating Cajun Shrimp Fusion Toasts that showcase the best of Southern cuisine.

conclusion :

In the grand symphony of Southern flavors, our Cajun Shrimp Fusion Toasts take center stage as a culinary masterpiece. With a harmonious blend of Cajun-spiced shrimp, velvety cream cheese, and the rich undertones of Parmesan and Fontina, these toasts deliver an extraordinary sensory experience. The marriage of textures, from the crispiness of perfectly toasted baguette slices to the succulent tenderness of the shrimp, creates a delightful journey for the palate.

As the bubbly, golden-brown perfection emerges from the oven, adorned with a sprinkle of green onions, it signals the culmination of a culinary adventure. These toasts not only celebrate the vibrant and diverse flavors of the South but also embody the spirit of effortless elegance in entertaining. Whether shared among friends or savored as a solo indulgence, our Cajun Shrimp Fusion Toasts are a testament to the joys of creative cooking.

So, let these toasts be more than a delightful appetizer; let them be a catalyst for memorable moments shared around the table. Elevate your gatherings, spark conversations, and relish the satisfaction of creating a dish that transcends the ordinary. With each bite, savor the fusion of tradition and innovation that makes these toasts a truly unique and gratifying experience. Cheers to good company, good food, and the joy of culinary exploration!

Read More

My Mom’s Perfect Thanksgiving Stuffing

Celebrate the essence of Thanksgiving with this delectable stuffing that elevates tradition to new heights. Embrace the culinary adventure and create cherished memories with our unique recipe for Savory Thanksgiving Harvest Stuffing.

Ingredients:

  • 1 finely chopped onion
  • 1 vibrant green bell pepper, diced
  • 1 cup of unsalted butter
  • 3/4 cup of finely diced celery (or a teaspoon of celery seed)
  • 2 beaten eggs
  • 2 cups of high-quality canned chicken broth
  • 1 bag (16 oz.) of Pepperidge Farm herbed seasoned stuffing (crumbs, not cubes)
  • 1 bag (16-20 oz.) of soft bread cubes
  • Fresh garlic
  • Poultry seasoning
  • Fresh parsley or dried parsley flakes
  • 1/2 teaspoon of oregano
  • 1 Reynolds turkey-sized baking bag

Directions:

  1. Begin the culinary journey by combining the herbed seasoned stuffing crumbs with soft bread cubes in a large mixing bowl.
  2. In a frying pan, dance flavors into the mix by melting butter over medium-high heat. Sauté onions, green peppers, and celery (or opt for the aromatic touch of celery seed) until a symphony of softness and translucency envelops the kitchen.
  3. Pour this luscious medley of melted butter and vegetables over the bread cubes and crumbs. Let the celebration of textures begin!
  4. Introduce the beaten eggs to the ensemble and toss gently. It’s time to weave in the enchanting notes of garlic powder, poultry seasoning, dried parsley, and a hint of oregano. Toss once again, ensuring each element becomes a harmonious part of the melody.
  5. Now, the stage is set for the pièce de résistance – the chicken broth. Gradually pour it over the mixture, allowing the stuffing to become delightfully moist but not overly wet. Adjust as needed, preserving the remaining broth if the stuffing leans towards perfection without it.
  6. Give it one final toss, ensuring every morsel is draped in the rich flavors. Ready to stuff the turkey? Pack it in snugly, creating a flavorful cocoon inside.
  7. For a little extra magic, rub softened butter all over the turkey, creating a golden symphony on the skin. A dash of paprika adds the finishing touch.
  8. Assemble the turkey in a Reynolds baking bag, generously sprinkling about 2 tablespoons of flour inside before introducing the turkey. Seal the bag tightly, make three elegant slits for ventilation, and place it in a roasting pan with the lid secured.
  9. The baking bag, a culinary wizard, will reduce baking time while sealing in the succulent juices. No need to baste, but if you fancy, a couple of gentle bastes during the process add to the allure.

Conclusion:

In the finale, as the aroma of a perfectly baked turkey fills the air, remember to make those strategic slits in the bag. A treasure trove of flavorful broth awaits within, ready to be transformed into the perfect gravy to crown your Thanksgiving feast. Our Savory Thanksgiving Harvest Stuffing is not just a recipe; it’s an invitation to create culinary poetry and savor the symphony of flavors that make this festive occasion truly unforgettable.

Read More

9 Surprising Yet Brilliant Uses For Vanilla

Vanilla extract is a common ingredient in many kitchens, primarily known for its role in baking. However, this versatile natural product offers a variety of other surprising and practical uses. Here are nine ingenious ways to use vanilla extract beyond the realm of baking:
Refrigerator Freshener: Wiping the inside of your refrigerator with vanilla can help neutralize unpleasant odors. For ongoing freshness, soak a cotton ball in vanilla extract and place it inside the fridge.
Natural Air Freshener: Add a drop or two of vanilla extract onto a light bulb. When the light is turned on, the heat will diffuse the vanilla scent, filling the air with a pleasant aroma.
Paint Odor Neutralizer:

Continue reading this article on the next page

Read More

Mint Magic: There Are 8 Reasons to Grow Mint

Mint, with its refreshing aroma and versatile nature, is an enchanting addition to any garden. Whether you’re a seasoned gardener or just starting out, mint is a wonderful herb to grow. Let’s explore eight compelling reasons why cultivating mint can be a rewarding experience.
Culinary Delights:
Mint is a culinary star, perfect for creating refreshing sauces, innovative salads, and mint-infused oils. It’s an all-rounder in the kitchen, enhancing both sweet and savory dishes, and can truly elevate your cooking adventures.
Herbal Teas and Infusions:
Home-grown mint offers endless possibilities for herbal teas and infusions. Enjoy the classic mint tea or experiment by combining mint with other herbs and spices for a delightful twist to your tea experience.
Cocktail Ingredient:

Continue reading this article on the next page

Read More

Enhance Carrots in Your Slow Cooker with Butter Pats for a Quick and Tasty Side Dish

Discover the delights of Slow Cooker Glazed Carrots, a dish that beautifully marries the natural sweetness of carrots with a savory glaze. This recipe is not only straightforward to make but also serves as a superb side dish to various main courses.
Versatile Pairings
These glazed carrots are a fantastic complement to many dishes. Their sweetness pairs wonderfully with savory proteins like roasted chicken, grilled fish, or steak. For a vegetarian option, try them with a grain-based dish like quinoa pilaf or wild rice. You can also add steamed green vegetables like broccoli or asparagus for a colorful and nutritious side.

Slow Cooker Glazed Carrots Recipe

Ingredients:

2 pounds of carrots, peeled and cut (baby carrots can also be used)
1/3 cup sliced butter
1/4 cup maple syrup…

CONTINUE reading all ingredients & instructions on the next page

Read More

Steak Bites with Garlic Butter

Delight in these succulent seared steak bites, cooked to sheer perfection in a savory garlic butter sauce. This dish is not only a breeze to prepare but also makes for an impressive meal or a crowd-pleasing party snack. In just a few minutes, you can serve up a dish that’s bursting with flavor!

Cuisine: American

Prep Time: 5 minutes

Cook Time: 10 minutes

Total Time: 15 minutes

Servings: Varies

Calories: 272 kcal per serving

Ingredients:

Continue reading ingredients, instructions & notes on the next page

Read More

Most folks don’t recognize this item anymore. Only real legends know. Here’s what you need to know

In today’s fast-paced culinary world, brimming with high-tech gadgets, we often overlook the simple beginnings of kitchen tools. Consider the evolution of opening a canned good: what’s now a simple button push was once a skilled task, achieved with the ingenious can opener key. Let’s journey back in time to appreciate the origins, rise, and gradual fading of this once-essential kitchen device.
As canned food gained popularity in the late 19th century, so did the necessity for an easy way to access these metallic containers. The can opener key, though quite different from today’s electric openers, was a pivotal invention, transforming how we approached canned goods. Before its introduction, opening cans was a risky and labor-intensive process, often involving sharp knives, chisels, and hammers, leading to potential injuries and food wastage.
Using a can opener key required skill and patience, contrasting sharply with the effortless operation of modern electric openers. It consisted of a sharp blade and a rotating handle. Users would insert the blade into the can’s lid and turn the handle to gradually puncture and slice through the metal. This method, safer and more efficient than previous ones, made canned food more accessible and popular, even in remote areas.

Continue reading this article on the next page

Read More