With these tips you will easily make your red anthurium flower
Do you have a red anthurium, but it hasn’t given you flowers? We assure you that you are not the only one, because although it is a great option for decorating the house for its impressive red flowers , many times the necessary care is not taken to make them bloom. Therefore, here we will tell you how you can make your red anthurium full of flowers with these four tips.
The red anthurium or Anthurium andreanum is an indoor plant, which makes it an excellent choice for decorating the home thanks to its attractive, resistant and unique flowers, in addition to its heart-shaped leaves which give them an elegant tone.
These plants are tropical and come from Central and South America , so they need warm and humid conditions, but this does not mean that it should be in a place where direct light gives, because this will only burn its leaves. What you should do is put it in a place near a window that faces north or, where it gives filtered light.
1. Your red anthurium needs regular watering
Being a plant that loves humidity, it needs its watering to be regular , but without becoming excessive, because you can rot its roots. It is best to check the top layer of soil to see whether it is already dry or not.
Humidity is key to making anthuriums thrive, however, you can’t take the easy routes like placing it near a humidifier or in a tray of pebbles. It is advisable to mist the leaves from time to time to give moisture to their leaves.
Have you ever tried something so delicious you can barely stand it This is one of those recipes. When you make this Recipe you’ll feel like you’ve died and gone to heaven.
I love those recipes that we all grew up with, they are just too good to miss out on.This slow cooker creamy potato bacon soup is going to be a new family-friendly favorite. It’s easy to make so it’s perfect for a weeknight dinner, and reheats really well so it’s great for meal prep. This crock pot ground beef soup is also gluten-free and loaded with vegetables like potatoes, carrots, onion, celery and tomatoes. It’s full of flavor and one of our go-to recipes for fall and winter.To Make this Recipe You’ Will Need the following.
Ingredients:
3.5 cups chicken broth 4 russet potatoes, peeled and diced (3–4 cups) 1 (14 ounce) can diced tomatoes 1 yellow onion, diced 1 cup shredded carrots 1 cup diced celery 1 tablespoon dried parsley 1/2 tablespoon garlic powder 1 teaspoon dried basil 1 teaspoon salt 1/2 teaspoon black pepper 1 pound ground beef 1 package (12 ounces) bacon, cooked and chopped 3 tablespoons butter 1/4 cup flour (gluten free 1:1) 2 cups half and half 2 cups shredded cheddar cheese or pepper jack cheese To garnish: green onions, reserved chopped bacon
PREPARATION:
Add the broth, tomatoes, potatoes, onions, carrots, celery, parsley, garlic powder, basil, salt and pepper to the slow cooker. Cover with the lid and cook on low for 6 to 8 hours, or on high for 3-4 hours About 30 minutes prior to serving, brown the ground beef. Drain the grease and add it to the slow cooker. Fry and chop the bacon and transfer the chopped bacon to the slow cooker. You can also bake the bacon in the oven at any point while the soup is cooking and set it aside for later
Wipe out the pan of any excess grease and add in the butter. Melt the butter and then whisk in the flour until it’s all combined. Then whisk in the half and half. Continue whisking for about 2-3 minutes, until it’s thickened a bit Pour the half and half into the slow cooker and stir to combine it in with the rest of the soup. Add the cheese and stir again. Cover and let the cheese melt for a few minutes. Give it another good stir or two to fully incorporate the cheese just prior to serving.
Have you ever tried some thing so scrumptious you can barely stand it…and some thing that you’re even extra stunned that you truely made. This is one of these recipes. When you make this Mini poultry pot pies you’ll sense like you’ve died and long gone to heaven.
Mini Chicken Pot Pies are a exciting and convenient recipe for your youngsters and household any night time of the week. With the ideal mixture of biscuits, chicken, vegetables, and cheese, this is positive to be a new household favorite.
This muffin tin recipe is ideal for busy weeknights, weekends when you have pals over, or every time you choose a creamy scrumptious household pleasant poultry recipe for dinner. You’ll be amazed to see that this recipe makes use of solely easy and effortless ingredients. A rotisserie fowl in this recipe is such a time saver.
Dinner will be on the desk in much less than 30 minutes, begin to finish!To Make this Recipe You’ Will Need the following ingredients
Ingredients
8 portions of biscuits
1 cup cooked hen breast, diced (any precise leftover chicken)
1 can (10 half ounces) low-fat rooster soup
2/3 cup low-fat shredded cheddar cheese
1 half of c. thawed frozen veggies (I used 1 c corn, peas and carrots and half of cup broccoli)
1 teaspoon dried parsley flakes
1 teaspoon minced onion
1/4 teaspoon black pepper
1/2 teaspoon salt
Directions :
Preheat the oven to four hundred tiers and cook dinner the hen the way you choose it, then reduce it into small pieces
Separate the biscuits and vicinity every biscuit in a gently oiled 12-hole muffin cup, urgent the dough to the facets to the aspect of the cup.
In a medium bowl, mix chicken, fowl and vegetable soup, cheddar cheese, parsley flakes, and black pepper. Mix nicely till combined.
Spoon the fowl combination into the biscuit cups organized with the spoon.
Bake for 12 to 15 minutes or till golden brown.
Take it out of the oven. Place the muffin pan on a wire rack and let it relaxation for 2-3 minutes.
grew up with green beans, potatoes and ham. So I decided to put a fun twist on this family favorite. I have always wanted to try bacon as the ham element and what better way to cook this recipe than in a crockpot!
I am happy to report that this recipe was loved by the entire family. I was able to use vegetarian bacon to make this vegetarian friendly for Darryl, and it also turned out great. This quick and easy side is perfect for any family occasion.
“I make this dish often; I have never really measured the ingredients, but can give you a reasonable approximation. Note: Freeze leftover cooking liquid, and then add to bean soup, ham or cabbage dishes, or use to cook dumplings in. It’s delicious!”
To Make this Recipe You’Il Need the following ingredients:
Ingredients:
2 lb fresh green beans, rinsed and trimmed
1 large onion, chopped
3 ham hocks
1 1⁄2 lb new potato, quartered
1 tsp garlic powder
1 tsp onion powder
1 tsp seasoning salt
1 tbsp chicken bouillon, granules
1 ground black pepper, to taste
I have made this recipe for years. My kids usually selected it for their birthday cake over any other, and it makes adequate for a crowd. Moist and delicious. Very convenient to make. Enjoy!
Salted Caramel Kentucky Butter Cake is a home made moist and buttery cake recipe with an irresistible caramel butter sauce that is rich, addictive, delicious, and soaks proper into the cake! This Salted Caramel Kentucky Butter Cake is a recipe you’re about to fall in love with – have faith me on this one, guys. I love bundt cake recipes like this Hot Chocolate Coffee Rum Cake due to the fact they simply seem so fancy and presentable!
My baking loving self has made so many variants of them and they are constantly a large success and a hit amongst my household and friends. I like huge Bundts and I can’t lie! The accurate critiques on this cake communicate for themselves. I have baked this salted caramel Kentucky butter cake at least a few instances now however have switched up the liquid I comprise into it and toppings used and it constantly receives rave reviews. The cake is very palatable with splendid flavor.
PROMOTED CONTENTBelieve it or not, it tastes even higher the subsequent day! I really experience that the longer it sat, the greater moist and tasty it became. What different cake can you say that about? This desserts virtually receives higher with time (like myself…….totally kidding).To Make this Recipe You’ Will Need the following ingredients:
Ingredients
Cake:
3 cups all-purpose flour 2 cups white sugar 1 teaspoon salt 1 teaspoon baking powder ½ teaspoon baking soda ½ teaspoon cream of tartar 1 cup caramel espresso creamer (I used International Delight Simply Pure) (can replacement Buttermilk however depart out the cream of tartar) 1 cup unsalted butter, room temperature 2 teaspoons vanilla extract 4 giant eggs, room temperature
Butter Sauce:
¾ cup white sugar ⅓ cup butter 3 tablespoons caramel espresso creamer 2 teaspoons vanilla extract Salted Caramel, for topping (makes 1.5 cups OR use store-bought): 1 cup sugar ¼ cup water ¾ cup heavy cream 3½ tablespoons unsalted butter 1 teaspoon sea salt or kosher salt
Instructions
Cake:
Preheat oven to 325 levels F. Grease and flour a 10 inch Bundt cake pan. In a massive bowl, whisk collectively the flour, two cups sugar, salt, cream of tartar, baking powder and baking soda.
In the bowl of a stand mixer or with a hand mixer, combo in (meaning, into the DRY mixture) the espresso creamer, 1 cup of butter, two teaspoons of vanilla and four eggs. Beat for three minutes at medium speed. Pour batter into organized Bundt pan. Bake in preheated oven for 50-55 minutes, or till a timber toothpick inserted into core of cake comes out clean. Prick holes in the cake whilst it is nonetheless heat (I use the take care of of a timber spoon – nothing too large – can additionally use a wood skewer). Slowly pour the butter sauce over cake making positive it receives in all of the holes. Let cake cool definitely earlier than eliminating from pan. Running a knife along the edges first helps the cake come out cleanly.
Butter Sauce:
In a saucepan mix the ¾ cups sugar, ⅓ cup butter, two teaspoons vanilla, and the espresso creamer. Cook over medium heat, till utterly melted and combined, however do now not the combination boil. Salted Caramel (if making homemade): In a heavy-bottomed saucepan, mix the sugar and water over medium-low warmth till the sugar dissolves. Increase the warmth to medium-high and carry to a boil, except stirring. If necessary, use a moist pastry brush to wash down any crystals on the aspect of the pan. Boil till the syrup is a deep amber color, about 6-8 minutes.
Remove the sugar from the warmness and cautiously whisk in the heavy cream. The combination will bubble. Stir in the unsalted butter, and salt. Transfer the caramel to a dish and cool. Drizzle/pour over the cake. You might also have some leftover – use it over ice cream!
I love those recipes that we all grew up with, they are just too good to miss out on.At family get-togethers, our children always request this spirit-warming Ground Beef Vegetable Soup along with a fresh loaf of homemade bread and tall glasses of milk. This hamburger soup has robust flavor, plenty of fresh-tasting vegetables and is easy to make This hearty hamburger soup is loaded with ground beef, potatoes and an assortment of vegetables, all in a savory broth. The perfect easy dinner option that the whole family will love!
When I’m looking for a one pot meal that I know will be a crowd pleaser, I turn to chili mac, chicken cacciatore or this simple yet satisfying Ground Beef Vegetable Soup .
Ingredients:
2 pounds ground beef
4 carrots, diced
4 celery chops, chopped
1 onion, chopped
4 potatoes, peeled and cut into 1-inch pieces
1 can (15.25 oz) whole grain corn, drained and rinsed
Garlic is an essential ingredient in our gastronomy. Excluding it from the diet is almost impossible, and it wouldn’t even make much sense.
Garlic is very rich in vitamin E, magnesium and selenium, as well as numerous antioxidant compounds which give it countless therapeutic properties and health benefits.
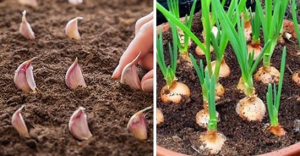
Few people know that growing garlic in pots is very simple, and very little is needed to have a constant supply of this excellent vegetable. By growing garlic at home, you will have an organic and pesticide-free product, in addition to saving money.
To grow garlic , you need 1 clove of garlic, 1 pot about 20 centimeters deep and some soil.
Select a clove and, without removing the husk, plant it about 10 centimeters deep in the potting soil, with the pointed end facing up.
If you decide to plant more than one clove, make sure to leave about 8cm of separation between them. The garlic will take a few weeks to germinate.
In botany, orchids are part of the immense family of monocotyledonous plants which numbers more than 25,000 species. Certainly the most appreciated and highly appreciated indoors, the “Phalaenopsis” orchid, more commonly known as the “butterfly orchid”, is very easy to grow at home. With simple maintenance and without too many constraints, it can be kept for a long time and prolong its flowering. It blooms fully in an environment around 20°C (never below 10°C) and tolerates summer heat well. Light as butterflies, its flowers are very beautiful to look at, oscillating between various colors ranging from white, pink, yellow and orange. Some hybrid orchids can even borrow perennial hues such as purple, violet or electric blue.
This tropical plant is resistant and its cultivation is ideally done during the winter period. In the bulb or rhizome state it adapts easily to cool temperatures. After the cold months, the orchid prepares for its vegetative awakening. But how to take care of it to give it everything it needs and stimulate its spring flowering?
In this article we reveal the best natural fertilizers to make your orchids bloom (or rebloom) faster at home according to the advice of Romain Le Tallec, a florist from Lyon.
Read also: How to clean car mats? Tips and advice
Banana peel to make your orchids bloom
To increase the flowering of your orchid, there’s nothing like adding a little fertilizer to its substrate. The most popular natural fertilizer for this type of plant is banana peel. This is precisely the nutrient it needs: rich in vitamins B6 and C, mineral salts such as potassium and magnesium, banana peel is the little push it needs to grow and flourish peacefully.
Take a banana peel, wash it and cut it into small pieces. Then place them in a bowl with 2 liters of water and soak them for about 48 hours. Finally filter the mixture.
The liquid obtained will absorb all the nutrients from the banana peel, so you can use it as water to water your orchids.
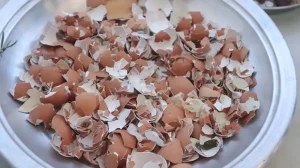
egg shells
Widely used to chase away all the undesirables that revolve around plants, eggshell is also a natural fertilizer rich in calcium and potassium. By crushing the shells very finely and sprinkling them on the bark of your orchids, the soil will quickly absorb all these nutrients and minerals essential for flowering.
Ash
Do you like creating a cozy atmosphere in winter around the fireplace? So little tip, don’t get rid of the ashes! You may not know it, but you can recycle them into fertilizer for your orchids. It may seem strange to you, but fireplace ashes are very rich in calcium, potassium, phosphorus and trace elements. In other words, a cocktail of nutrients that your plants need!
The ideal is to add these ashes directly to your orchid’s soil. Do this after watering. The ash tree favors flowering and also takes advantage of this to asphyxiate insects that revolve around the plants. However, they lack nitrogen and phosphorus, which you will need to supplement with other fertilizers. Caution: Since ash is a bit caustic, it’s best to wear gloves when handling it.
banana tea
Another clever method with this same ingredient: take a banana peel and cut it into small pieces. Then place them on a cutting board and expose them to direct sunlight for about 48 hours. You will notice that your skin dries out and becomes harder. Then put the peels in a blender and you will obtain a powdered mixture.
Use a teaspoon of this product, pouring it into approximately 200 ml of hot water. Mixed. Then let it cool. You’ve just made some banana tea: let it cool and then pour it into your orchid.
banana powder
This method is also very convenient. In this case, after drying the banana peels in the sun, you must place them in the oven at 70°C until they are completely dry. Then remove them from the oven and grind them into powder. You can then use this banana powder as fertilizer to help your orchid grow better.
Don’t throw away banana peels, as you can see, they are much more useful on your plants than in the garbage!
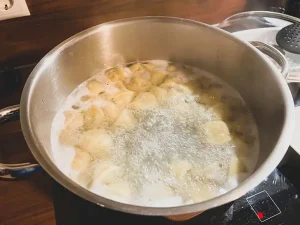
cooking water
Another unexpected alternative to fertilizer: vegetable cooking water. You definitely make this for every meal! So stop throwing that water down the drain and save it for watering your orchids instead. Because, you need to know that during cooking, these foods release a lot of nutrients into the water. And it turns out it’s a great natural fertilizer for your plants!
NB: you should not use salt water, at the risk of killing your orchids!
Read also: Put a spoon in water and clean the baseboards. They will shine like new
When to use these natural fertilizers?
These natural fertilizers must be used with great care. If you use them too often, you risk damaging your orchid. During the winter months, fertilize at most once a month. Begin fertilizing more frequently as new shoots begin to develop.
Why doesn’t the moth orchid bloom indoors?
If you notice that your orchids develop leaves well, but do not produce flowers, it means that the conditions are not optimal for its flowering. It’s typically a light issue: your plants need light, but not direct sunlight. As for temperature, avoid drafts and install them in a warm but humid place. Lack of humidity can prevent flowering.
This easy homemade funnel cake recipe tastes just like the classic fair favorite. Top these with some powdered sugar or your favorite topping for a simple treat that everyone will love!
My whole family loves this recipe so much. If it were for them, I’d be making this every day! Give it a shot, you’ll love it!
This is a tried and true recipe !! if you want to satisfy your sweet tooth, you cannot go wrong here. This is the way my Mother always made, jut give a shot it won’t fail you !
In a large deep skillet filled halfway with vegetable oil and heated to 375 degrees.
To Make this Recipe You’ Will Need the following ingredients :
Ingredients:
I used:
2 eggs
1 cup milk
1 cup of water
1/4 teaspoon vanilla extract
1/4 cup of granulated sugar and 3 cups of self-rising flour.
Directions:
Whisked till smooth and took a funnel holding my finger over the hole and ladled mixture into it then holding it several inches above the oil made circular motions until funnel was empty.
Simple and easy ! My whole family loves this recipe so much. If it were for them, I’d be making this every day! Give it a shot, you’ll love it!To Make this Recipe You’ Will Need the following ingredients:
Ingredients:
2 eggs
2/3 cup milk
32 Ritz crackers, crushed
1/2 cup chopped onion
4 ounces shredded sharp cheddar cheese
1 teaspoon salt
1/4 teaspoon pepper
1 1/2 lbs ground beef
1/2 cup ketchup
1/2 cup brown sugar
1 teaspoon mustard