Day: November 17, 2023

Eliminating Car Scratches at Home with Toothpaste

Our vehicles are like cherished family members, and seeing them scratched or dinged can be disheartening. While professional garage services are available, they can be expensive. Fortunately, there are simple and cost-effective methods you can use to fix car scratches yourself. Here are six easy ways to address car scratches:

1. Paint Touch-Up Kit

This traditional method involves using a paint touch-up kit to repair scratches. While it requires a small investment in supplies, it can yield effective results. Follow these steps for this method:

  • Purchase a paint touch-up kit suitable for your car’s paint color.
  • Clean the scratched area thoroughly.
  • Apply the touch-up paint using the provided brush, following the manufacturer’s instructions.
  • Allow each coat of paint to dry before applying the next one.
  • This method is ideal for repairing minor scratches and imperfections.

2. Toothpaste

For light scratches, toothpaste can be a handy solution. The silicone content in toothpaste can help polish the paint surface and minimize the appearance of scratches. Follow these steps:

  • Choose a whitening toothpaste for the best results.
  • Apply a small amount of toothpaste to a clean, soft cloth.
  • Gently rub the toothpaste onto the scratched area in a circular motion.
  • Buff the area with another clean cloth to reveal improved results.

3. WD-40

Read More

Italian Wedding Soup

Italian Wedding Soup, a flavorful and hearty dish that marries the delightful combination of meat and vegetables, isn’t actually tied to weddings. Its name, “minestra maritata” in Italian, reflects the fusion of flavors rather than matrimonial celebrations. Let’s dive into this unique and original recipe for Italian Wedding Soup that’s perfect for any occasion.

Recipe:

Savor the essence of Italian Wedding Soup with a unique twist on this classic recipe. Made with tender mixed pork and beef meatballs, a medley of vegetables, and acini di pepe pasta, all bathed in a delicately seasoned broth, it’s a feast for your taste buds.

Ingredients:

Meatball Mix

  • 1 1/4 lbs mixed ground pork and beef
  • 1/2 cup breadcrumbs
  • 1 tablespoon dried parsley
  • 1 teaspoon dried basil
  • 1 teaspoon dried oregano
  • 1 large egg
  • 1/2 cup shredded Parmesan cheese
  • 1 1/2 tablespoons olive oil

Soup

  • 1 medium sweet onion, finely diced
  • 2 large carrots, finely diced
  • 2 stalks of celery, finely diced
  • 3 cloves garlic, minced
  • 1 tablespoon dried parsley
  • 1 teaspoon dried basil
  • 1 teaspoon dried oregano
  • 8 cups low-sodium chicken broth
  • 1 cup acini di pepe pasta
  • 4–5 ounces baby spinach
  • Kosher salt and freshly ground black pepper

Instructions:

  • Begin by crafting your flavorful meatballs. In a mixing bowl, combine the ground pork, ground beef, breadcrumbs, dried parsley, basil, oregano, egg, and Parmesan cheese. Shape this mix into 3/4-inch meatballs.
  • Heat up the olive oil in a large skillet over medium-high heat. Add these meatballs and let them sizzle to perfection. Browning them imparts a rich, savory flavor and a delightful texture. Once browned, remove the meatballs from the skillet and set them aside.
  • In the same skillet, maintain the medium heat, and add the finely diced onions, carrots, and celery. Saute these until they become tender and fragrant, which should take about 7-10 minutes. Stir in the minced garlic, dried parsley, basil, and oregano, cooking for an additional minute to enhance the aromatic profile.
  • Now, transfer these cooked vegetables to a sturdy stockpot or Dutch oven. Pour in the chicken broth, and bring it to a gentle boil.
  • It’s time to introduce the acini di pepe pasta and the beautifully browned meatballs. Let them simmer together for approximately 15 minutes, or until the pasta reaches its desired tenderness.
  • Just before serving, add the baby spinach to the mix. Stir the soup until the spinach wilts and imparts its vibrant color and freshness.
  • Season your creation with kosher salt and freshly ground black pepper to taste, enhancing the flavors to perfection.

Conclusion:

Italian Wedding Soup, named not for matrimonial unions but for the harmonious blending of tastes, is a dish that will make any day special. With this unique and original recipe, you can savor the essence of Italy with every spoonful. Enjoy the delightful marriage of meat and vegetables in a beautifully seasoned broth, and serve it up for your loved ones on any occasion. Bon appétit!

Read More

How To Properly Clean Your Interior Windshield For A Streak-Free Shine

Are you tired of dealing with the annoying glare caused by streaks and spots on your car’s interior windshield when driving at night? Fear not, as we’ve got a straightforward solution that will have your windshield looking crystal clear. YouTuber ChrisFix recently shared a fantastic hack that requires just a few common supplies you probably already have at home.

Supplies:

  • Microfiber cloths
  • Mr. Clean Magic Eraser or rubbing alcohol
  • Glass cleaner

Directions:

  • Step 1: Start the process by taking a dry microfiber cloth and gently wiping the inside of your windshield. Use circular motions to ensure a thorough cleaning.
  • Step 2: Take a Mr. Clean Magic Eraser (or in its absence, rubbing alcohol) and dip it in warm water. Wring it out, and then use it to clean your windshield. Follow this by wiping the windshield with another clean, dry microfiber cloth.
  • Step 3: To finish the job, grab a clean microfiber cloth and spray your favorite glass cleaner on it. Use this cloth to wipe the inside of the windshield.

It’s crucial to note that if you don’t have a Magic Eraser, you can substitute it with rubbing alcohol. Both the Magic Eraser and rubbing alcohol are effective at removing the grease buildup responsible for those stubborn stains and scratches.

Windshield glare can be incredibly distracting and reduce your visibility on the road, especially at night. So, give this method a try, and say goodbye to those annoying streaks. You’ll be amazed at the difference it makes in your driving experience.

For a visual demonstration of this method, check out the video below:

A big thank you to ChrisFix for sharing this quick, simple, and highly effective solution. Don’t wait – give it a try on your own vehicle this weekend and enjoy a safer and more enjoyable driving experience!

Read More

Crab Stuffed Mushrooms

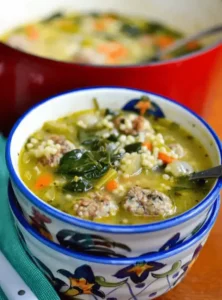
Crab stuffed mushrooms are a culinary delight, and with the festive season approaching, there’s no better time to impress your guests with these delectable appetizers. Whether you’re hosting a holiday gathering or simply looking for a satisfying main course, this quick and creamy recipe is the perfect choice. Let’s dive into the world of flavors and learn how to make these tantalizing Crab Stuffed Mushrooms.

Prep Time: 15 minutes

Cook Time: 20 minutes

Total Time: 35 minutes

Yield: 12 stuffed mushrooms

Ingredients:

  • 12 medium button mushrooms or cremini mushrooms, cleaned with stems removed and discarded
  • Olive oil spray
  • 1 box (8 ounces) cream cheese, softened
  • 1/2 cup fresh bread crumbs or panko breadcrumbs
  • 2 garlic cloves, minced
  • 1/2 tablespoon Worcestershire sauce
  • 1/2 cup finely chopped green onions
  • 1/2 cup freshly grated Parmesan cheese
  • 2–3 tablespoons fresh chopped Italian parsley
  • 1 cup cooked shelled crab, finely chopped (such as King Crab)
  • Salt and pepper to taste

Instructions:

  • Preheat your oven to 375 degrees. Lightly spray the mushrooms with olive oil and arrange them cap side down on a baking sheet or baking dish.
  • In a large bowl, combine the softened cream cheese, fresh bread crumbs, minced garlic, Worcestershire sauce, green onions, freshly grated Parmesan cheese, chopped Italian parsley, and finely chopped crab meat. Season with salt and pepper to taste.
  • Scoop approximately 1 1/2 tablespoons of the cream cheese mixture into each mushroom.

Bake the stuffed mushrooms for 20 minutes. In the final minute of cooking, turn on the broiler to lightly brown the tops. Keep a close eye on them, as broilers can be unpredictable.

Recipe Notes and Tips:

  • To prevent the mushrooms from releasing excess moisture when you bite into them, you can precook them for about 2-3 minutes, turning them upside down on a rack to allow drainage.
  • For a bit of extra kick, consider adding 1/4 teaspoon of cayenne pepper or crushed red pepper.
  • If you prefer, you can use cremini mushrooms (also known as baby bella mushrooms) instead of white button mushrooms.
  • Smaller mushrooms are a great choice for parties, as they stretch the recipe further. Just reduce the cooking time slightly for the smaller mushrooms.
  • Don’t discard the mushroom stems. Chop them finely and sauté them with a bit of olive oil or butter and garlic in a skillet over medium heat before adding them to the mixture.

Feel free to experiment with different spices and herbs, such as paprika, thyme leaves, chopped chives, fresh parsley, dried oregano, snipped rosemary, or Old Bay seasoning.

You can also add sautéed chopped spinach or chopped artichokes to the filling for a twist.

Freshly grated Parmesan cheese is recommended for its superior flavor compared to the canned variety.

Fresh bread crumbs work wonders in this recipe, but you can crush croutons in a bag or food processor as an alternative.

Conclusion:

These mouthwatering Crab Stuffed Mushrooms are an ideal appetizer for your next gathering or even a delightful main course. With their irresistible combination of fresh crab, cream cheese, and a medley of seasonings, they are sure to leave your guests raving. So, whether you’re hosting a holiday feast or a casual get-together, give this recipe a try and watch the magic unfold in your kitchen. Enjoy the flavors and the smiles that follow!

Read More

Fiesta Frito Pie Extravaganza

Get ready for a taste bud fiesta with our Fiesta Frito Pie Extravaganza! This revamped take on the classic Frito Pie is a celebration of flavors, featuring seasoned ground beef, sweet onions, tomatoes, and kidney beans, all intertwined with the crunch of Fritos. Crowned with a decadent blend of Cheddar and Monterey Jack cheeses, this Southwest-inspired dish is a culinary masterpiece. Let’s dive into the recipe and experience the ultimate Fiesta Frito Pie bliss.

Fiesta Frito Pie Extravaganza Recipe:

Ingredients:

  • 1 lb ground beef
  • 1 diced onion
  • 3 minced garlic cloves
  • 3 tablespoons taco seasoning
  • 1 tablespoon chili powder
  • ½ cup water
  • 1 (10 ounce) can mild Rotel diced tomatoes
  • 1 (15 ounce) can kidney beans, drained
  • 4–5 cups Fritos corn chips
  • 1 cup shredded Cheddar cheese
  • 1 cup shredded Monterey Jack cheese
  • 2 sliced green onions
  • Sour cream
  • Diced tomatoes
  • Chopped cilantro

Instructions:

  1. Preheat the oven to 400 degrees. Grease a 9×13-inch casserole dish with nonstick cooking spray.
  2. In a large skillet over medium heat, brown the ground beef. When halfway browned, add diced onions and cook until beef is browned, and onions are soft. Reduce heat to low, add garlic, and cook for 1 minute, stirring constantly. Drain any excess grease.
  3. Stir in taco seasoning, chili powder, water, Rotel Tomatoes, and kidney beans. Simmer for about 10 minutes.
  4. Layer about 2 cups of Fritos in the casserole dish. Spoon half of the beef mixture on top, sprinkle with half of the Cheddar and Monterey Jack cheeses.
  5. Sprinkle with 2 more cups of Fritos, followed by the remaining meat and bean mixture. Top with the remaining Fritos and cheese.
  6. Bake for about 20 minutes or until the cheese is melted, and the casserole is hot. Top with green onions, sour cream, diced tomatoes, and chopped cilantro. Serve immediately and relish the Fiesta Frito Pie Extravaganza.

Conclusion:

As we bring our Fiesta Frito Pie Extravaganza to a close, we hope this culinary adventure has filled your senses with the vibrant flavors of the Southwest. The perfect marriage of seasoned ground beef, crunchy Fritos, and a symphony of spices, all embraced by a cheesy duet of Cheddar and Monterey Jack, creates a dish that transcends the ordinary. Whether shared with loved ones or savored solo, our Fiesta Frito Pie Extravaganza is more than a meal; it’s a celebration on your plate. So, go ahead, take a bite, and let the Fiesta Frito Pie Extravaganza be the star of your next gathering or a comforting treat after a long day. May every crunchy, cheesy, and savory sensation linger in your memory until the next time we embark on a culinary journey together.

Read More

Fluffy Brown Butter Miso Mashed Sweet Potatoes

Elevate your Thanksgiving feast with a surprising twist on sweet potatoes that will steal the spotlight at your holiday table. These Brown Butter Miso Mashed Sweet Potatoes are a delightful departure from the traditional, bringing together the nutty richness of brown butter, the umami depth of miso paste, and just a hint of maple syrup sweetness. This recipe serves 8 and takes only 45 minutes from start to finish, making it a quick and tantalizing addition to your Thanksgiving spread.

Prep time : 15 minutes

Cook time : 30 minutes

Makes : 8 cups

Serves : 8

Ingredients for Brown Butter Miso Mashed Sweet Potatoes:

  • 4 pounds of sweet potatoes (approximately 5-6 medium-sized or 4 large)
  • 1 stick of unsalted butter
  • 3 tablespoons of miso paste (white miso preferred)
  • 1 cup of half-and-half (or 1/2 cup heavy cream and 1/2 cup whole milk)
  • 1/4 cup of maple syrup
  • 1 1/2 teaspoons of kosher salt, divided (plus extra to taste)
  • 1/2 teaspoon of freshly ground black pepper

Instructions:

  1. Begin by setting 1 cup of half-and-half on the counter to reach room temperature while you work on the sweet potatoes.
  2. Peel the sweet potatoes, then cut them into 2-inch chunks and place them in a Dutch oven or a large pot. Sprinkle 1 tablespoon of kosher salt over the sweet potatoes and add enough cool water to cover them by about an inch. Bring the water to a boil over medium-high heat. Once boiling, lower the heat to maintain a gentle simmer and cook the sweet potatoes until they are very tender, usually taking about 20 to 25 minutes. While the sweet potatoes are cooking, you can prepare the delectable brown butter.
  3. Take the unsalted butter and cut it into 4 pieces, placing them in a medium-sized saucepan. Melt the butter over medium heat, and continue cooking it while occasionally swirling the pan and scraping up any browned bits from the bottom with a wooden spoon. This process will take about 2 to 4 minutes, resulting in the butter turning into a toasty-brown color with a delightful nutty aroma.
  4. Remove the saucepan from the heat and slowly, but carefully, add the room-temperature half-and-half and 3 tablespoons of miso paste. Be ready for a little bubbling. Whisk this mixture until it’s mostly smooth, creating a flavorful blend of savory and creamy goodness.
  5. Once the sweet potatoes are tender, drain them and return them to the pot. Use a potato masher to transform them into a lusciously smooth consistency right there in the pot.
  6. Add the miso and butter mixture, along with 1/4 cup of maple syrup, the remaining 1/2 teaspoon of kosher salt, and 1/2 teaspoon of freshly ground black pepper. Stir everything together until it harmoniously combines into a unique and irresistible side dish. Taste and adjust with more kosher salt as needed to suit your preferences.

These Brown Butter Miso Mashed Sweet Potatoes are a Thanksgiving revelation, a fusion of sweet and savory that’s certain to be a conversation starter at your holiday feast. Enjoy the unexpected richness of brown butter and the depth of miso paste, beautifully balanced with a touch of maple syrup. Your guests will be grateful for this delectable addition to the Thanksgiving menu.

these Brown Butter Miso Mashed Sweet Potatoes are a delightful departure from the traditional sweet potato dishes you might expect on your Thanksgiving table. With their unexpected fusion of rich, nutty brown butter, savory miso paste, and a touch of maple syrup, they offer a unique and tantalizing flavor experience that’s sure to make them the star of your holiday feast.

The recipe is straightforward and time-efficient, taking only 45 minutes from start to finish, ensuring that you have more time to enjoy the festivities with your loved ones. The balance of sweet and savory, combined with the creaminess of the potatoes, will leave your guests raving about this remarkable side dish.

So, this Thanksgiving, surprise and delight your family and friends with these Brown Butter Miso Mashed Sweet Potatoes. They are not just a side dish; they are a flavorful revelation that will add a memorable touch to your holiday celebration. Give them a try and savor the compliments that come your way!

Read More

Cheesy Pierogi Casserole

Embark on a culinary journey with our one-of-a-kind Cheesy Pierogi Casserole, a gastronomic masterpiece that transforms humble cheddar cheese pierogies into a decadent delight. This recipe elevates weeknight dining, infusing classic comfort with layers of alfredo sauce, crispy bacon, green onions, and a luxurious blend of mozzarella and cheddar cheese. In just 45 minutes, you can create a culinary sensation that marries convenience with sophistication, making it the perfect choice for both busy weeknights and special occasions.


Why You’ll Love This Gourmet Recipe:

  • Effortless Elegance: With the convenience of frozen pierogies and jarred alfredo sauce, this casserole exudes gourmet elegance without the fuss, catering to those seeking a gourmet experience on a time budget.
  • Flavorful Harmony: Immerse yourself in the symphony of flavors as the cheddar pierogies meld seamlessly with the creamy alfredo sauce, smoky bacon, and the rich, melty goodness of mozzarella and cheddar. It’s a harmonious blend that delights the taste buds with every bite.
  • Accessible Indulgence: Enjoy gourmet without the gourmet price tag. All the ingredients, carefully curated for maximum flavor, are readily available at your local grocery store, ensuring that culinary excellence is within reach.

Unveiling the Culinary Journey:

  • Preheat and Prepare: Begin by preheating your oven to 375 degrees and generously greasing a 9×13 inch casserole dish, setting the stage for a culinary masterpiece.
  • Layering the Symphony: Arrange half of the frozen cheddar cheese pierogies in the casserole dish, and drizzle them with half of the luxurious alfredo sauce, creating the first layer of flavor.
  • Bacon-Infused Crescendo: Sprinkle half of the crispy chopped bacon, finely chopped green onions, and a generous helping of shredded mozzarella and cheddar cheese, building layers of savory crescendo.
  • Harmonious Repetition: Add the remaining pierogies to the composition, creating a symphony of flavors. Top them with the remaining alfredo sauce, bacon, green onions, and the final crescendo of mozzarella and cheddar.
  • Seasoned Finale: Season the dish with a touch of kosher salt and black pepper, ensuring a perfect balance of flavors in every bite.
  • Bake to Perfection: Cover the dish with foil and bake for 15 minutes, allowing the flavors to meld. Uncover and bake for an additional 20-25 minutes until the casserole reaches the pinnacle of perfection – bubbly and cooked through.
  • Garnish with Grandeur: Conclude this culinary masterpiece by garnishing with finely chopped fresh parsley, adding a touch of grandeur to your creation.

The Art of Recipe Tips:

  • Frozen Magic: Discover the convenience of frozen pierogies, a magical ingredient readily available in most grocery store freezer sections.
  • Cleanup Symphony: Grease the casserole dish for an easy cleanup – an essential note in the symphony of convenience.
  • Boil-Free Brilliance: Revel in the brilliance of no pre-boiling; the pierogies will cook to perfection nestled within the layers of sauce and cheese.
  • Cheese Concerto: Personalize your cheese symphony; however, the harmonious blend of mozzarella and cheddar with alfredo sauce creates an exquisite culinary concerto.
  • Protein Variation: Explore the gastronomic landscape by substituting bacon with the rich flavors of browned Italian sausage for a delightful variation.
  • Leftover Overture: Store the culinary masterpiece in an airtight container in the refrigerator for up to 4 days, and witness the flavors harmonize even further with each reheating, easily achieved in the microwave.

Prep Time: 15 minutes

Cook Time: 30 minutes

Total Time: 45 minutes

Yield: 6 servings

Ingredient List:

  • 2 lbs frozen cheddar cheese pierogies
  • 1 (15 ounce) jar alfredo sauce
  • 8 pieces crispy cooked bacon, chopped
  • 2 green onions, finely chopped
  • 1 cup shredded mozzarella
  • 1 cup shredded cheddar
  • Kosher salt and black pepper to taste
  • 1 teaspoon chopped fresh parsley

Our Cheesy Pierogi Casserole is not just a recipe; it’s a culinary experience. With its effortless elegance, flavorful harmony, and accessible indulgence, this gourmet masterpiece stands as a testament to the art of fine dining at home. Whether shared with family on a busy weeknight or presented to guests as the star of a dinner party, this Cheesy Pierogi Casserole is a culinary composition that transcends the ordinary and celebrates the extraordinary. Elevate your dining experience – savor the symphony of flavors, and let every bite be a note in the gastronomic masterpiece of your making.

Read More

How To: Paint Behind a Toilet

Repainting a bathroom can be a daunting task, especially when it comes to the challenging space behind the toilet. This area, often neglected, poses a unique challenge for homeowners and renters alike. However, with the right techniques and tools, achieving professional-looking results is within reach. In this guide, we explore two effective options for painting behind a toilet without the need to move the bulky ceramic fixture.

Option 1: Cover and Paint – A Comprehensive Approach:

When repainting the entire bathroom or the wall where the toilet is located, a comprehensive approach ensures a mess-free and flawless paint job.

  • Step 1: Ensure Proper Ventilation Bathrooms can be small and poorly ventilated. Enhance ventilation by removing moisture-retaining items like shower curtains and towels. Open windows or use a circulating fan. Consider wearing a painter’s mask to avoid inhaling paint fumes.
  • Step 2: Dust and Prep the Area Clean the area behind the toilet with a mild cleanser to remove dust and hair build-up. Cover the floor with a plastic sheet secured with painter’s tape to prevent paint spills. Wrap the toilet with an extra-large plastic garbage bag, securing it in place with painter’s tape.
  • Step 3: Prime and Paint Apply one to two coats of primer for optimal adhesion. Use a narrow paint roller to reach around the toilet, a 3”-wide foam brush for the space behind the toilet, and a 1”-wide angled brush for detail work around pipes. Allow the primer to dry thoroughly before applying paint.

Option 2: The Innovative Jimmy Sponge Stix:

For a specialized and efficient solution, the Jimmy Sponge Stix proves to be a valuable tool for painting the narrow space behind a toilet.

  • Step 1: Ventilate and Prep for Paint Establish good ventilation and ensure a clean surface for adhesion. Use the Jimmy Sponge Stix to clean the wall behind the toilet with soapy water. Let it air dry while cleaning the tool itself.
  • Step 2: Roll Primer and Paint with the Jimmy Sponge Stix Apply paint primer to the spongey side of the Jimmy Sponge Stix using a traditional paint roller. Glide the stick down the wall behind the toilet, ensuring complete coverage. Apply two coats of primer, allowing sufficient drying time. Clean the stick and repeat the process with two coats of paint.

Conclusion

Repainting behind a toilet may seem challenging, but with the right techniques and tools, it becomes a manageable task. Whether opting for the comprehensive cover-and-paint method or the innovative Jimmy Sponge Stix, achieving a professional finish in this hard-to-reach space is both feasible and rewarding. Selecting the right paint and primer ensures longevity and protection against moisture, allowing you to enjoy the refreshed look of your bathroom for years to come.

Read More

Fried Cabbage with Bacon, Onion, and Garlic

INGREDIENTS

DIRECTIONS

  1. Place the bacon in a large stockpot and cook over medium-high heat until crispy, about 10 minutes. Add the onion and garlic; cook and stir until the onion caramelizes; about 10 minutes.
  2. Immediately stir in the cabbage and continue to cook and stir another 10 minutes. Season with salt, pepper, onion powder, garlic powder, and paprika. Reduce heat to low, cover, and simmer, stirring occasionally, about 30 minutes more.

Tip

  • Aluminum foil helps keep food moist, ensures it cooks evenly, keeps leftovers fresh, and makes clean-up easy.
  • SERVES 4 – 5 WW SP  per serve.Nutrition
  • Amount per serving (6 total)
  • Calories: 194 kcal
  • Fat: 12.9 g
  • Carbs: 15.5g
  • Protein: 6.4 g
  • Cholesterol: 19 mg
  • Sodium: 1435 mg

Read More

The Ultimate Prime Rib Experience

Prepare to embark on a culinary journey fit for royalty with “The Ultimate Prime Rib Experience.” As the holiday season unfolds, the prime rib takes center stage, rightfully earning its reputation as the king of beef cuts. With a tantalizing blend of marbled fat, juiciness, and tenderness, this roast promises not only a feast for the belly but a visual spectacle that commands attention.

Ingredients:

1 prime rib roast (with or without bone, any size)

Garlic powder

Salt

Pepper

The Pinnacle of Prime Rib Mastery

  • Preheat to Perfection: Preheat the oven to a scorching 550°F, setting the stage for the culinary magic about to unfold.
  • Rub of Royalty: Create a regal rub by combining garlic powder, salt, and pepper. Apply this majestic mixture generously to the prime rib, ensuring an even coating. Place the roast in a shallow roasting pan, fat side up, ready to claim its throne in the oven.
  • Roast Regimen: Roast at 550°F, following the princely rule of 5 minutes per pound for rare, 6 minutes per pound for medium, and 7 minutes per pound for well-done. Watch as the exterior achieves a golden brown perfection.
  • Enthralling Finale: As the cooking time concludes, turn off the oven, and resist the temptation to unveil the masterpiece for two hours. Let the flavors harmonize and reach their crescendo within the roast.

Conclusion:

Emerging from this culinary symphony, “The Ultimate Prime Rib Experience” ensures a flawless finale as you unveil a perfectly cooked, succulent masterpiece. Whether relishing the richness of rare perfection or savoring the tenderness of a well-done marvel, your taste buds are in for a treat. Elevate your festive gatherings with this prime rib sensation, and discover why it truly stands as the pinnacle of culinary excellence.

Read More