Day: November 17, 2023

Left-Handed People Are Truly Brilliant, According To Science

Left-handedness has long intrigued and perplexed societies globally, often attracting both reverence and skepticism. Historically perceived in some cultures as a sign of misfortune or nonconformity, contemporary research is shedding light on the exceptional cognitive and creative strengths of left-handed individuals, painting a picture of their distinct brilliance.
This exploration into left-handedness reveals a plethora of remarkable traits, from advanced problem-solving abilities to heightened creativity and innovation. We delve into the scientific underpinnings of left-handedness, unearthing the unique cognitive and creative edges it bestows. Celebrating the contributions of notable left-handed figures throughout history and aligning these with current scientific discoveries, this analysis offers an insightful examination of why left-handed individuals are truly extraordinary.
Studies Highlighting Left-Handed Excellence
Problem-Solving Skills:

Continue reading this article on the next page

Read More

Mastering the Art of Waffle Making

Make savoury or sweet waffles using this all-in-one batter mix. For even lighter waffles, whisk the egg white until fluffy, then fold through the batter

Ingredients:

1 egg225g self-raising flour

1 tbsp golden caster sugar (optional)

250ml milk

50g butter, melted and cooled

½ tsp vanilla extract (optional)

1 tbsp sunflower or vegetable oil

maple syrup and icing sugar, to serve (optional)

Method:

Continue reading methods on the next page

Read More

How To Make Southern Fried Chicken Batter

Ingredients:

2 beaten egg

1 cup milk

2 teaspoon paprika

1/2 teaspoon poultry seasoning

4 teaspoons garlic salt

2 teaspoon black pepper

2 cup all-purpose flour

Directions:

Continue reading directions on the next page  

Read More

Philly Cheesesteak Recipe

Introduction
Welcome to the epitome of gastronomic delight – our perfected Philly Cheesesteak recipe promises to elevate your culinary experience to new heights. As connoisseurs of fine dining, we take pride in presenting this mouthwatering masterpiece that transcends the ordinary.

Origin Story: The Heart of Philadelphia
The roots of the Philly Cheesesteak trace back to the vibrant streets of Philadelphia, where innovation and flavor collide. This iconic sandwich emerged in the early 20th century, showcasing the city’s rich culinary history. Our recipe pays homage to this tradition while adding a modern twist for an unparalleled taste sensation.

Ingredients: Crafting Excellence

  • Prime Ribeye Steak with Mushrooms
    Prepare to embark on a flavor journey with 1.5 pounds of prime ribeye steak, thinly sliced to perfection, and complemented by the earthy richness of sautéed mushrooms. This choice cut ensures a succulent and tender bite, setting the foundation for an authentic Philly Cheesesteak experience.
  • Freshly Baked Hoagie Rolls
    No culinary masterpiece is complete without a canvas, and for our Philly Cheesesteak, that canvas is a pair of freshly baked hoagie rolls. The crisp exterior and soft interior provide the ideal vessel for the delectable filling.
  • Provolone or American Cheese
    Elevate the cheesy goodness with a choice between Provolone or American cheese. The creamy melt-in-your-mouth texture adds a layer of richness that distinguishes a true Philly Cheesesteak.
  • Sautéed Onions, Bell Peppers, Mushrooms, and Flavorful Seasonings
    Infuse depth and aroma with a generous portion of sautéed onions, bell peppers, and mushrooms. This aromatic blend not only enhances the flavor but also adds a colorful touch, making the dish visually appealing. Our secret lies in the perfect blend of salt, pepper, and a dash of garlic powder. These seasonings harmonize to create a symphony of flavors, ensuring each bite is a culinary revelation.

Cooking Process: A Symphony of Culinary Expertise

  • Step 1: Searing the Steak
    Begin by searing the thinly sliced ribeye steak, adorned with mushrooms, on high heat. This initial step locks in the juices, creating a caramelized exterior that forms the foundation of a mouthwatering texture.
  • Step 2: Cheese Melting Mastery
    Layer the seared steak with your cheese of choice, allowing it to melt seamlessly. The interplay between the hot steak, mushrooms, and the creamy cheese sets the stage for an indulgent experience.
  • Step 3: Assembling the Layers
    Nestle the cheese-laden steak within the freshly baked hoagie rolls. The warmth of the steak further softens the bread, creating a harmonious marriage of textures that tantalize the taste buds.
  • Step 4: Sautéed Symphony
    Top the steak and cheese ensemble with a generous serving of sautéed onions, bell peppers, mushrooms, and the flavorful seasoning blend. This aromatic medley elevates the dish, providing a burst of flavors that dance on the palate.
  • Serving Suggestions: Elevate Your Experience
    Pair your Philly Cheesesteak with crispy golden fries or a side of tangy coleslaw for a complete culinary experience. For an extra kick, consider drizzling a zesty aioli or hot sauce over the sandwich.

Conclusion:

In conclusion, our meticulously crafted Philly Cheesesteak recipe is more than a meal; it’s a culinary journey that pays homage to tradition while embracing innovation. Elevate your dining experience with the perfect blend of prime ribeye, melted cheese, sautéed goodness, mushrooms, and the colorful addition of bell peppers. Unleash your inner chef and savor the extraordinary

Read More

MINI PINEAPPLE UPSIDE DOWN CAKES

These beautiful mini cakes are not only tasty, but they are so easy to throw together. Perfect for when you have a busy day but need an easy and fast dessert on the table. If you have not made an upside-down cake before, you should start with this. It’s as easy as devouring them!

Ingredients:

  • 1 box yellow cake mix
  • 2 cans pineapple slices 20 OUNCE CANS
  • maraschino cherries CUT IN HALF
  • 2/3 c. brown sugar
  • 1/3 c. butter MELTED

How to make Mini Pineapple Upside Down Cakes

  • Prepare the oven. Preheat it to 350 degrees F.
  • Using non-stick cooking spray, grease the muffin tins. Also, open the cans of pineapple and make sure to keep the juice.
  • Combine the melted butter with brown sugar until well blended. To the bottom of each muffin cup, add a spoonful of the mixture, evenly distributing it.
  • Following the package directions ready the cake mix except using the juice from the canned pineapple instead of water.
  • See also Chocolate Baileys Mud Cake
    To the bottom of each muffin cup, add a well-drained pineapple slice. Then, in the centre of each pineapple, put a cherry cut side up. Lastly, pour each muffin cup with about 1/4 to 1/3 cupcake batter.
  • Place in the preheated oven and bake for about 20 to 25 minutes until the tops are golden and a toothpick inserted in the centre of the cake comes out clean.
  • When done, remove from the oven and allow the cakes to cool for at least 5 minutes. If needed, you can loosen the edges, placing a cookie sheet on top of the muffin pan to get ready to flip the mini cakes over.

Enjoy!

Read More

Garlic chicken

Garlic chicken is a very tasty dish with a unique flavor, since it has an exquisite aroma due to
the spices used for its preparation. It is a very delicious recipe and it won’t cost you much to prepare.
Today we are going to teach you, step by step, how to prepare this delicious garlic chicken recipe. Take note of the
recommendations that we are going to give you and we guarantee that you will cook a succulent dish.

Ingredients:

• 1 large chicken

• 2 tbsp white vinegar

• 1 tbsp dried parsley

• 3 tbsp paprika powder

• 2 tbsp broken red chili

• 1 tbsp papaya puree

• 9 cloves of minced garlic

• 1/2 teaspoon ground black pepper

• 1/3 cup vegetable oil

• 1 1/2 tablespoons salt to taste

Steps

Garlic chicken can be prepared for lunch or dinner, the time does not matter, the important thing is
enjoy this dish. As we have already mentioned, you don’t need to be a master chef to make

Step 1

First, wash the chicken well.

Step 2

Next, put enough water in a container, add the vinegar and put the chicken in it. Leave it alone
rest for 20 minutes.

Step 3

Once the time has elapsed, remove the chicken from the water, let it drain and dry it.
Dry well with kitchen paper

Step 4

In a bowl, put the oil, pressed garlic, red chili, paprika powder, black pepper, parsley.
dry, the papaya paste, season with salt and mix well. Reserve.

Step 5

Spread the chili paste on all sides, carefully lift the skin and rub the chili well inside and
outside. Then cover it and put it in the refrigerator and let it rest for 3 hours.

Step 6

Once the time has passed, heat the oven and put the chicken at 220 degrees for 1 hour and 30 minutes and that’s it!
ready!

After preparing this delicious garlic chicken recipe, we are sure that your guests will love it.

They will be very grateful, because it is a very tasty dish. This meal can be prepared at any time
of the day, it is economical and requires little preparation time. Now that you know how to make this recipe, you
We encourage you to do it and enjoy it with your family.

Read More

Apply This to Your Furniture and Surfaces, and Say Goodbye to Dust Issues

Dust is a common nuisance that settles on various surfaces, making cleaning a continuous task. Fortunately, there are several simple and effective methods to clear dust from different areas of your home. Here are 10 dust cleaning methods you should know:

1. Leather Furniture

Cleaning leather furniture requires special care. To remove dust from leather surfaces, avoid using dry cloths. Instead, use a vacuum cleaner with a crevice tool to clean the crevices and corners of the furniture effectively.

2. Electronics

Delicate electronic screens and surfaces require gentle cleaning. Use a clean dryer sheet to wipe down screens on devices like computers, phones, tablets, and TVs. This method effectively removes dust without scratching the screens.
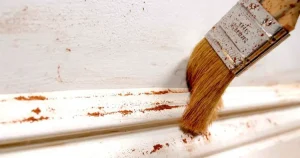
3. Baseboards

Before sweeping or vacuuming the floor, use a clean paintbrush to dust baseboards. This prevents the dust from falling onto the freshly cleaned floor.

4. Candles

Candles can collect dust over time. To clean them, take an old pair of pantyhose, bunch it up, and rub it over the surface of the candle to remove dust and debris.

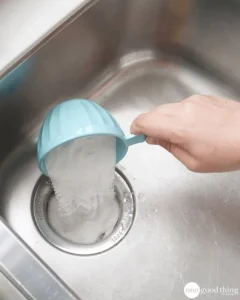
5. Deep Clean Your Broom

After dusting, your broom can become dirty and clogged with dust and debris. Regularly clean your broom to maintain its efficiency and prolong its lifespan.

6. Car Vents

Car vents often accumulate dust, which can get blown into the car when the air conditioner is turned on. Use a foam brush to clean the vents and remove dust effectively.

7. Light Fixtures

Different types of light fixtures require specific cleaning methods. For chandeliers, hanging or standing light fixtures, use a lamb wool duster. For recessed can lights, use a damp cloth to dust the fixtures.

8. Wood Furniture

Wood furniture can be easily cleaned using various materials. Old T-shirts, lamb wool dusters, feather dusters, or dust cloths can all effectively remove dust from wood surfaces. Dampen the cloth slightly if there is a lot of dust to avoid scattering it.

9. Clean Dust and Gunk from the Windshield

The interior of your car’s windshield can accumulate dust, smoking residue, oils, and other debris. Regularly clean the interior windshield to ensure clear visibility. Use appropriate glass cleaners and microfiber cloths to achieve a streak-free result.

10. Maintain Air Quality

Preventing excessive dust buildup starts with maintaining good air quality. Use high-quality air filters in your HVAC system and consider using air purifiers to reduce dust particles in your home.

By applying these dust cleaning methods, you can efficiently maintain a clean and comfortable living environment without the need for professional assistance.

Read More

Symphony of Crunch – Homemade Peanut Brittle

Embark on a culinary journey with our Symphony of Crunch – Homemade Peanut Brittle, an exquisite ode to the past that unfolds effortlessly on your stovetop. Perfectly suited for the holiday season, this artisanal delight invites you to savor the simplicity of a bygone era, where homemade treats held a special place in every celebration.

Ingredients:

  • 1 cup sugar
  • 1/2 cup light corn syrup
  • 1/4 cup water
  • 1 1/4 cups salted roasted peanuts
  • 3/4 teaspoon baking soda
  • 2 tablespoons unsalted butter, softened
  • 1 teaspoon vanilla extract

Method:

  1. Preparation: Begin by preheating your oven to 200 degrees. Cover a baking sheet with a minimum 1/2-inch rim with aluminum foil. Coat the foil with butter and warm it in the oven.
  2. Stovetop Alchemy: In a robust 2.5-quart or larger saucepan, combine sugar, corn syrup, and water. Attach a candy thermometer to the side and bring the mixture to a boil, stirring frequently to dissolve the sugar. When it reaches a boil, introduce the roasted peanuts and continue cooking until the temperature hits 300 degrees, stirring diligently.
  3. Artful Finale: Retrieve the baking sheet from the oven. Swiftly remove the peanut brittle from heat and stir in the softened butter, baking soda, and vanilla. Exercise caution, as it will foam up, undergoing a delightful transformation in texture. Pour the caramel in a circular or linear fashion, tilting to spread the peanut brittle evenly. Allow the brittle to cool at room temperature before breaking it into exquisite, handcrafted pieces.

Conclusion:

In each bite of this Symphony of Crunch, you’ll experience the rich, buttery notes entwined with the satisfying crunch of roasted peanuts. As you share these delectable morsels with loved ones, you’ll be creating not just a treat but a cherished memory, a testament to the art of homemade goodness that transcends time.

Read More

How To Unclog A Sink Using Just 2 Natural Ingredients

How to De-clog a Sink

The kitchen sink in my house, specifically its waste disposal and drain, is notoriously finicky. A more fitting term would be to brand it as a high-maintenance drama queen! I’ve had a few run-ins with clogged pipes over time, so now I tread carefully about what goes down there. Items like rice, eggshell fragments, vegetable peels are all off-limits.

A Simple Way To Unclog A Sink

You’ll need:

  • 1 cup white vinegar
  • 1 cup baking soda
  • Drain plug

Directions:

Read More

Crispy Herb-Infused Air Fryer Salmon

Discover the culinary magic of our “Crispy Herb-Infused Air Fryer Salmon.” This recipe unveils a delightful combination of simplicity and sophistication, ensuring a flavorful taste and tender fillet with every bite. Surprise your loved ones with this quick and easy dish that’s perfect for any night of the week.

Prep Time: 5 minutes
Cook Time: 8 minutes
Total Time: 13 minutes
Yield: 4 servings
Category: Main Meal, Fish
Method: Air Fryer
Cuisine: American

Ingredients:

  • 2 tablespoons brown sugar or honey
  • 1 teaspoon Old Bay Seasoning
  • ¼ teaspoon onion powder
  • ¼ teaspoon garlic powder
  • ½ teaspoon smoked paprika
  • 1/2 teaspoon kosher salt
  • 1/2 teaspoon fresh ground black pepper
  • 1 tablespoon olive oil
  • 4 salmon fillets
  • 1 teaspoon finely chopped Italian Parsley
  • Fresh lemon wedges

Instructions:

  1. In a small bowl, combine brown sugar (or honey), Old Bay Seasoning, onion powder, garlic powder, paprika, salt, and pepper.
  2. Spritz or brush olive oil over the salmon fillets. Rub the brown sugar mixture evenly over each fillet.
  3. Preheat the air fryer to 400 degrees for 5 minutes. Place the fillets in the air fryer basket with a bit of space between them. Cook for 7-8 minutes or until the internal temperature reaches 145 degrees.
  4. Optionally, sprinkle with finely chopped Italian Parsley and serve with fresh lemon wedges.

Conclusion:

In just 13 minutes, you’ve transformed simple ingredients into a gourmet masterpiece. Our Crispy Herb-Infused Air Fryer Salmon not only delights the taste buds but also showcases the ease of creating a sophisticated dish at home. Indulge in the harmonious blend of flavors and textures—your ticket to a memorable dining experience awaits!

Read More