Day: November 15, 2023

CRACK GREEN BEANS

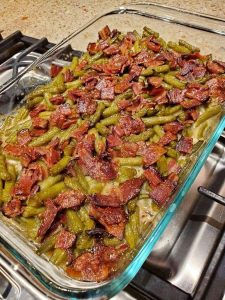
HOW TO MAKE CRACK GREEN BEANS

Preparation Time: 15 minutes.
Cooking Time: 40 minutes.
Total Time: Approximately 55 minutes.
Servings: 8-10.
Welcome, foodies!! Prepare to embark on a culinary journey that balances the best of both worlds – the earthy goodness of green beans and the irresistible allure of smoky, crispy bacon. Omg!! This recipe for Crack Green Beans is a delightful symphony of flavors, blending sweet and savory elements in perfect harmony. What sets these green beans apart is the delectable glaze that encapsulates them. Crafted from a delectable combination of brown sugar, melted butter, soy sauce, and just a hint of garlic powder, this sauce elevates an ordinary side dish to an extraordinary one.
Yeah!! The name “Crack Green Beans” derives from the dish’s addictive quality – once you’ve tried them, you’ll understand why they’re so irresistible. Whether you’re preparing this dish for a family dinner, a holiday gathering, or any occasion that demands a standout side, these green beans are certain to leave a lasting impression.
With a straightforward preparation process, you’ll find yourself eagerly anticipating the moment these green beans emerge from the oven, their flavors melded to perfection. So, get ready to savor the mouthwatering blend of sweet and salty, all while delighting your guests with a side dish that’s sure to become a favorite. This is the recipe that brings smiles to the faces at your table and keeps them coming back for more.

Ingredients:

5 cans (8 ounces each) of drained green beans.
12 slices of bacon, chopped, cooked until crisp, and drained.
2/3 cup of brown sugar.
1/4 cup of melted butter.
7 tsp of soy sauce.
1 1/2 tsp of garlic powder.

Instructions:

Step 1
First, place the drained green beans in a 9×13-inch pan and add the cooked bacon pieces.
Step 2
Next, combine the brown sugar, melted butter, soy sauce, and garlic powder. Pour this mixture over the beans and bake at 350°F for 40 minutes.
Step 3
Finally, toss to coat and mix everything, then serve.

Short tips:

– Use fresh, frozen, or canned green beans, but blanch fresh or frozen beans first.
– Ensure the bacon is crispy for added texture.
– Adjust sweetness by varying brown sugar.

Variations:

– Add cheese for a cheesy twist.

– Incorporate toasted nuts for a nutty crunch.

– Add spice with red pepper flakes or hot sauce.

Have a nice day!!

Read More

The Ultimate Chocolate Chip Cookies

The Ultimate Chocolate Chip Cookies: A Recipe for Perfection

The finest chocolate chip cookies are a joy for everyone; they are a sugary symphony with crisp edges, chewy cores, and pockets of melting chocolate throughout. This time-honored dessert has been a pillar of the baking industry for many years and provides a flavor that is evocative of sheer comfort and yesteryear.
Baking the Best Chocolate Chip Cookies is a labor of love that exemplifies the artisanal nature of the baking process. With the help of this comprehensive book, you will be equipped with the information and skills necessary to produce batches of cookies that will have everyone begging for more of them. Start by preheating your oven, gathering all of your ingredients, and then setting off on a delectable adventure to achieve cookie perfection.

THE INGREDIENTS LIST:

  • 1 Cup.Of (2 sticks) unsalted butter, softened.
  • 1 Cup.Of granulated sugar.
  • 1 Cup.Of packed light-brown sugar.
  • 2 large eggs.1 Tsp.Of pure vanilla extract.
  • 3 Cups.Of all-purpose flour.
  • 1 Tsp.Of baking soda.
  • 1/2 Tsp.Of baking powder.
  • 1/2 Tsp.Of salt.
  • 2 Cups.Of semisweet and/or milk chocolate chips.

PREPARATION:

Read More

SEAFOOD MAC AND CHEESE

HOW TO MAKE SEAFOOD MAC AND CHEESE

Macaroni and cheese is a classic comfort meal that many people like eating since it reminds them of their youth and warm nights. The question is, however, why not take it up a level and add a dash of sophistication and opulence? This dish accomplishes just that by fusing the velvety smoothness of conventional mac and cheese with the savory tastes of seafood in one wonderful dish called Seafood Mac and Cheese. This opulent take on a time-honored meal is sure to steal the spotlight and leave a delightful impression on your palate. Join me as I offer a recipe for Seafood Mac & Cheese in all its illustrious glory.
The Seafood Mac & Cheese dish is like a symphony of different tastes and textures in every bite. While the seafood contributes a delightfully oceanic richness, the creamy cheese sauce envelops the properly cooked pasta like a warm blanket. The use of cheddar, Gruyere (or Swiss), and Parmesan cheese in dish results in a taste profile that is nutty, sharp, and savory all at the same time, which is why everyone enjoys this dinner so much!
TO CREATE THIS FLAVORFUL SEAFOOD MAC AND CHEESE, GATHER THE FOLLOWING

INGREDIENTS:

12-oz.Of pasta (elbow macaroni or any pasta of your choice).

1 lb.Of mixed seafood ( I used; shrimp, crab, or lobster).

4 Tbsp.Of unsalted butter.

1/4 Cup.Of all-purpose flour.

3 Cups.Of whole milk.

2 Cups.Of shredded cheddar cheese.

1 Cup.Of shredded Gruyere cheese (or Swiss cheese).

1/2 Cup.Of grated Parmesan cheese

1/2 Tsp.Of garlic powder.

1/2 Tsp.Of onion powder.

1/4 Tsp.Of paprika.

Salt and pepper, to taste.

Fresh parsley, chopped (for garnish).

PREPARING THE SEAFOOD MAC AND CHEESE:

1st Step 

Cook the pasta according to the instructions on the package until al dente. Drain and reserve.

2nd Step 

Over medium heat, soften two tablespoons of butter in a large skillet. Add the seafood to the pan and simmer until fully cooked. This typically takes between three and five minutes, depending on the type of seafood used. Take the seafood out of the pan and set it aside.

3rd Step 

Melt the remaining 2 tablespoons of butter in a large saucepan over medium heat. Continuously whisk in the flour until a uniform mixture, known as a roux, forms. Pour the milk in gradually while whisking continuously to prevent clots from forming. Reduce the mixture until it thickens and simmers.

4th Step 

Turn the thermostat down to medium. Add cheddar cheese shreds, Gruyere (or Swiss) cheese, and Parmesan cheese gratings to the saucepan.

5th Step

Stir until the cheese has dissolved completely and the sauce has become smooth. Add garlic, onion, paprika, salt, and pepper. Taste the dish and adjust the seasonings to your liking.

6th Step 

Heat the oven to 375 degrees Fahrenheit (190 degrees Celsius). Combine the cooked linguine, sautéed seafood, and cheese sauce in a large mixing basin. Stir gently until all ingredients are evenly coated.

7th Step 

Place the mixture in an oiled baking dish. Bake in a preheated oven for 20 to 25 minutes, or until the surface is golden brown and steaming.

8th Step 

Before serving, remove the Seafood Mac and Cheese from the oven and allow it to chill. Add visual appeal and a touch of freshness with freshly minced cilantro.

Read More

TACO PIZZA

HOW TO MAKE TACO PIZZA

Taco Pizza is a delicious fusion of two beloved culinary traditions, combining the flavors of tacos with the convenience of pizza. This dish is not only wonderfully delicious but also surprisingly simple to prepare, which makes it an excellent option for a supper that can be prepared in a short amount of time yet provides a sense of fulfillment.
It is very simple to prepare!!! A mouthwatering Taco Pizza that deftly combines the savory tastes of tacos with the ease of pizza to produce one mouthwatering concoction that is just irresistible. This dish is likely to be a hit not just with your taste buds but also with those of your friends and family, making it an ideal choice for any occasion when you could find yourself in the position of playing host to a gathering of friends and acquaintances.

TO MAKE A MOUTHWATERING TACO PIZZA, YOU’LL NEED THE FOLLOWING INGREDIENTS:

  • 1 pre-made pizza crust or dough.
  • 1/2 Lb.Of ground beef (or any other ground meat of your choice)
  • A Pkt.Of taco seasoning.
  • 1/4 Cup.Of water
  • 1 Cup.Of shredded Mexican cheese blend.
  • 1/4 Cup.Of diced tomatoes.
  • 1/4 Cup.Of diced red onions.
  • 1/4 Cup.Of sliced black olives.
  • 1/4 Cup.Of chopped fresh cilantro.
  • Sour cream and salsa (optional, for serving).

PREPARATION: 

1st Step

Start by heating the oven in accordance with the directions provided on the packaging of the pre-made pizza crust or dough.

2nd Step

To ensure that the ground beef is cooked through, brown it in a pan over medium heat. Remove any more fat that may have accumulated in the pan.

3rd Step 

In the same pan in which the ground beef has been cooked, add the water and the taco seasoning package. While stirring the ingredients together well, leave the mixture to boil for a few minutes so that the sauce may thicken. Take the pan off the heat.
4th Step 
Roll out your pizza crust or dough onto a baking sheet or pizza stone, following the instructions on the packaging. Spread the taco meat equally over the pizza dough, but leave a thin border around the borders to provide room for the crust to expand.
5th Step 
To ensure that the Mexican cheese mix is distributed evenly throughout the taco meat, sprinkle it with shredded Mexican cheese.
6th Step 
Place the chopped tomatoes, diced red onions, and sliced black olives in a random pattern on top of the cheese layer. This will give the pizza a burst of freshness and a crunch.
7th Step 
Put the pizza in an oven that has been warmed and bake it according to the directions on the box of pizza crust or dough.
8th Step 
After the pizza has reached the desired level of doneness, take it out of the oven and cover the surface with freshly cut cilantro. This herb adds a vibrant and aromatic element to the finished dish.
9th Step 
Wait a few minutes for the Taco Pizza to cool down before slicing it into wedges or squares, depending on your personal choice. If desired, top the taco pizza with sour cream and serve it with salsa on the side to give each bite more tang and flavor.

Read More

KETO GARLIC CHICKEN STIR FRY

Ingredients:

  • 1 lb boneless, skinless chicken breast, cut into cubes
  • 1 tbsp + 1 tsp olive oil (divided)
  • 1 yellow bell pepper, sliced
  • 1 cup sliced mushrooms
  • 2-3 cups broccoli florets
  • 4 cloves garlic, minced
  • Salt and pepper to taste
  • 1 tbsp soy sauce or tamari (for a gluten-free option)
  • ¾ cup chicken broth
  • 1 ½ tsp sugar substitute (such as erythritol or stevia) or a few drops of liquid stevia (adjust to taste)
  • 2 tsp sesame oil
  • 2 tsp xanthan gum (for thickening, as a keto-friendly alternative to cornstarch)

    Instructions:

    1. In a bowl, combine the minced garlic, soy sauce, 1 tsp olive oil, and your choice of sugar substitute or liquid stevia. Add the cubed chicken and toss to coat. Let it marinate for about 15-20 minutes.
    2. In a separate bowl, mix the chicken broth with xanthan gum to create a thickening agent. Set it aside.
    3. Heat a large skillet or wok over high heat. Add 1 tbsp of olive oil and let it heat up.
    4. Add the marinated chicken to the hot pan and stir-fry until it’s cooked through and slightly browned, about 3-4 minutes. Remove the chicken from the pan and set it aside.
    5. In the same pan, add the remaining 1 tsp of olive oil, and then add your choice of vegetables (bell pepper, mushrooms, and broccoli). Stir-fry for about 3-4 minutes or until the vegetables are crisp-tender.
    6. Return the cooked chicken to the pan and pour in the chicken broth mixture. Stir-fry for an additional 1-2 minutes until the sauce thickens.
    7. Drizzle with sesame oil and season with salt and pepper to taste.
    8. Taste and adjust the seasonings, including your choice of sugar substitute, if necessary.
    9. Serve your keto garlic chicken stir-fry hot, garnished with chopped green onions or sesame seeds if desired.

Read More

How To Make The Best Carrot Cake

This is my favorite recipe for carrot cake! It is 100% made from scratch, easy to make, versatile, and utterly delicious. One of our most popular recipes! Just read all the rave reviews!

This carrot cake is quick, easy to make, and utterly delicious. It wasn’t until recently that we realized just how much we love carrot cake. It wasn’t something either of us grew up eating. Thanks to this easy recipe, we fell in love.

You can make this cake quickly without lots of fancy equipment. Not only is this the best-tasting carrot cake we’ve made, but it’s a cinch to make.

This carrot cake is quick, easy to make, and utterly delicious. It wasn’t until recently that we realized just how much we love carrot cake. It wasn’t something either of us grew up eating. Thanks to this easy recipe, we fell in love. You can make this cake quickly without lots of fancy equipment. Not only is this the best-tasting carrot cake we’ve made, but it’s a cinch to make.

Ingredients:

Continue reading ingredients & instructions on the next page 

Read More

CRAB AND SHRIMP SEAFOOD BISQUE

CRAB AND SHRIMP SEAFOOD BISQUE 😋😍

INGREDIENTS:

3 tablespoons butter

2 tablespoons chopped green onion

2 tablespoons chopped celery

3 tablespoons all-purpose flour

2 1/2 cups milk

1/2 teaspoon freshly ground black pepper

1 tablespoon tomato paste

1 cup heavy whipping cream

8 ounces of crab meat

4 to 8 ounces small cooked shrimp or other seafood

2 tablespoon sherry wine* (Optional; especially if a child is going to be eating this.)

Instructions:

Use a sieve to sift the flour. Mix this into the butter and vegetables until well combined. Cook and stir for about 2 minutes.

-In another saucepan, warm the milk over medium heat.

-Stir the warmed milk slowly and continue to cook while stirring until the milk has thickened.

-Stir in the freshly ground black pepper, tomato paste, then, the heavy cream.

-You can puree the soup if desired using a blender or a food processor. Then, pour it back into the saucepan.

-Add in the crab, shrimp, and the sherry. Stir and bring to a simmer.

-Serve immediately. Enjoy!

Read More

How To Make Bacon Cheddar Deviled Eggs

I created this recipe a few years ago when I was craving something different to do with hard-boiled eggs. Three of my favorite foods—bacon, eggs and cheese—come together in these deviled eggs. They’re my go-to party snack. —Florida

Ingredients:

14 hard-cooked eggs

1/2 cup mayonnaise

1/2 cup sour cream

1 1/2 teaspoons Dijon mustard

1 teaspoon fresh lemon juice

1/4 teaspoon black pepper

1/3 cup crumbled cooked bacon

1/4 cup (1 ounce) finely shredded sharp Cheddar cheese

2 tablespoons chopped fresh chives or scallion (green onion) tops

Directions:

Continue reading ingredients & directions on the next page 

Read More

How To Grow New Hydrangeas From Cuttings

Hydrangeas are a much-loved garden plant known for their opulent, globular blossoms and variety of eye-catching colors. They’re versatile, hardy, and surprisingly easy to propagate. One common method is via cuttings, allowing you to grow a whole new plant from a small piece of an existing one. In this article, we will discuss a step-by-step guide on how to grow new hydrangeas from cuttings.

Materials Needed:

  1. A healthy hydrangea plant
  2. Pruning shears or a sharp knife
  3. Potting soil (well-draining)
  4. Perlite or vermiculite
  5. Rooting hormone (optional)
  6. A container or pot
  7. Plastic bags or a plastic cover

Steps to Propagate Hydrangeas fro

Step 1: Choosing Your Cm Cuttings:utting

The first step in propagating hydrangeas is to choose the right cutting. Look for a branch that’s healthy, strong, and not flowering. It’s recommended to select a branch with new growth, which you can identify by its lighter color and softer texture. The cutting should be about 5-6 inches long, with several sets of leaves.

Step 2: Preparing the Cutting

Using your pruning shears or a sharp knife, cut the selected stem at a 45-degree angle. This increases the surface area for roots to develop. After you’ve made the cut, remove all but the top two leaves from the stem. You can also cut these leaves in half to reduce water loss through transpiration.

Step 3: Applying Rooting Hormone

While this step is optional, a rooting hormone can significantly improve your success rate. Dip the cut end of your stem into the rooting hormone, ensuring it’s thoroughly coated. This encourages root development at the site.

Step 4: Planting the Cutting

Prepare a container with a mix of well-draining potting soil and perlite or vermiculite. Make a hole in the center of the soil mix, deep enough to accommodate the cutting without the leaves touching the surface. Place the cutting in the hole and firm the soil around it to ensure it stands upright.

Step 5: Creating a Mini Greenhouse

To create a high-humidity environment, cover the pot with a plastic bag or plastic cover. This simulates a greenhouse environment and helps the cutting retain moisture, which is essential for root development. Make sure the plastic doesn’t touch the leaves to prevent rotting.

Step 6: Caring for Your Cutting

Place the pot in a location with bright, indirect light. Direct sunlight can cause the cutting to dry out and die. Regularly check the soil moisture level. It should remain consistently damp but not waterlogged. If you notice condensation on the inside of the bag, you can open it for a few hours to let excess moisture escape.

Step 7: Checking for Root Growth

After 2-4 weeks, check for root growth by gently tugging on the cutting. If you feel resistance, it means the roots have started to grow. Once the cutting has a robust root system, it can be transferred to a larger pot or directly in the garden, depending on the season and climate.

Step 8: Transplanting Your New Hydrangea

When your new hydrangea is ready to move, choose a spot in your garden that gets morning sun and afternoon shade. Hydrangeas prefer well-drained soil that’s rich in organic matter. Dig a hole twice the size of the root ball, place the plant in the hole, fill it with soil, and water it well.

Remember that patience is key when it comes to propagation. Not every cutting will take root, and that’s perfectly okay. The process of growing hydrangeas from cuttings may be a trial and error, but the reward of seeing a new plant flourish makes it all worth it. Happy gardening!

Read More

How To Make Cream Cheese Cranberry Bread ?

Last year I didn’t make this enough of this fantastic recipe. This year, I’m prepared!

2 cups all-purpose flour

2 cups fresh or frozen cranberries

1 cup softened butter

8 ounces softened cream cheese

1.5 cups granulated sugar

1 teaspoon vanilla extract

4 eggs

1.5 teaspoons baking powder

1/2 teaspoon salt

1/2 cup chopped pecans (optional)

Instructions:

Continue reading instructions on the next page

Read More