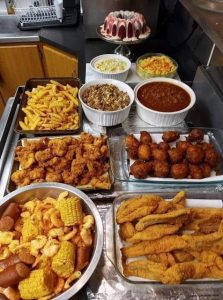
Day: August 26, 2023

Baked Fried Chicken

Baked Fried Chicken

Ingredients:

°2 cups all-purpose flour

° 2 tsp black pepper

°2 tsp paprika

°4 tsp garlic salt

°½ tsp mixture for poultry seasoning

°1 cup buttermilk

°2 eggs beaten

Instructions:

FIRST STEP:

In a bowl, mix the beaten eggs with the buttermilk

In another bowl, combine flour, poultry seasoning, garlic salt, paprika and black pepper and place in large ziploc bag

STAGE TWO:

Place chicken pieces in bag and shake bag to coat all pieces

Remove chicken and dip each piece in egg mixture

STAGE THREE:

Dip each piece of chicken in the flour mixture once more, shaking the excess.

Heat oil in heavy-bottomed pan to 375*

STEP FOUR:

Fry the chicken on each side and reduce the heat in the pan.

Cook the chicken for 20 to 30 minutes, depending on the size.

STEP 5:

The chicken’s internal temperature should reach 165* before serving.

Drain on paper towels and serve.

Read More

How to Cook the Old Perfect Steak

Ingredients:

° 2 double rib Swiss steak, approx. 6 cm thick

° 2 tablespoon of oil

° 4 sprig of rosemary

60 grams of butter

° salt

° ground pepper

Methods:

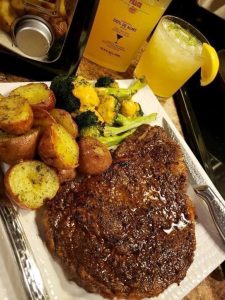
Take the double ribs out of the refrigerator an hour before preparing them.

2 If you are using a meat thermometer, insert it into the center of the meat. If you like a rare rib steak, set the thermometer to a core temperature of 55°C.

3 Pour the oil into a frying pan and heat it over a high heat. When it becomes liquid like water, it is hot enough and you can put your rib eye steak in it.

4 Grill the steak on each side for about a minute. Never prick the meat with a fork to turn it over, it will lose juice unnecessarily.

Reduce temperature to temperature. Adding butter and rosemary and cook the appetizer for another 8 to 10 minutes. Turn it over from time to time.

6 Place your middle finger on your thumb and press down on the area under your thumb. If your Entrecôte has the same resistance, it’s quite rare (use your ring finger for a medium doneness and your little finger for a good doneness). If you are using a thermometer, remove the meat from the pan when the temperature reaches 55°C.

7 When desired doneness level is reached, immediately remove meat from skillet. Cover with aluminum foil and let it rest for 2 minutes so the cooking juices are evenly distributed throughout the meat.

Salt, pepper and cut the rib-eye steak perpendicular to the fibers – and serve immediately.

Read More

Crepes recipe

Ingredients:

• 1 cup all-purpose flour

• 2 eggs

• ½ cup of milk

• ½ cup of water

• ¼ teaspoon of salt

• 2 tablespoons melted butter

Instructions:

Step 1

In a large mixing bowl, whisk together flour and eggs. Gradually add milk and water, stirring to combine. Add the swab and adulation; beat until smooth.

Step 2

Heat a lightly waxed griddle or griddle face over medium-high heat. Scoop or pour the batter onto the griddle, using about 1/4 cup for each waffle. arm the face with indirect shaking so that the paste shaves the face unevenly.

Step 3

Bake waffle for about 2 flicks, until bottom is light brown. Peel off with a spatula, turn over and cook the other side. Serve hot.

Read More

Fluffy Condensed Milk Bread

With its super soft texture, semi-sweet flavor, this fluffy condensed milk bread will be your all time favorite recipe. You don’t need to be a bread baker to make this amazing bread.

This is my favorite milk bread recipe; it’s also one of the most popular recipes on the blog. The recipe received a lot of love and a high rating due to its perfection. It is safe to say this is the best fluffy condensed milk bread recipe, and if you haven’t tried it yet, now is the time.

INGREDIENTS:

°240 ml (1 cup) warm milk

°75 g (¼ cup) condensed milk

°1 egg

°30 g (2 tablespoons) sugar

°7 g (2 ¼ tsp) dry yeast

°520 g (4 ¼ cups) flour

°1 tsp salt

°50 g (¼ cup) butter, softened

°45 g (3 tablespoons) butter

°45 g (3 tablespoons) condensed milk

METHOD:

Whisk the hot milk with the sugar and condensed milk. Adding dry yeast & an egg, whisk again. Mix liquids with dry ingredients – flour and salt.

Work the dough with the hooks until smooth. Add the butter and knead for 10 minutes. Set aside for 1 hour.

Cut the ⅓ of the dough and roll it into a 25×40 cm rectangle. Rolling dough into a log & cutting log into pieces.

Place the pieces of dough in a pan and set aside. To make rolls, repeat the same process with the leftover ⅓ of dough.

Set buns aside for 1 hour. Brush the top of each bun with the egg wash before cooking. Bake in 180C/350F for 25-30 minutes. For the rolls, 20 minutes will do.

Whisk together equal portions of butter and condensed milk. Brushing buns with this mixture while they are still warm.

Remove the baking pans when completely cooled.

Read More

Swedish Cream Bun Cake

Ingredients:

2 1/2 cups all-purpose flour

1/4 cup granulated sugar

1/4 tsp salt

1 tbsp active dry yeast

1/2 cup warm milk

1/4 cup unsalted butter, melted

2 large eggs

1 egg yolk

1/4 cup whipped cream

1/4 cup confectioners’ sugar

1 tsp vanilla extract

1/2 cup raspberry jam

1/2 cup heavy cream

Instructions:

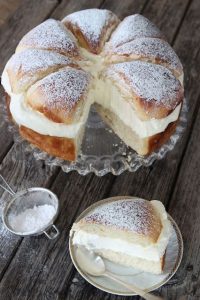
In a large bowl, combine flour, granulated sugar, and salt. Mix well.

In a small bowl, dissolve yeast in warm milk. Let sit for 5 minutes, until the mixture becomes foamy.

Add the melted butter, eggs, and egg yolk to the yeast mixture. Stir until well combined.

Add the wet ingredients to the dry ingredients and mix until a dough forms. Knead the dough on a floured surface for 5 minutes, until it becomes smooth and elastic.

Place the dough in a greased bowl, cover with a damp towel, and let it rise in a warm place for 1 hour, until it has doubled in size.

Preheat the oven to 375°F. Grease a 9-inch cake pan.

Roll the dough out into a large rectangle, about 1/4 inch thick. Spread the raspberry jam over the dough.

In a separate bowl, whisk together the whipped cream, confectioners’ sugar, and vanilla extract. Spread the mixture over the raspberry jam.

Roll up the dough tightly, starting from the long end. Cut the roll into slices about 1 inch thick.

Arrange the slices in the greased cake pan, cut side up. Brush the tops with beaten egg.

Bake for 20-25 minutes, until the cake is golden brown and the dough is fully cooked.

Let the cake cool for 10 minutes before removing it from the pan. Whip the heavy cream until stiff peaks form and serve it with the cake.

Enjoy your delicious Swedish Cream Bun Cake!

Read More

BAKED PARMESAN YELLOW SQUASH

Baked Parmesan Yellow Squash is an easy and delicious veggie snack, appetizer or side dish that the whole family will enjoy! Cut the yellow squash into slices, add the seasoning and Parmesan, then cook until golden brown! It’s simple and delicious!
+The best yellow squash recipe with parmesan bread
Cooking yellow parmesan squash courses is super easy! Cook until soft and the Parmesan cheese is melted and it’s absolutely delicious. Keep baking those golden rings until crunchy and enjoy them like French fries!
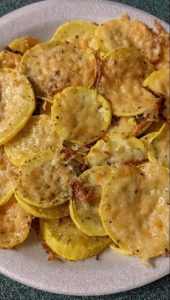
Yellow squash is a variety of summer squash, also called yellow straight squash or yellow turtleneck squash. You’ve probably seen both at the grocery store and named them interchangeably, it’s common and something I’ve been doing for many years too!
Our simply delicious parmesan coated yellow squash courses are the perfect anytime snack or side dish!
The deliciously mild flavor of yellow squash is revealed when roasted in the oven! I’ve always thought the slightly sweet, toasted flavor complimented the melted Parmesan cheese filling perfectly!
Plus, for those family members who typically complain about the soft texture of cooked summer squash, baked squash rings retain their texture without turning to mush!
This easy recipe uses just two ingredients, plus some spices. The yellow squash and Parmesan really shine!
Yellow squash – 3 yellow zucchini, washed and cut into thin slices.
Parmesan cheese – ½ cup Parmesan cheese. Grated cheese yourself for best results!
Garlic salt and pepper – add a little more seasoning to taste.

Ingredients:

°3 large yellow zucchini (washed and thinly sliced)

°¼ c Parmesan cheese (grated)

°garlic salt and pepper (to taste)

Directions:

Preheat the oven to 425°F (220°C) and line a baking sheet or two with parchment paper, parchment paper, or a silpat mat.
Prepare the yellow squash, wash each zucchini and cut off the ends. Slice them into thin, even slices so they cook evenly and cook at the same time. I use a mandolin to cut the slices so they are just under 1/2 inch thick.
Spread zucchini slices on baking paper in a single layer. Sprinkle with seasonings, garlic salt and pepper.
Grate the Parmesan and place it on the yellow squash slices. Spoon grated Parmesan in the center of the slices or use the back of a spoon to push the cheese around the edges of each slice.
Bake in the center of a 425°F (220°C) oven for about 15 minutes or until the top is golden brown and the cheese is melted.
Take it out of the oven and serve it hot.

Read More

Ham And Eggcups

Breakfast is the hardest meal to manage every day at home. But in fact, it is the most important meal. I mean, you don’t work properly on an empty stomach.
And your mind isn’t running on all cylinders, you know what I mean? So breakfast is the meal I struggle to get the whole family to eat on busy mornings at school and work.
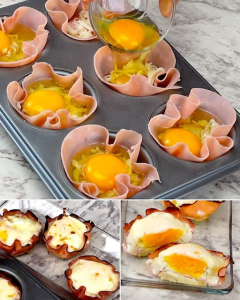
I usually make my boys eat scrambled eggs so this was a great way to change it up while giving them something to enjoy. It was a huge success!! They tasted really great.
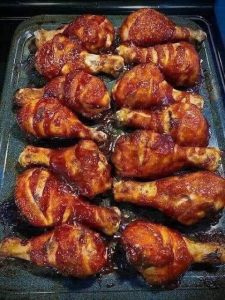
The eggs are cooked through and fluffy and the ham is a little crunchy around the edges. Read my notes below for more complementary flavor ideas!
These low-carb baked egg cups and ham are perfect for an on-the-go breakfast. Ham makes a cup full of eggs and cheese.

Ingredients:

°6 eggs

°Slices of bread

°grated cheese

°Pork chops

°Cheese Slices

°Vegetable oil

To prepare:

Cut several small circles of bread.

Grease a muffin mold with oil.

Place a circle of bread in each hole.

Cut the cheese into small squares and add to the bread.

Add a slice of ham.

Add grated cheese.

Pour an egg into each hole and bake for 8 minutes at 180°C/355°F.

Add more grated cheese and cook again for 5 minutes.

Read More

Baked chicken legs

This  Recipe is a delicious twist on a traditional Italian evening meal that is easy to prepare and full of flavour. Once the chicken is seasoned with a simple mixture of olive oil and garlic, toss it with pre-cooked pasta, tomatoes, and fresh basil. Chicken and pasta are served with a delicious sauce that is produced when blending the taste of garlic, tomato and basil. This sauce is the perfect companion to chicken.
This recipe is a great way to put leftovers to good use. You can choose to serve it as is or add freshly grated Parmesan cheese on top before serving. If you are preparing dishes for a large number of people, you can easily multiply the recipe ingredients by two or three. Complete your dinner by serving it with a side green salad and crispy bread. You and your loved ones will really love this traditional Italian dinner that you cook.

Ingredients:

°12 chicken thighs.
°2 tablespoons of extra virgin olive oil.
°Oil spray.
°Here is the required season for chicken:
°3 tablespoons of garlic powder.
°3 teaspoons of onion powder.
°5 tablespoons of smoked paprika.
°2 tablespoons of black pepper.
°1 1/2 teaspoons kosher salt.
°4 1/2 tablespoons plain/all-purpose flour.
°3 tablespoons of baking powder.

To prepare:

The first step
Preheat the oven to 200°C (about 390°F). Start by lining the baking sheet with aluminum foil, then place a wire rack on the baking sheet lined with aluminum foil. This will help the bottom of the drumstick become crispy.
The second phase
In a small bowl, mix all seasoning ingredients. We put chicken thighs in olive oil and mix them. To cover as much of the meat as possible with the skin, the skin should be taut and twisted on each thigh.
The third step
Coat the drumstick with the seasoning, then shake off as much of the excess as possible. Put yourself on the shelf. Start over with the remaining drumsticks.
The fourth step
Apply a thick layer of oil spray to the legs. Bake for 30 minutes, flipping the pan halfway through.
Fifth step
After increasing the oven temperature to 220°C (430°F), continue to cook the chicken for another 15 minutes or until the skin is crispy.

Read More

Corn dogs are super easy to make at home

These corn dogs will be the hit of the party. A cornbread like batter that’s light and savory with the addition of buttermilk, smothers the hot dog perfectly. Perfectly tender on the inside with a nice crunch on the outside. Exactly how a corn dog should be. Nothing beats a corn dog fresh from the skillet straight to your mouth. Top with your favorite spices and make the party in your mouth.
One of the best things about making corn dogs at home is the fun your kids will have helping you. I let them mix the cornbread mixture, skewer the sausages, and the best part, dip them in! The adults have to do the frying, but the kids will love helping with everything else. And the whole family will love their taste. You may never buy a corn dog at the fair again!
What you need for easy corn dogs
Always use your favorite brand of hot dog to ensure the best flavor your family will love. These corn dogs will become a family favorite in no time! All measurements for your homemade corn dogs can be found in the recipe card below.

Ingredients:

°Canola oil for frying
°12 hot dogs of regular size and thickness
°12 hot dog or lollipop sticks, candy sticks, wooden skewers, etc.
°1 cup all-purpose flour
°1 cup fine cornmeal
°Half a teaspoon of salt
°2 tablespoons of granulated sugar
°1 tablespoon baking powder
°1 large egg
°2 tablespoons of honey
°1 cup of milk
°Half a cup of milk

Directions:

Heat about 2 inches of oil in a large saucepan or Dutch oven to 350 degrees.
Prepare the hot dog by patting it with a paper towel and inserting the sticks. Put aside.
In a large bowl, whisk together the flour, cornmeal, salt, sugar, and baking powder. In another bowl or large liquid measuring cup, whisk together the eggs, honey, buttermilk, and milk. Add the wet ingredients to the dry and mix well. The mixture will be thick but smooth enough to evenly coat the hot dog once dipped.
Fill a tall glass with paste. Dip the whole hot dog into the cup, drop straight down and rotate it into the cup. When removing the hot dog, rotate it to avoid leaving air bubbles. If you see bubbles or bare spots on the sausage, dip it again.
Carefully place the breaded hot dog into the hot oil. Cook for 2-3 minutes, until nicely browned on all sides. Remove from oil and leave on absorbent paper. Serve immediately.
If you have leftover dough, you can store it in the refrigerator for 2-3 days and use it to fry other dogs. With dog scraps, they can be stored in the refrigerator in an airtight container for 2-3 days or frozen.

Read More

PIONEER WOMANS APPLE DUMPLINGS

This apple dumpling recipe uses Granny Smith apples, a Pillsbury croissant, and a can of Mountain Dew. Oh, and more butter than I’ve ever seen.
This apple dumpling recipe uses Granny Smith apples, a Pillsbury Crescent roll, and a can of Mountain Dew.
Oh, and more butter than I’ve ever seen. Serve these beauties with vanilla ice cream (or if you’re on a diet, you’ll wonder how these ordinary ingredients can be so sublime.
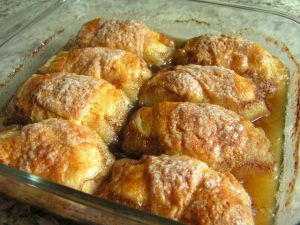
To make these puppies, all you have to do is roll croissant dough around apple slices, pour a mixture of melted butter and sugar over the top, take some Mountain Dew out of the box, sprinkle with cinnamon and cook. And ta da!  You have a dessert that everyone will love.
With a little bit of effort to get a great dessert, this recipe definitely made me rethink all of my complicated dessert recipes. What’s the point of working in the kitchen for hours if something semi-homemade will do?
I will definitely making them again. Perhaps a cheese and berry filling would also be good. Or maybe a peach…

Ingredients:

1 large apple {I used Fuji – any apple will do, pie works best}
1 box of Pillsbury Croissant Dough
1/2 cup of butter
2/3 cup of sugar
1/2 teaspoon cinnamon
1/2 teaspoon vanilla
3/4 cup or 6 ounces 7-Up or equivalent {half box}

Directions:

Preheat oven to 350 degrees F. Grease an 8″ x 8″ baking pan.
Cutting each apple into 8-10 wedges.
Also cut the apple peel and keep it apart.
Separate croissant dough into triangles.
Roll each apple slice into the crescent moon dough, starting at larger end.
Pinch the apple closed, cover it, and place it in the baking dish. {It’s easiest if you dry apple wedge first and then roll the dough around it.}
Melting butter in a small saucepan and add the sugar & cinnamon. Heat while whisking until homogeneous.
The mixture will slowly blend and thicken. When it becomes thick, remove from heat and add vanilla.
Pour cinnamon mixture over the apple balls. Pour soda on dumplings. Bake in  preheated oven for 40-45 minutes or until golden brown!!!

Read More