Day: August 17, 2023

CHOCOLATE ECLAIRS

Here’s all you need to know about making Perfect Classic Chocolate Eclairs! This foolproof tutorial will guide you through the recipe step by step, and also discuss eclairs troubleshooting tips for common recipe pitfalls. 

Deliciously crisp, puffy and perfect chocolate eclairs filled with chocolate or vanilla pastry cream. 

Have you been left wondering why your eclairs always came out flat or soggy? Or why they have a concave-shaped bottom, or a huge crack right down the middle on the bottom?

You’ve probably tried all the recipes that claim to make perfect eclairs, and still ended up with flat, depressing eclairs instead? Well, then you’ve come to the right place! 🙂

Today, I’m going to show you guys how to make Foolproof, Perfect Classic Eclairs!

My classic choux pastry troubleshooting post is one of the most popular posts on my blog, and I’ve had many readers ask me for a follow up post dedicated to classic eclairs. It’s been a long time coming, but here it is! However, I do encourage you to read my choux pastry troubleshooting recipe post first for a detailed and comprehensive guide on how to make perfect choux pastry and how to fix any shortcomings with the dough. It’ll help you troubleshoot common issues that you may encounter when making eclairs or any choux pastry dessert.

Ingredients

For the Choux Pastry
250 ml (1 cup + 2 tsp) water
70 grams (5 tbsp) butter
150 grams (1 cup) all-purpose flour
4 eggs
1/8 tsp salt
For the pastry cream
350 ml (1 1/2 cup) cold milk
30 grams (3 3/4 tbsp) corn starch
100 grams (1/2 cup) sugar
75 grams (1/3 cup) butter at room temperature
200 ml (3/4 cups + 2 tbsp) heavy whipping cream, cold

Continue reading ingredients & instructions on the next page

Read More

Slow Cooker Mango Chicken Curry

Related searches to Slow Cooker Mango Chicken Curry
indian mango chicken curry
thai mango chicken curry
mango chicken curry recipe jamie oliver
beef mango curry slow cooker
creamy mango chicken recipe
pineapple mango chicken slow cooker
slow cooker chicken curry
mango chicken and rice

Mango Chicken Curry in the slow cooker . House smells amazing.

Ingredients:

600-800gm chicken thighs.
I tsp Chicken stock powder.
1 tbsp Brown sugar
2 cloves garlic.
1 Brown onion sliced.
2 carrots peeled and sliced.
1 can mango pieces, drained and roughly chopped.
1 can coconut milk.
2 tsp curry powder.
1 tsp tumeric.
1 tsp lemon/lime juice
Beans halved

Method:

Put onion, carrot mango pieces, stock powder, garlic, brown sugar and coconut milk in the SC.
Chop chicken thighs into about 4-5 pieces. Brown in frying pan. Remove from pan add tumeric and curry powder, put chicken back in fry for about 2 minutes to coat then pop it in the SC scraping all the bits in too.
Cook on low 4-6 hours. Half hour before ready pop in the beans. Add lemon juice before serving
My variations.
I swapped out the Brown sugar for mango chutney so it isn’t as sweet but still yummy. If you want a thicker sauce you can use coconut cream. It is pretty mild so you can add heat to your taste easily. You can add coriander at the end if you like that. I just serve it with rice and papadums or naan. Enjoy!!

Read More

Baked sweets & sour chicken

These are the best crispy chicken nuggets you will ever make! This recipe for delicious and healthy chicken nuggets takes about 30 minutes from start to finish and uses very simple ingredients like panko breadcrumbs, chicken breast and spices.
Serve with honey mustard, ketchup or your favorite barbecue sauce. They are suitable for children (and adults) and are adult approved!
It looks a bit like nuggets, but it’s homemade and contains less fat, salt and sugar. Baking avoids frying, wrapped in cornflakes, these chicken meatballs are crispy and delicious…
It all happened in 4 minutes when we made this recipe at the office! So it is confirmed that it is adult approved as well.
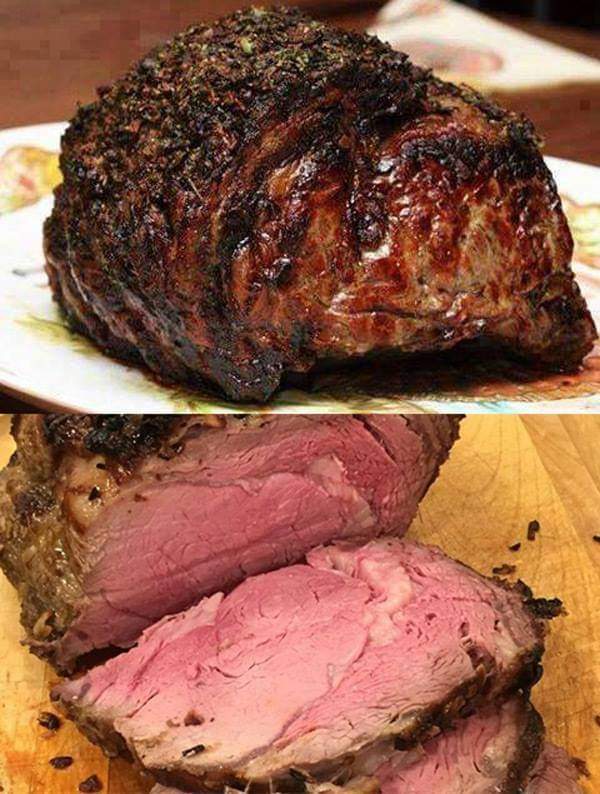
She often asks me for easy weekday recipes with few ingredients. Well, this is for you.
I found a very easy and quick oven method. In addition, we do not turn all our fingers into nuggets by breading croquettes. it is magic!

Ingredients:

+For 8 people
°3 cups (240g) rusks
°105 g (1 cup) grated parmesan
°2 tbsp. salt
°2 tbsp. black pepper
°2 tbsp. onion powder
°2 tbsp. smoked paprika
°1 ea. garlic powder
°1/2 tsp. Cayenne pepper
°4 eggs
°1/4 cup (60ml) milk
°2 pounds (1 kg) boneless, skinless chicken breasts, cut into 1-inch (2.5 cm) cubes

Continue reading ingredients & directions on the next page

Read More

Perfect Prime Rib

Prime rib claims center stage during holiday season for a very good reason. It is the king of beef cuts.

If you’ve ever carved into a prime rib at a big holiday meal expecting a juicy, perfectly pink interior only to discover a dry, overcooked roast, this recipe is for you.

This simple, foolproof “mathematical method” for making the very best prime rib will greatly increase your chances of success. Here is the formula: Multiply the exact weight times 5 minutes. For me it was 5.35 x 5 = 26.75 minutes, which we round up to 27.

You’ll cook your room-temperature prime rib at 500 degrees F for exactly that many minutes. (Twenty-seven minutes, in my case.) Then turn off the oven and wait 2 hours without opening the door. When the time’s up, remove the prime rib and slice into the most perfectly medium-rare meat you’ve ever seen. See? That’s all it takes to make foolproof prime rib cooked to a perfect pink that’s somewhere just a shade under medium rare. Just make sure you’re starting with a prime rib that has been brought to room temperature! This is critical in order for the math to work!

Now, while the method could not be easier, there are a couple things that this method requires: a full-size, modern oven with a digital temperature setting that indicates when it is preheated. Older ovens with manual controls can vary greatly, and the doors may not have the proper insulation. Here’s another pro tip for you: Because prime rib is expensive, you should always insert a probe-style thermometer to monitor the internal temp of your roast and avoid any chance of over-cooking. Set the probe alarm (125 F for medium-rare) just in case, and pull the prime rib from oven even if there’s still time left on the oven timer.

It’s called a standing rib roast because to cook it, you position the roast majestically on its rib bones in the roasting pan.

Beautifully marbled with fat, this roast is rich, juicy, and tender—a feast for the eyes and the belly.

It’s also very easy to cook. You just start it in the oven at a high temperature to get good browning on the outside of the roast, and then cook it at a lower temperature to make sure the meat in the center doesn’t get over cooked.

Continue reading ingredients & instructions on the next page

Read More

BREAD AND BUTTER PUDDING

Bread and Butter Pudding is surely the ultimate use of leftover bread!! While wonderful made with pre-sliced bread, it’s company-worthy made with chunks of bread, whether it’s a leftover loaf, dinner rolls or even hot dog buns(!)

A classic comfort dessert, custardy on the inside, golden and buttery on top. The only real question is this: what will you serve it with? Ice cream, cream, custard – or something else? 😉

I remember the first time I had Bread and Butter Pudding. I was really cynical. Stale bread for a dessert?? It sounded ridiculous.

How wrong I was.

If you’ve never tried Bread and Butter Pudding before, be prepared to be amazed because it truly is a thing of beauty. Try telling me you don’t want to eat this!!

And while it’s well-known as a rustic, home-style dessert of frugal origins, nowadays the humble Bread and Butter Pudding even makes an appearance on the menu at upscale bistros! Though admittedly, they tend to make it with rich and extra-buttery bread like brioche and challah, which gives it a really luxurious edge.

But today, we’re using old school, economical everyday plain white bread. 😇 Though I think you’ll agree there’s nothing economical about how this tastes!!!

INGREDIENTS:

1 teaspoon ground cinnamon
1/4 cup sugar
4 Tablespoons butter or margarine, at room temperature
5 slices crust-on white bread
1/2 cup raisins
2 cups milk
2 eggs


DIRECTIONS:

*Preheat oven to 350 degrees F / 180 C
*Add cinnamon to sugar in cup and mix well.
*Set aside.
*Generously spread one side of each piece of bread with butter or margarine.
*Cutting diagonally, slice each in half.
*Arrange triangle slices in pan, slightly overlapping, with butter-side
up and cut edges facing the same direction, making a spiral.
*As you add the bread, sprinkle with sugar, cinnamon, and raisins.
*Put milk in small bowl, add eggs, and using whisk or fork, mix to blend well.
*Pour milk mixture over bread and raisins in baking pan.
*Set aside for about 15 minutes for bread to absorb liquid.
*Bake in oven for about 30 minutes, or until top is golden brown.
*Serve the pudding while still warm in individual dessert bowls.
*It is eaten plain or with cream poured over it.

Read More

BACON WRAPPED CREAM CHEESE STUFFED CHICKEN BREAST

I don’t know about you guys and gals but I love chicken strips. I know that these strips of poultry goodness are looked upon as a “kid food” but i don’t care. I’m almost 35 years old and I’ll continue to at chicken strips for the rest of my life.

I have since learned to make my own chickens trips since I love them so much. This recipe takes the yum factor another step forward by wrapping these delicious chicken strips in bacon. It doesn’t get much better than that, folks.

Plus, this recipe comes complete with a honey mustard how-to. So savory and sweet! These bacon-wrapped chickens trips are very easy to make and almost anyone can do it. Enjoy!

Today, we’re going to be cooking Bacon Wrapped Cream Cheese Stuffed Chicken Breast! This recipe is a MUST TRY recipe for any bacon lover. A friend shared it with me on Facebook.

INGREDIENTS :

2 Boneless skinless chicken breast
4 tablespoons cream cheese
1/4 cup Pepperjack cheese, shredded
2 tablespoons green onion, chopped
4 to 8 pieces of bacon

DIRECTIONS :

Cut chicken into 4 equal size pieces. Pound breast so it is about 1/4″ thick.
Mix together softened cream cheese, chopped green onions and shredded pepperjack cheese. Put 1/4 of this mixture into the middle of each piece of chicken.
Starting at the long side, roll chicken breast up, keeping the cheese mixture to the middle.
Wrap 1 to 2 slices of bacon around the chicken breast, secure with toothpick, if needed.
One piece of bacon wrapped around each breast is enough. But 2 pieces of bacon for each breast fully wraps the chicken and is outstanding.
Place on baking sheet and back for 30 minutes at 375 degrees F.
Broil topside for about 5 minutes to fully brown and crisp bacon. Turn each breast over and broil for another 3 minutes or so to crisp up the bottom side.

Read More

Country Cabbage Rolls Straight From A Mennonite Kitchen

Do you have a traditional recipe that has been repeated many times in your household? My mother had many different things she used to make for us and cabbage rolls were one of them. I like traditional recipes like these because they remind me of childhood. In addition, this cabbage rolls recipe is Mennonite and German inspired, which makes it even tastier.
Cabbage rolls are one of my favourite dishes. My mother used to make them all the time when I was a child and I continued the tradition with my own family.

Ingredients

  • 1 large savoy cabbage
  • 2 pounds lean ground beef
  • 2 medium to large onions
  • 2 tablespoons canola or Bertolli olive oil .. or even butter is fine
  • 1 cup white or brown rice. . . and 2 cups water
  • 3 Eggland’s Best eggs
  • 1 1/2 teaspoons Morton salt
  • 1 teaspoon pepper
  • 2 cans tomato soup
  • 2 small bottles (individual serving sizes) tomato juice or vegetable cocktail . .like V8
  • 1 can or small carton chicken broth

Ingredients

In the bag that you brought your savoy cabbage home. . .place the cabbage in the freezer and leave for 12 hours or overnight.. . .remove and leave to thaw at room temperature. .this will take awhile. . so I often take it the night before the day I want to make the cabbage rolls. The leaves will be soft and easy to use without having to boil them.

In a small saucepan or a microwave safe covered dish. . .cook the rice. . set aside to cool. The rice can be made the day ahead and kept chilled in the refrigerator overnight.

Chop the onions fine and saute them slowly until they are golden brown. . .set aside to cool.

In a large bowl, break apart the ground beef, add the salt, pepper, eggs, sauteed onions and the rice. . mix together until combined. . use your hands.

Remove the leaves from the cabbage, cutting away the tough part closest to the core.

Spray your large casserole or two small casserole dishes with cooking spray.

Put about a 1/3 to 1/2 cup meat mixture at the bottom of the leaf and roll up. . the meat amount varies depending on the size of the leaf. . repeat until all the meat is used up.

In a large mixing bowl. . .combine the tomato soup, juice, and broth. . pour evenly over the cabbage rolls. Cover with foil. . or the lid.

Bake the cabbage rolls slowly at 325 for two hours. . serve or cool on the counter. .remove the foil (if you don’t. . you will have little bits of foil on your cabbage rolls where ever it touches. .) cover with plastic wrap. .and either refrigerate or freeze.

For reheating . .thaw first if frozen . .remove the plastic wrap and cover with a lid or foil. . and just reheat in the oven. . for about an hour .. at 325. . . or if you want, they can be reheated beautifully in the microwave on sensor reheat.

Source :  allrecipes.com

Read More

STUFFED BELL PEPPERS

These stuffed bell peppers are filled with a mixture of ground beef, tomato sauce and rice, then topped with cheese and baked to perfection. A classic dish that’s comfort food at its finest!

I love to prepare stuffed veggies such as stuffed zucchini, stuffed cabbage and these fabulously delicious stuffed peppers. My family requests this recipe time and time again, it’s just that good.

Stuffed bell peppers have been popular for many years for good reason – they’re totally delicious! My version features a hearty beef and rice mixture with plenty of melted cheese. Serve your stuffed peppers as-is, or add a side salad for a meal that your family will be sure to love.

What You’ll Need :

2 bell peppers
1 1/2 C. cooked rice
1 lb. ground beef
3 green onions
1 tsp. oregano
1 tsp. cumin
1/2 tsp. chili powder
1/2 tsp. smoked paprika
1/2 tsp. garlic powder
1 tsp. Worcestershire sauce
5-6 good dashes hot sauce
10 oz. can petite diced tomatoes with green chilies
shredded mozzarella cheese

How to Make It :

-Cut the bell peppers in half and remove the seeds. Place them in a pot of boiling water for 3 minutes. Remove to a baking dish. In a skillet, brown the ground beef.

-Drain off the grease and add the onions and cook for 1 minute. Add in all the seasonings, Worcestershire sauce, and hot sauce.

-Stir to combine well. Stir in the tomatoes with juice and cook for 1 minute. Stir in the rice and combine well.

-Spoon the mixture into the pepper shells halfway and sprinkle with a little cheese. Fill the rest of the way and mound it on top then sprinkle with more cheese.

-Bake in a 350 degree oven for 20-25 minutes.

Continue watching the step-by-step video recipe on the next page

Read More

Taco Stuffed Shells

The taco stuffed shells recipe is a family favorite in our house. My husband and I love to make them for dinner, and our kids always gobble them up.
This is a dish that is so good it is hard to imagine not making it. When you stuff the jumbo pasta shells with taco-flavored meat and then top it with gooey cheese, it is almost heaven in a baking dish.
The stuffed jumbo pasta shells can also be topped with your favorite toppings for Mexican food.
These taco stuffed shells are super easy to make! Just stuff the shells with the filling, top with some cheese, and bake. In no time at all, you’ll have a delicious meal that the whole family will love.

Ingredients

  • 8 oz. Jumbo Shell Pasta
  • 1 lb. Ground beef
  • 1 Packet taco seasoning
  • 2 tsp. Minced garlic
  • 5 oz. Cream cheese
  • 1 C. Salsa
  • ¼ C. Chopped green onions
  • 1 C. Shredded taco blend cheese

Instructions

    • Boil the jumbo shell pasta until al dente, drain, and rinse in cold water to keep the noodles from sticking together.
    • Preheat the oven to 350 degrees.
    • Add the ground beef to a skillet over medium high heat, and saute until completely browned. Drain and excess fat.
    • Mix in the minced garlic and saute 30 seconds more.
    • Add the taco seasoning packet, cream cheese, and salsa to the skillet with the beef and stir until the cream cheese is completely melted. Let the meat mixture cool.
    • Stuff the cooked jumbo shell pasta with the ground beef mixture and place it into a well-greased 9×13 baking dish.
  • Sprinkle with the cheese and bake for 15-20 minutes.
  • Garnish with fresh chopped green onions and serve.

Read More

Even though it’s called “Poor Man’s Cubed Steak,” this dish still makes me feel like I’ve won the lottery.

Are you looking for a convenient, economical meal that will satisfy your taste buds? Look no further than the poor man’s slow cooker steak. This recipe takes simple, affordable cubed steak and turns it into tender, flavorful chops. With just a few ingredients and a dependable slow cooker, you can make a hearty dish that will keep your family coming back for more.
Prepare to be amazed as simple cubed steaks take on new life in the slow cooker. Falling into a vat of sauces, these cubes undergo a magical transformation. As it boils low and slow, it absorbs the delicious flavors of the rich concoction, resulting in tender, melt-in-your-mouth bites of pure bliss.
One of our cheap and affordable secrets? Steak cubes.
+Why do we use meat cubes?
Regular steak refers to the thick cut of beef taken from the tender parts of the animal, known for its tenderness, marbling, and flavour. On the other hand, cube steak (or sometimes called a “micro steak”) is thin slices of beef that have been mechanically tenderized, often from a tougher cut. The giving process creates a distinctive texture with cubic patterns on the surface.
Regular steaks are usually cooked using high-heat methods to maintain tenderness, while flank steaks are often used in recipes that require longer cooking times to achieve tenderness, such as stews and casseroles. A plain steak is enjoyed on its own, while cubed steaks make an economical meal option that’s both flavorful and budget-friendly (exactly what we want here!).

Ingredients:

°4 steak cubes
°1/2 cup of water
°1 can (10.5 ounces) French Onion Soup
°(10.75 ounce) can of cream of chicken soup
°1 packet of mixed broth

Directions:

1. Get a 6-quart slow cooker. Combine soup with broth mixture and water. Mix well.
2. Place the meat cubes in the sauce mixture, making sure they are evenly coated.
3. Cover the slow cooker and cook the steaks over low heat for 6-8 hours.
4. Toward the end of the cooking time, prepare to thicken the sauce. You can certainly skip this step, but here we like a thicker sauce. In a small bowl, whisk together equal parts cornstarch and cold water (about 2-3 tablespoons each). Stir the mixture into the slow cooker.
5. Increase the setting to high and cook for an additional 20 minutes or until the sauce thickens.
6. Serve and Enjoy !

Read More